
This PSEB 6th Class Computer Notes Chapter 5 MS Paint Part-2 will help you in revision during exams.
PSEB 6th Class Computer Notes Chapter 5 MS Paint Part-2
Introduction:
There are two types of Ribbon in Paint:

Home Tab Ribbon
Most of the commands in MS Paint are placed in the home tab ribbon. Home Tab Ribbon of MS Paint contains the most usable tools. This Ribbon appears below the menu bar of MS Paint.
Clipboard Menu
The clipboard menu has three options-Cut, Copy and Paste. Cut and Copy icons are shown only when a selection is active.
![]()
Image Menu
When we click the down arrow just below the dotted rectangle or just below the word image, a menu offers us further choices.
Before we can use the buttons on the right of this menu, we must select the part of our drawing that we want to work with.
1. Transparent Selection: At the bottom of the Select menu, we can see Transparent selection. This option is useful enough as it removes the white background of selection. We can use our selection with only drawing objects. This option is most frequently used. We can add this option to Quick Access bar for its fast access. There will be a checkbox in front of the Transparent selection.
While that box has a tick in it, selections will be transparent. To make our selections opaque, just click the checkbox to remove the tick.
2. Rectangular Selection: Usually we can make a rectangular selection. After clicking the rectangular selection tool, position the cursor at the top left of the part we want to select, press your mouse button and drag down to its bottom right. A dashed rectangle will appear around our selection. With the Move Cursor we can move our selection or drag while holding the Ctrl key to make a copy of it.
3. Freeform Selection: We may need to make a freeform selection if the part of our drawing that we want to work with is crowded up closely with parts we don’t want to include.
1. Copying a Selection: There is a Copy button on the ribbon for copying, but we can make multiple copies of a selection in a faster way also. For this purpose draw a selection around the part we want to copy, using either the rectangular or the freeform selection tool.
Whenever Move Cursor appears. Hold the Ctrl key and drag your selection to its new location. A new copy of the selection will be moved to the new location. If we want to continue copying, press the Ctrl key again as we begin to drag the second time. Repeat as many times as we needed.
2. Painting with a Selection: Select a small piece from a picture, for example, with more than one color. Hold down the Shift key while dragging it around to make an abstract pattern. We can even write with a small selection.
3. Selection option: To the right of the selection icon we can see three options, Crop, Resize and Rotate flip.
1. Crop: Crop button is like Diamond shape with a line at the top . It helps us to crop our picture to the selected area only. If we click the Save icon after cropping to a selection, our large drawing page will be replaced with the new selection area.
2. Saving a selected area as a drawing:
- Save the picture we are working on.
- Select the part we want to save as a drawing. Click the Crop button.
- Go to the Paint button and open the menu.
- Click Save as.
Type a name for the new Selected drawing and click Save. We will return to the Paint window with the only selected drawing and the name on the Title bar is the name we used when saving the new Selection.
3. Resize and Skew: The second small button to the right of the large Select button will open the Resize and Skew dialog as shown in figure ahead:
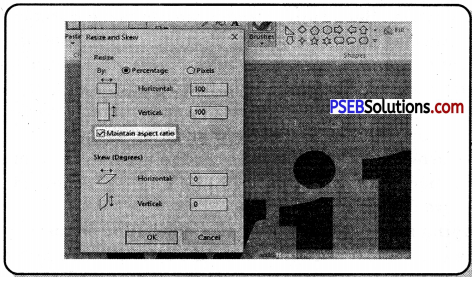
Resize and Skew
(а) Resize: We can quickly resize a selection by dragging any of the little blocks or handles on the selection rectangle. However, if we want the size adjustment to be precise, we must use the Resize and Skew dialog box. When we click the Resize icon, the dialog box appears as shown in the figure.
Only the top half of this dialog is concerned with resizing.
Note: While the option Maintain aspect ratio is checked, whatever we type into the Horizontal slot will be repeated in Vertical and our selection will stay exactly in proportion. We can remove the check if we want the selection to be fatter or thinner.
(b) Skew: The bottom part of the Resize and Skew dialog box allows us to skew our selection. When we use this option, it makes our selection include a lot of border areas to avoid having part of the picture cut off. If this does happen, click Undo and make a wider selection before trying again. This blue box is skewed 20 degrees horizontally. We can skew a selection both horizontally and vertically.
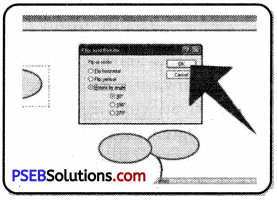
(c) Rotate or Flip: This menu helps us in rotating our drawing item to 90 degrees or 180 degrees. We can also make mirror images of selections using this option. We can mirror the drawing either vertically or horizontally. We can use this option for making some systematic designs in MS Paint.
(d) Invert Color: Another set of options are available if we right click on a selection. It includes Cut, Copy, Paste, Crop, Select all, Invert selection, Delete, Rotate and Resize, the only one option that is available on this menu and nowhere else is Invert color. This option makes the light colours darken and vice-versa to create an invert colour pattern.
![]()
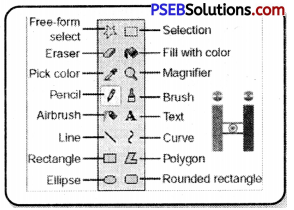
Tools Menu
The following tools are available in the tools menu of MS Paint:
1. Pencil: The pencil tool is used for free-hand drawing. We can work with pixel editing when using this tool in zoom-in view. When we work with the pencil tool, we must press the left mouse button to draw with Color 1 and with the right mouse button to draw with Color 2.
2. Fill with Color: The Fill with color tool is used to fill an area with a single color. Color 1 is used if we press the left mouse button on the area to be filled. Color 2 is used if we press with the right mouse button. This tool does not work successfully if we are trying to color different shades of one color. The Fill with Color tool always fills with a solid color.
3. Text Tool: The Text tool is used to insert any text. To begin inserting text, click on the text tool. Our cursor will change to an insertion bar. With this cursor we can draw the required size of area for texts. We must not click anywhere outside that area until our text is final from all aspects.
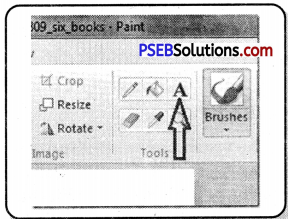
When we are using the Text Tool then the Text Toolbar starts appearing.
Formatting the Text:
- Select the text we have typed.
- Click the down arrow at the end of the Font Name box, so that a list of fonts drops down.
- Run your cursor-without pressing any mouse buttons—up and down in the font list. As we do this, the appearance of the text we have typed will change accordingly. When we like what we see, click on the name of that font.
- The font list will close.
- We can repeat this process with the Font Size list also.
- We can also click the Background from Transparent to Opaque or vice versa.
- We can change both Color 1 and Color 2.
We can also type text in different colors, fonts and size, in the same text box. When we are making changes, only selected text will be affected. When we have completed editing of text, we can click anywhere outside of your text box. After clicking away from the text box, the Text Toolbar disappears and the text becomes part of our picture. Now, it cannot be edited in any way.
4. Eraser: The Eraser tool erases the part of a picture with the left button of the mouse pressed. It changes whatever is dragged across to the background color-Color 2 With the right button pressed, the eraser tool changes pixels of Color 1 to Color 2, but leaves everything else unaffected.
5. Color Picker: The Color Picker Tool is used to set the current foreground or background color and to match any color in our picture. It’s especially useful when colors in the picture are different from those on the palette. By picking a color from the picture, we can make sure that we are using the same color as already used in the drawing.
For example: we are zoomed in and working with the Pencil tool on an area that has many shades of red and we want to use one of those shades. Click the Color Picker and click directly on the shade of red that we want to use. The tool will immediately change back to the Pencil, loaded with the color we want.
6. Magnifier: The Magnifier Tool is used to zoom in on a section of our picture. Magnifier can be clicked over an area of which we want a closer view. The Left click gives a closer view and Right click zoom out.
Brushes
The brush tool is similar to the ordinary brush we use for painting, It shows a similar brush effect on the Canvas. We can work in various widths and textures with the help of Brushes. Widths are controlled by the brushes and the Size Tool together; textures are controlled by the brushes.
Shapes
In the Shapes Gallery several tools like Rectangles, Rounded Rectangles Ellipses and Freehand Polygons, the Line Tool and the Curved Line Tool can be seen. There are number of other shapes such as arrows, speech balloons, various stars and others are also Shapes included.
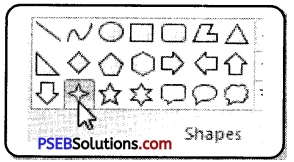
We can open the Shapes Gallery by clicking the down arrow under the Shapes picture and click the shape we want to draw.
- Straight Lines: Straight lines can be drawn while the left mouse button is pressed and will usp Color 1, those drawn with the right button will use Color 2. Line will be perfectly straight, If we hold down the Shift key while drawing a line. Ellipses, Rectangles, Circles and Squares: If we want to draw an exact shape such as a square or a circle, hold the Shift key while we draw.
- Curved Lines: Click the Curved Line button to draw a curve. Click the Outline button and choose Solid Color or a texture of your choice. Then click under the Size picture and choose a line thickness.
- Freehand Polygons: To draw a freehand polygon, click the Polygon button in the gallery. Hold a mouse button down and draw the first line of the polygon. Then release your mouse button and click where you want the next line to end. Keep clicking end points until you want the last line to finish the shape, then double click.
![]()
The Size Tool
This tool becomes active only after we choose either a Brush or a Shape.
After selecting our Brush or Shape we will find the down arrow under Size Tool and can choose a line thickness. The line thicknesses offered varies according to the brush we have chosen.
Colors
- The Color section of the ribbon has three parts: Boxes; showing the active colors – Color 1 and Color 2.
- Color Palette .
- Edit Colors button.
1. Color Box:
Color 1: Color 1 is the Foreground Color and is always black when we open Paint.
Color 2: Color 2 is the Background Color and is always white when we open Paint.
2. Color Palette: The two top lines of the Color Palette show all the colors available. Whenever we are making a picture. The line of blank squares at the bottom shows those colors we have edited during our work. Once Paint is closed, the edited colors vanish away.
3. Edit Colors: The Edit Colors button takes us into the Edit Colors dialog box. We can click any color on an extended palette and click the Add to Custom Colors button.
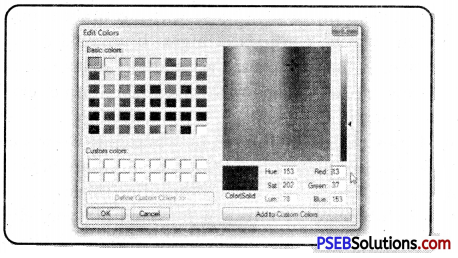
Here only one color will be added to the squares under the palette. To add more colors, we must return to the dialog box and add them one at a time.
View Tab Ribbon
The following section explains the View Tab Ribbon. It has three main options: Zoom, Show or hide and Display.
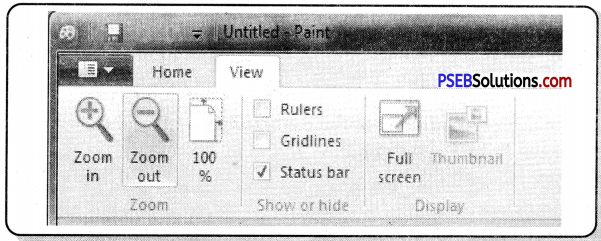
Zoom
Zooming in and out can be used alone or in conjunction with the Zoom Tool on the Ribbon or the slider on the Status Bar. Zoom in and Zoom out tools can be clicked repeatedly to get a closer or more distant view. The 100% option brings us back to a normal view of the picture.
Show or Hide
This portion of the View Tab Ribbon includes:
- The Show or Hide option for the status bar. The status bar is very useful while drawing pictures precisely.
- Gridlines are convenient if we want to align shapes accurately
- Rulers can be turned on or off as per our requirement.
Display
- On the Display section, we can click for Full Screen View. We can also get a Full Screen View by hitting Fll. We can come back to a normal view by pressing the Esc key.
- Thumbnail: Thumbnails are active only when we are zoomed in. It helps us see how changes we have made are affecting our picture in a normal view.