PSEB 9th Class Computer Notes Chapter 7 E-Governance

This PSEB 9th Class Computer Notes Chapter 7 E-Governance will help you in revision during exams.

PSEB 9th Class Computer Notes Chapter 7 E-Governance

“Governance” means The process of decision-making and the process by which decisions are implemented. Various factors are involved in governance. Government is one of the actors in governance. Other actors involved in governance vary depending on the level of government.

It’s not about making ‘correct’ decisions, but about the best possible process for making and implementing those decisions.

PSEB 9th Class Computer Notes Chapter 7 E-Governance

Main Characteristics of Good Governance:

  1. Good governance is answerable to the community,
  2. Good governance is transparent.
  3. Good governance follows the rule of law.
  4. Good governance is responsive.
  5. Good governance is effective and efficient in implementing decisions and follows processes.
  6. Good governance is participatory.

History and development of E-governance:

In India E-Governance originated during the seventies. The ICT was used to manage data related to elections, census, tax administration etc. After that, with the efforts of the National Informatics Center (NIC) all the district headquarters were connected during the eighties. From the early nineties, e-governance has used IT for wider sectoral applications with emphasis on reaching out to rural areas.

Earlier, a talk between a citizen and the Government takes place in a government office. But with the advancement of Information and Communication technologies, work culture of government offices has enhanced. Information and Communication Technologies has made it possible to locate service centers near to clients.

Such centers may consist of an unattended kiosk in the government agency, a service kiosk located close to the client outside the government agency, or the use of a personal computer at home or office.

In all the cases public traditionally look for information and services addressing his/her needs. In both cases quality and efficiency are of great importance. Therefore, the establishment of e-Govemance requires a good knowledge of the needs that exist in the society and that can be offered using ICT.

Due to widespread demand of E-govemance and exponentially increasing size of data, new technologies Hke Open source solutions and cloud computing need to be used in working of government. Today, electricity, water, phone and all kinds of bills can be paid over the internet. All these work is what government and citizens are using and doing. All ‘this dependents on internet and when citizens depends on government internet services all that come is E-Govemance.

PSEB 9th Class Computer Notes Chapter 7 E-Governance

E-governance:

Online working of a government or providing its services online to its citizens at their door step is known as E-Govemance. In other words, E-Govemance means online availability of government services.

E-Govemance has made the working of government more efficient andmore transparent to its citizens. Success or failure of any government depends on three things:

  1. The way the government works.
  2. Transparency in its working and information.
  3. Communication to its citizen.

In E-Govemance, government use of internet technology to communicate and provide information to common peoples and businessman.

There are four pillars of E-Governance:

  1. Connectivity: Connectivity is required to connect the people to the services of the government.
  2. Knowledge: The knowledge here is referred to as IT knowledge.
  3. Data Content: To share information over the internet, government possesses its database which should have the data content related to government services.
  4. Capital: Capital is referred to money used by government to provide their services.

Objectives of E-Governance:

The two main objectives of e-governance are:
1. To satisfactorily fulfil the public’s needs and expectations by simplifying their interaction with various online services.
2. To facilitate a speedy, transparent, accountable, efficient and effective process for performing government administration activities.

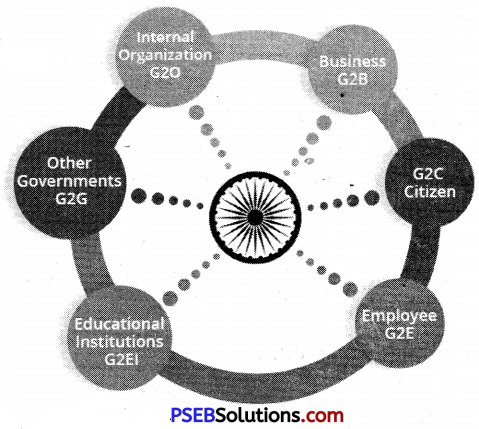
E-Governance models:

These four models of e-governance are as:

  1. Government to citizens (G2C)
  2. Government to government (G2G)
  3. Government to employees (G2E)
  4. Government to businessman (G2B)

PSEB 9th Class Computer Notes Chapter 7 E-Governance 1

PSEB 9th Class Computer Notes Chapter 7 E-Governance

1. Government to citizens (G2C):

This model of e-govemance refers to the government services which are shared by citizens. In this model, citizens visit to the links of services that they want to use. This model strengthens the bond between government and its citizen. Type of services which are provided by this model includes:-

  1. Payment of online bills such as electricity, water, telephone bills etc.
  2. Online registration of applications.
  3. Copies of land-record.
  4. Online filling of complaints.
  5. Availability” of any kind of online information.

2. Government to government (G2G):

This model refers to the services which are shared between the governments. These types of services or information are as:

  1. Sharing of information between police department of various state.
  2. Government document exchange which includes preparation, approval, distribution, and storage of ail governmental documents, is also done through e- governance.
  3. Most of the finance and budget works are also done through e-governance.

3. Government to businessmen (G2B):

It is used by businessmen to communicate to the government. Type of services which are provided by this model includes:-

  1. Collection of taxes.
  2. Rejection and approval of patent is done by this model.
  3. Payment of all kind of bills and penalty.
  4. Sharing of all kind of information, rules and data.
  5. Complaints or any kind of dissatisfaction can be shown by this.

4. Government to employees (G2E):

This model increases the transparency between government and its employee. Information that can be shared by this model:

  1. All kind of data submission (attendance record, employee record etc.) from various government offices is done by this model.
  2. Employee can file all kinds of complaints and dissatisfaction by this model.
  3. All kind of rule- regulation and information for employees can be shared by this.
  4. Employees can check their payment and working record.
  5. Employees can register all kind of working forms online.

PSEB 9th Class Computer Notes Chapter 7 E-Governance

Areas of E-governance:

Today area of e-governance is very wide. E-Governance is implemented by government in almost every field.

I. E-Governance in urban areas:

1. Transportation

Services provided by e-governance in this area are:

  1. Issue of learner licensees, Issue of driving licenses, Renewal of driving licenses etc.
  2. To provide transport-related facilities online.
  3. For online bookings, cancellation of seats, for enquiry about departure of buses, availability of seats and buses etc.
  4. Issuance of Time Table of buses.
  5. Provision of booking facility for Interstate transport.
  6. Transportation Improvement Program.
  7. Regional Transportation Plans.
  8. Congestion Management Process.
  9. Transportation Demand Management.

Various projects such as

  • IRCTC (Indian Railway Catering and tourism Cooperation ltd.) Offers online rail ticket booking, and checking of ticket reservation status.
  • HRTC (Himachal Road Transport Corporation project) is for online bookings, cancellation of seats, for enquiry about departure of buses, availability of seats and buses etc.

2. Online payment of bills and taxes

Services provided by e-govemance in this area are :

  1. Online Transactions such as payment of license fees, university fees, etc.
  2. Payment of Bill such as online payment of electricity and water bills,utility bills, to avail of trade licenses and transact on government matters at these facilities. ‘
  3. Payment of taxes such as online payment of motor vehicle taxes, revenue taxes,
  4. Payment of house EMIs.

Various Projects such as

  • SAMP ARK by Chandigarh government.
  • E-Suvidha by the government of Uttar Pradesh.
  • E-SEVA (Electronic seva) by Andhra Pradesh.
  • E-Mitra by the Government of Rajasthan

PSEB 9th Class Computer Notes Chapter 7 E-Governance

3. Information and public relation key services:

With these kinds of projects people can get any kind of information with just a single click are as under :
1. Information about vacancies, tenders and market rates etc.
2. Village e-mail etc.

Various projects such as
1. LokMitra by the government of Himachal Pradesh.

4. Municipal services

Services provided are as:

  1. House Tax Assessment, Billing and Collection.
  2. Maintaining records of Land & property. Certificates like Land sale Permission, Legal heir certificate.
  3. Issue of Passport Verification Certificate.
  4. Issue of Death and BirthCertificates.
  5. Registration & Attorneys of properties such as computerization of the Document registration work at Sub Registrar Office.
  6. Provide services such as issuance of certificates, issuance of orders in respect of Social Security Schemes such as old age pension, widow pension, freedom fighter pension etc.
  7. Review and approval authority for site plans

Various projects such as

  • SDO Suite by Assam government.
  • Rural Digital Services.

5. Roads and traffic management

Services provided by this type of e-governance is :

  1. Network of Roads & Bridges.
  2. Road construction and their maintenance.
  3. Traffic Management.

Safety, Accident and pollution control.arious projects such as
1. RSPCB (Rajasthan State Pollution Control Board) by Govt, of Rajasthan.

PSEB 9th Class Computer Notes Chapter 7 E-Governance

II. Areas of e-governance in rural areas

In rural areas e-govemance has its very powerful impact.
1. Agriculture:
Following are the projects used in Agriculture.
1. AGMARKNET: It is a project approved by Department of Marketing & Inspection (DMI), Ministry of Agriculture, and the Government of India.
2. SEEDNET: It is a SEED informatics network under ministry of Agriculture, Government of India.

2. Local information:

For local information such as personal information, prices of seeds, fertilizers, loan rates etc.
Various projects such as
1. E-Aadhar
2. E-JanSampark

3. Disaster management:

To deal with these disasters, much state government has started e-governance service for this.
Project in this area are:
1. Chetana by the state of Bihar is a Disaster management system which has been started to deal with natural disasters such as flood and earthquake.

4. Land record management:

By facilitating e-governance service in this area, millions of land records can be maintain in a very short time span.
Projects in this area are :

  1. Land Records Management System State Government of Punjab.
  2. Devbhoomi State Government of Uttarakhand.
  3. Bhu-Lekh UP State Government of Uttar Pradesh.
  4. E-Dhara State Government of Gujarat.

5. Panchayat:

Services provided by e-governance in this area are:

  1. Issue of Birth/Death certificate.
  2. Application for inclusion of name in Voter list.
  3. Conducting various welfare schemes for the poor and needy sections of the society.
  4. Preparing district wise planning, implementing those plan, and review for success.
  5. To provide wage employment to the needy from amongst the poorest section of the rural society.
  6. Rural water supply and sanitation.

PSEB 9th Class Computer Notes Chapter 7 E-Governance

Various projects:

1. E-GramViswa Gram Project by Gujarat.

III. E-governance in Health

Service provided by these projects are as:

  1. Availability of medicines.
  2. Special health camps.
  3. Facilities at Anganwadi centers.

Various projects are:

  • Hospital OPD Appointment:
  • Online Vaccination Appointment for International Traveler:

IV. E-governance in Education

Providing basic education (elementary, primary, and secondary) to children.

  1. Providing computer education to children.
  2. Results for 10th& 12th classes.
  3. Information on eligibility for “Distribution of books” scheme.

Various projects are:
Online Scholarship Management System such as Ashirwad portal by Punjab Government.

PSEB 9th Class Computer Notes Chapter 6 Internet Applications

This PSEB 9th Class Computer Notes Chapter 6 Internet Applications will help you in revision during exams.

PSEB 9th Class Computer Notes Chapter 6 Internet Applications

Internet allows us to use many services like Internet Banking, Online Shopping, Online Ticket Booking, Online Bill Payment, emaihetc.

Internet provides concept of electronic commerce that allows the business deals to be conducted on electronic systems

PSEB 9th Class Computer Notes Chapter 6 Internet Applications

Email:

Email, short for “electronic mail,” It is one of the most widely used features of the Internet, along with the web. It allows us to send and receive messages to and from anyone with an email address, anywhere in the world.

Gmail:

‘Google Mail’ or ‘Gmail’ is a free email service provided by Google. You can send and receive emails, block spam, create an address book, and perform other basic email tasks.
PSEB 9th Class Computer Notes Chapter 6 Internet Applications 1

Creating new account:

In this, we’ll study about how to get started with email by creating an account in Gmail.
Follow these step-by-step instructions to create a Gmail account
1. Open up our internet browser.
2. Type address. WWW.gmail.com

3. Create Google Account
The ‘choose our username’ is the unique email address that we wish to use, which will be placed before ‘@gmail.com’.
1. Type password
2. Then fill your birth date (Month, Day, Year)
PSEB 9th Class Computer Notes Chapter 6 Internet Applications 2
3. Fill your Gender (Male/Female)
4. Mobile phone number and any other e-mail address(if exist)
Once we have completed this page fully, clicking Next Step will take us to the next Page.
Click “Continue to Gmail” to go to our inbox and get started.

PSEB 9th Class Computer Notes Chapter 6 Internet Applications

Captcha Code:

A CAPTCHA is a type of test used in computing to determine whether or not the user is human.
PSEB 9th Class Computer Notes Chapter 6 Internet Applications 3
A CAPTCHA is a program that protects websites by generating and grading tests that humans can pass but current computer programs cannot.

How to send and receive E-mail?

To send an email, click “Compose Mail” located above the folder list. An entry form appears in the Gmail interface.

The recipients: In the “To:” box, type the address of the person we want to write to.
To view the “Cc:” tab click “Add Cc”. Cc means “carbon copy”, type here the addresses of people who are not the main recipients of the message, but we still want to send a copy to.

To view the “Bcc:” tab click “Add Bcc”. Bcc stands for “Blind carbon copy “, type here the addresses of people we want to send a copy of the mail to, without the other recipients knowing.
PSEB 9th Class Computer Notes Chapter 6 Internet Applications 4

PSEB 9th Class Computer Notes Chapter 6 Internet Applications

The subject

In “Subject:”, enter the subject of the email.
When we finish typing our mail, click the “Send” button to send it immediately or on the “Save” button to save as draft.

Attach file(s)with email message:

In the new message window, click the paperclip icon to add an attachment. Find and click on the folder or files we wish to attach, then click “Open” and we should see the attachment added to our message.
PSEB 9th Class Computer Notes Chapter 6 Internet Applications 5

Google Apps:

Google Apps is a suite of Web-based applications from Google that includes e-mail, calendar, word processing, spreadsheet and presentations.
PSEB 9th Class Computer Notes Chapter 6 Internet Applications 6

PSEB 9th Class Computer Notes Chapter 6 Internet Applications

1. Google Calendar

Google Calendar is a time-management web application and mobile app created by Google. Google Calendar allows multiple calendars to be created and shown in the same view. Each can be shared, either read-only or with full edit control, and either with specified people or with everyone.
PSEB 9th Class Computer Notes Chapter 6 Internet Applications 7

2. Google Maps

Google Maps is a desktop web mapping service developed by Google. It offers satellite imagery, street maps, 360° panoramic views of streets (Street View), real-‘time traffic conditions (Google Traffic), and route planning for traveling by foot, car, bicycle (in beta), or public transportation.
PSEB 9th Class Computer Notes Chapter 6 Internet Applications 8

3. Translate

Google Translate is a free multilingual statistical machine translation provided by Google to translate text, speech, images, or real-time video from one language into another.
PSEB 9th Class Computer Notes Chapter 6 Internet Applications 9

PSEB 9th Class Computer Notes Chapter 6 Internet Applications

4. Google +

Google+ (Google Plus) is Google’s attempt at social networking. The Google+ service that delivers functionality and many features similar to those of Facebook.
PSEB 9th Class Computer Notes Chapter 6 Internet Applications 10

5. Google Docs

Google Docs is an online word processor that lets you create and format text documents and collaborate with other people in real-time.
PSEB 9th Class Computer Notes Chapter 6 Internet Applications 11

6. Google Sheets

Google Sheets is an online spreadsheet app that lets you create and format spreadsheets and simultaneously work with other people.

7. Google Slides

Google Slides is an online presentations app that allows you to show off your work in a visual way.
PSEB 9th Class Computer Notes Chapter 6 Internet Applications 12

PSEB 9th Class Computer Notes Chapter 6 Internet Applications

8. Play Store

Google Play is Google’s online store for purchasing and downloading apps, music, books, movies and similar content for use on Android-powered smartphones, tablets, Google TV and similar devices.
PSEB 9th Class Computer Notes Chapter 6 Internet Applications 13

Google Drive

Google Drive is a service offered by Google that allows us to store and share files online.
PSEB 9th Class Computer Notes Chapter 6 Internet Applications 13

Benefits of Google Drive:

  1. Google Drive lets us send large files directly from our Gmail account.
  2. Google Drive allows us to access our files remotely.
  3. Google Drive has its own mobile application which gives us access to our files on our iPhone or smartphone.
  4. Google Drive allows us to find content easily with a keyword search.
  5. Google Drive is equipped with an OCR (optical character recognition) function, which allows us to search for words or expressions in scanned documents.
  6. Google Drive allows users to open various types of files.
  7. All the facilities described above are free.

How to share file(s)?

1. Open Drive, or a file or folder we want to share.
2. Open the sharing box:

  • While we have a file open: Click Share in the top-right comer.
  • While we have a folder open: Click the share icon in the top-right.
  • From our file list in Drive: Select the name of a file or folder and click the share icon at the top.

3. Under “People” in the sharing box, type the email addresses of the people or Google Groups we want to share with.
PSEB 9th Class Computer Notes Chapter 6 Internet Applications 15
4. Choose the type of access we want to give -these users by clicking the dropdown arrow to the right of the text box:

  • Can edit: Users can edit the file or folder and share it with others.
  • Can comment: Users can view and add comments to the file, but can’t edit it.
  • Can view: Users can see the file or folder but can’t edit or comment on it

5. Click Done. The users will receive an email letting them know we’ve shared the file or folder with them.
6. If we want to share multiple files at once, add the files to a folder in Drive and then share the entire folder with the people we want to see the files.

PSEB 9th Class Computer Notes Chapter 6 Internet Applications

How to download software?

The same basic steps apply to most downloads:

  1. Click the link.
  2. Choose open or save.
  3. Confirm the download.
  4. rim or open the download.

Internet in Media

TV, radio and the Internet used to be completely separate things, but that’s no longer true with today’s technology. We can now watch TV shows on our computer, connect to the Internet on many.

1. On Line Newspaper:
Online newspaper is the online version of a newspaper, either as a stand-alone publication or as the online version of a printed periodical.

2. Online TV channels, Radio, Live programs(Streaming Media)
Online radio is the distribution of audio broadcasts over the Internet. There are thousands of Internet radio stations that can be streamed to a software media player in a computer, mobile device, stand-alone Internet radio, media hub or media server.

What is Cloud?

The term ‘Cloud’ refers to a Network or Internet. In other words, we can say that Cloud is something, which is present at remote location.
Applications such as e-mail, web conferencing, customer relationship management (CRM) execute on cloud.
Cloud networking refers to manipulating, configuring, and accessing the hardware and software resources remotely. It offers online data storage, infrastructure, and application.

PSEB 9th Class Computer Notes Chapter 6 Internet Applications

Cloud Printing:

Cloud Printing enable users to print documents and other materials on any device associated with the cloud (network). Users create content with any softwarefool they want and transfer the file to a cloud printing service provider via whatever device they choose, which then routes the file to a cloud-attached printer at a location selected by the user.

Internet Security:

The Internet is indeed private and secure, but there are a number of serious security risks.

1. Virus/Anti-virus:
A computer virus is a computer program that replicates itself into other computer programs and can cause damage to a computer’s software, hardware or data.

2. Spyware:
Spyware is a program installed on our computer that sends information about us and how we use our computer to a third party, typically without we being aware this is happening. Spyware often enters our system when we install some type of free software from an untrusted source.

3. Trojan:
A Trojan horse, often shortened to Trojan, is a type of malware designed to provide unauthorized, remote access to a user’s computer. Trojan horses do not have the ability to replicate themselves like viruses; however, they can lead to viruses being installed on a machine since they allow the computer to be controlled by the Trojan creator.

4. Phishing Scams:
Phishing is an e-mail fraud method in which the wrongdoer sends out legitimate-‘looking email in an attempt to gather personal and financial information from recipients.

5. Digital Signature:
Digital Signature is a digital code which is attached to an electronically transmitted document to verify its contents and the sender’s identity.

PSEB 9th Class Computer Notes Chapter 2 MS Excel Part-II

This PSEB 9th Class Computer Notes Chapter 2 MS Excel Part-II will help you in revision during exams.

PSEB 9th Class Computer Notes Chapter 2 MS Excel Part-II

A chart is a tool that is used to communicate data graphically. A chart can allow knowing the meaning behind data.

Charts:

Excel has various types of charts, so we can choose one that most effectively represents our data.

PSEB 9th Class Computer Notes Chapter 2 MS Excel Part-II

Types of Chart:

  1. Pie Chart
  2. Column Chart
  3. Line Chart
  4. Bar Chart
  5. Area Chart
  6. Scatter Chart.

Create a Chart

To create a line chart, the steps are as follows:
1. Type the data in our excel worksheet.
PSEB 9th Class Computer Notes Chapter 2 MS Excel Part-II 1
2. Select the range.
PSEB 9th Class Computer Notes Chapter 2 MS Excel Part-II 2
3. On the Insert tab, in the Charts group, choose Line, and select Line with Markers.
PSEB 9th Class Computer Notes Chapter 2 MS Excel Part-II 3

PSEB 9th Class Computer Notes Chapter 2 MS Excel Part-II

Change a chart type

We can easily change a chart type at any time. Following are the steps to change a chart type:
1. Select the chart.
PSEB 9th Class Computer Notes Chapter 2 MS Excel Part-II 4
2. On the Insert tab, in the Charts group, choose Column, and select Clustered Column.
PSEB 9th Class Computer Notes Chapter 2 MS Excel Part-II 5

Switch Row/Column

1. Select the chart. Chart Tools contextual tab is activated.
PSEB 9th Class Computer Notes Chapter 2 MS Excel Part-II 6
2. On the Design tab, click Switch Row/ Column.
PSEB 9th Class Computer Notes Chapter 2 MS Excel Part-II 7

Add chart Title

1. Select the chart.
2. On the Layout tab, click Chart Title, Above Chart.
PSEB 9th Class Computer Notes Chapter 2 MS Excel Part-II 8
3. We will see a caption (Chart Title) above our chart. Enter our desired title.
PSEB 9th Class Computer Notes Chapter 2 MS Excel Part-II 9

Elements of a Chart

  1. Chart area: A chart area contains everything inside the chart window, including all parts of the chart.
  2. Data marker: A data marker is a symbol on the chart that represents a single value in the worksheet. A data marker can be a bar in a bar chart, a pie in a pie chart, or a line on a line chart.
  3. Data series: It is a group of related values such as all the values in a single row in the chart.
  4. Axis: It is a line that is used as a major reference for plotting data in a chart.
  5. Tick mark: It is a small line intersecting an axis. A tick mark indicates a category, scale, or chart data series.
  6. Plot area: It is the area where our data is plotted and it includes the axes and all markers that represent data points.
  7. Gridlines: These are the optional lines extending from the tick marks across the plot area.
  8. Chart text: It is a label8- or title that we add to our chart. Attached text is a title or label that is linked to an axis such as the Chart Title.
  9. Legend: It is a key that identifies patterns, colors, or symbols associated with the markers of a chart data series. The legend shows the data series name corresponding to each data marker

PSEB 9th Class Computer Notes Chapter 2 MS Excel Part-II

Equations and Symbols

How to insert equations, symbols and special characters in excel:

Excel makes it easy to enter symbols, such as foreign currency marks, as well as special characters, like trademark and copyright symbols, into cells. These symbols are available in the Symbol dialog box.
PSEB 9th Class Computer Notes Chapter 2 MS Excel Part-II 10
1. Click the Insert tab and then click the Symbol button in the Symbols group. The Symbol dialog box appears.
PSEB 9th Class Computer Notes Chapter 2 MS Excel Part-II 11PSEB 9th Class Computer Notes Chapter 2 MS Excel Part-II 12
2. Select the desired symbol on the Symbols tab; or click the Special Characters tab and select the desired character.
3. Click Insert to insert the symbol or character.
4. Click close when we’re done adding symbols and special characters. The inserted symbols or characters appear in the worksheet.
5. Press Enter to complete the cell entry.

Pivot Table:

Insert Pivot Table

The data in a worksheet can be easily managed by using PivotTables. We can summarize the data. Pivot Table allows us to manipulate it in various ways. PivotTables are very helpful tool when we have to deal with large and complex spreadsheets.
PSEB 9th Class Computer Notes Chapter 2 MS Excel Part-II 13
A PivotTable is very helpful in doing these calculations. We can do calculations and summarize the data in a way that’s not only easy to read but also easy to manipulate.
PSEB 9th Class Computer Notes Chapter 2 MS Excel Part-II 14

PSEB 9th Class Computer Notes Chapter 2 MS Excel Part-II

How to create a PivotTable:

1. Select the table or cells – including column headers – containing the data we want to use.
2. From the Insert tab, click the PivotTable command.
PSEB 9th Class Computer Notes Chapter 2 MS Excel Part-II 15
3. The Create PivotTable dialog box will appear. Click OK.
PSEB 9th Class Computer Notes Chapter 2 MS Excel Part-II 16

Add fields to the Pivot Table:

1. Before using Pivot Table, first of all we’ll need to decide which fields to add to the PivotTable. Each field is a column header from the source data.
2. In the Field List, place a check mark next to each field we want to add.
PSEB 9th Class Computer Notes Chapter 2 MS Excel Part-II 17
3. The selected fields will be added to one of the four areas below the Field List.
PSEB 9th Class Computer Notes Chapter 2 MS Excel Part-II 18
4. The PivotTable now shows the change.

Data Tools:

Data Tools are simply tools which make it easy to manipulate data. Some of them are used to save our time by extracting or joining data and others perform complex calculations on data.

PSEB 9th Class Computer Notes Chapter 2 MS Excel Part-II

Convert Text to Columns:

Steps are as follows:
1. Type the data in our worksheet as:
PSEB 9th Class Computer Notes Chapter 2 MS Excel Part-II 19
2. Select the range with full names.
PSEB 9th Class Computer Notes Chapter 2 MS Excel Part-II 20
3. On the Data tab, click Text to Columns.
PSEB 9th Class Computer Notes Chapter 2 MS Excel Part-II 21
4. Choose Delimited and click Next.
PSEB 9th Class Computer Notes Chapter 2 MS Excel Part-II 22
5. Clear all the check boxes under Delimiters except for the Comma and Space check box.
PSEB 9th Class Computer Notes Chapter 2 MS Excel Part-II 23
6. Click Finish.

Data Validation:

Data validation is a powerful feature that is used to set up certain rules to dictate what can be entered into a cell.
PSEB 9th Class Computer Notes Chapter 2 MS Excel Part-II 24

PSEB 9th Class Computer Notes Chapter 2 MS Excel Part-II

How to Create Data Validation Rule:

To create a data validation rule, the steps are as follows:
1. Type the data in our excel worksheet.
2. Select cell D2.
3. On the Data tab, click Data Validation.
PSEB 9th Class Computer Notes Chapter 2 MS Excel Part-II 25
1. In the Allow list, click Whole number.
PSEB 9th Class Computer Notes Chapter 2 MS Excel Part-II 26
2. In the Data list, click between.
3. Enter the Minimum and Maximum values.
Input Message: Input messages appear when the user selects the cell and tell the user what to enter.

On the Input Message tabas below do the following:
1. Check ‘Show input message when cell is selected’.
PSEB 9th Class Computer Notes Chapter 2 MS Excel Part-II 27
2. Enter a title.
3. Enter an input message.

Error Alert:

If users ignore the input message and enter a number that is not valid, we can show them an error alert.
On the Error Alert tab do the following:
1. Check ‘Show error alert after invalid data is entered1.
2. Enter a title.
3. Enter an error message.
PSEB 9th Class Computer Notes Chapter 2 MS Excel Part-II 28
4. Click OK.

PSEB 9th Class Computer Notes Chapter 2 MS Excel Part-II

Data Validation Result:

To check our Data Validation result follows the steps as below:
1. Select cell C2.
PSEB 9th Class Computer Notes Chapter 2 MS Excel Part-II 29
2. Try to enter a number higher than 10.

What-If Analysis:

What-If Analysis in Excel allows us to try out different values (scenarios) for formulas. In MS Excel a scenario is a set of values that saves and can substitute automatically on our worksheet.
PSEB 9th Class Computer Notes Chapter 2 MS Excel Part-II 30
1. On the Data tab, click What-If Analysis and select Scenario Manager from the list.
PSEB 9th Class Computer Notes Chapter 2 MS Excel Part-II 31
2. The Scenario Manager Dialog box appears.
PSEB 9th Class Computer Notes Chapter 2 MS Excel Part-II 32
3. Type a name, select cell and click on OK.
PSEB 9th Class Computer Notes Chapter 2 MS Excel Part-II 33
4. Enter the corresponding value and click on OK again.
PSEB 9th Class Computer Notes Chapter 2 MS Excel Part-II 34
5. Next, add 4 other scenarios.
PSEB 9th Class Computer Notes Chapter 2 MS Excel Part-II 35

PSEB 9th Class Computer Notes Chapter 2 MS Excel Part-II

Scenario Summary:

After creating your required Scenarios, to easily compare the results of these scenarios following are the steps below:
1. Click the Summary button in the Scenario Manager.
PSEB 9th Class Computer Notes Chapter 2 MS Excel Part-II 36
2. Next, select cell for the result cell and click on OK.
PSEB 9th Class Computer Notes Chapter 2 MS Excel Part-II 37

Goal Seek?

The goal seek function is a part of what-if analysis tool set. It allows a user to use the desired result of a formula to find the possible input value necessary to achieve that result.
PSEB 9th Class Computer Notes Chapter 2 MS Excel Part-II 38
3. Type a name, select cell and click on OK.
PSEB 9th Class Computer Notes Chapter 2 MS Excel Part-II 39
4. Enter the corresponding value and click on OK again.
PSEB 9th Class Computer Notes Chapter 2 MS Excel Part-II 40
5. Next, add 4 other scenarios.
PSEB 9th Class Computer Notes Chapter 2 MS Excel Part-II 41
Scenario Summary: After creating your required Scenarios, to easily compare the results of these scenarios following are the steps below:
1. Click the Summary button in the Scenario Manager.
PSEB 9th Class Computer Notes Chapter 2 MS Excel Part-II 42
2. Next, select cell for the result cell and click on OK.
PSEB 9th Class Computer Notes Chapter 2 MS Excel Part-II 43

Goal Seek?
The goal seek function is a part of what-if analysis tool set. It allows a user to use the desired result of a formula to find the possible input value necessary to achieve that result.
PSEB 9th Class Computer Notes Chapter 2 MS Excel Part-II 44

PSEB 9th Class Computer Notes Chapter 2 MS Excel Part-II

Protection:

In simple words Protection means to keep our stuff safe from misuse from an authorised person. In Excel we can protect our workbook/worksheet.

Protect Worksheet

Steps to Protect Worksheet:
1. Right click a worksheet tab
PSEB 9th Class Computer Notes Chapter 2 MS Excel Part-II 45
2. Click Protect Sheet.
PSEB 9th Class Computer Notes Chapter 2 MS Excel Part-II 46
PSEB 9th Class Computer Notes Chapter 2 MS Excel Part-II 47

Protect Workbook

A workbook can be protected easily as we have protected a worksheet. A workbook can be protected such as:
Structure: If we protect the workbook structure, users cannot insert, delete, rename, move, copy, hide or unhide worksheets anymore.
Windows: If we protect the workbook windows, we cannot move, change the size and close windows anymore.
PSEB 9th Class Computer Notes Chapter 2 MS Excel Part-II 48
1. Open a workbook.
2. On the Review tab, click Protect Workbook.
PSEB 9th Class Computer Notes Chapter 2 MS Excel Part-II 49
3. Check Windows enter a password and click OK.
PSEB 9th Class Computer Notes Chapter 2 MS Excel Part-II 50
4. Re-enter the password and click on OK.
PSEB 9th Class Computer Notes Chapter 2 MS Excel Part-II 51

PSEB 9th Class Computer Notes Chapter 2 MS Excel Part-II

View Tab

PSEB 9th Class Computer Notes Chapter 2 MS Excel Part-II 52

Split

In Excel we can split the worksheet window into separate panes and scroll the worksheet in each pane so that we can easily compare data from two separate worksheet locations. We can make the panes in a workbook window disappear by double-clicking anywhere on the split bar that divides the window.
1. Click the split box above the vertical scroll bar.
2. Notice the two vertical scroll bars.
3. To remove the split, double click the horizontal split bar that divides the panes (or drag it up).
PSEB 9th Class Computer Notes Chapter 2 MS Excel Part-II 53

Freeze

Freeze option is very useful in some cases when we have a long table and want to see all. We need to scroll it while looking all the data. We will see that the table headings are also scrolled during scrolling, so it becomes difficult to understand the meaning of data without having its heading name hidden.

Freeze Top Row: To freeze the top row, execute the following steps.
1. On view tab, click Freeze Panes and then Freeze
PSEB 9th Class Computer Notes Chapter 2 MS Excel Part-II 54

2. Scroll down to the rest of the worksheet.
PSEB 9th Class Computer Notes Chapter 2 MS Excel Part-II 63

PSEB 9th Class Computer Notes Chapter 2 MS Excel Part-II

How to Unfreeze Panes of your worksheet

To unlock all rows and columns, execute the following steps.
1. On the View tab, click Freeze Panes, Unfreeze Panes.
PSEB 9th Class Computer Notes Chapter 2 MS Excel Part-II 64

How to Freeze Panes of a Worksheet

To freeze panes, execute the following steps.
1. Select row.
2. On the View tab, click Freeze Panes, Freeze Panes.
PSEB 9th Class Computer Notes Chapter 2 MS Excel Part-II 55
3. Scroll down to the rest of the worksheet.

Hide/Unhide Columns, Rows and Sheets:

Hiding Rows:

In desired spreadsheet select the rows (for multiple selection hold Ctrl key and keep selecting) we want to hide and navigate to Home tab.
From Cells group, click Format button. Now from Hide & Unhide options, click Hide Rows.
Upon click it will automatically hide the selected rows.
PSEB 9th Class Computer Notes Chapter 2 MS Excel Part-II 56

PSEB 9th Class Computer Notes Chapter 2 MS Excel Part-II

Hiding Columns:

For hiding the columns in specific sheet, following are the steps:
1. Select the columns we want to handle.
2. Now click on Format button in Cells group. Now Click on Hide & Unhide options then click Hide Columns.
PSEB 9th Class Computer Notes Chapter 2 MS Excel Part-II 57

How to Hide Worksheets

Following are the steps to do so:
1. Select the sheet which we want to hide.
2. Now Click Hide Sheet from Hide & Unhide options from Cell group in Home Tab.
3. Click on Hinde Sheet Option from Hide and Unhide.
PSEB 9th Class Computer Notes Chapter 2 MS Excel Part-II 58

Macro:

A macro is a series of commands that is grouped together so that we can run whenever we need to perform the specific task. We can use macros in Excel to save time by automating tasks that we perform frequently.

The easiest method for creating many macros is to use macro recorder. When we record a macro Excel stores the information about each step you take as you perform a series of commands. We then run the macro to repeat or playback the set of commands.
PSEB 9th Class Computer Notes Chapter 2 MS Excel Part-II 59
The macro recorder records every action we complete. So before we start the process of recording it is very important to plan macro- that what steps we need to record. To display the Developer tab, follow these steps:
1. Click the File tab and then click Options. The Excel Options dialog box
appears.
2. Click Customize Ribbon in the left pane, and then select the Developer check box under Main Tabs on the right side of the dialog box.
PSEB 9th Class Computer Notes Chapter 2 MS Excel Part-II 60
3. Click OK. The Developer tab appears in the Ribbon.
PSEB 9th Class Computer Notes Chapter 2 MS Excel Part-II 61

PSEB 9th Class Computer Notes Chapter 2 MS Excel Part-II

How to Record a macro:

Follow these steps to record a macro:
1. Choose Record Macro in the Code group of the Developer tab. The Record Macro dialog box appears.
2. Type a name for the macro in the Macro Name text box.
PSEB 9th Class Computer Notes Chapter 2 MS Excel Part-II 62
3. Assign a Shortcut Key.
4. From the Store Macro In drop-down list, select where we want to store the macro:

  • This Workbook: Save the macro in the current workbook file.
  • New Workbook: Create macros that we can run in any new workbooks created during the current Excel session.
  • Personal Macro Workbook: Choose this-option if you want the macro to be available whenever we use Excel, regardless of which worksheet we’re using.
  • Type a description of the macro in the Description text box.
  • Click OK. The Record Macro option on the Developer tab changes to Stop Recording.
  • Perform the actions you want to record.
  • Choose Stop recording in the Code group of the Developer tab.
  • The macro recorder stops recording keystrokes and the macro is complete.

PSEB 9th Class Computer Notes Chapter 5 Introduction to MS-Access

This PSEB 9th Class Computer Notes Chapter 5 Introduction to MS-Access will help you in revision during exams.

PSEB 9th Class Computer Notes Chapter 5 Introduction to MS-Access

Data has become an important part of human life. It has increased the need of data management. This need has given birth to various software. MS Access is one of the most common software in this category.

PSEB 9th Class Computer Notes Chapter 5 Introduction to MS-Access

MS-Access:

Access is a Relational Database Management System (RDBMS). It is used for database creation and management. MS-Access Allow user to perform basic tasks such as opening and closing database, Creating tables, Forms, queries and Reports. If we want to understand Access, Firstly we must have to understand databases.

It is part of the MS Office software suite. It is used in millions of corporate firms across the globe and in homes also.

MS Access is used to store and retrieve large amounts of data. It can be used for something simple such as keeping a record of your books collection or for something larger such as invoicing/ stock management.

Relational Database:

Relational database was proposed by Edgar Codd around 1969. It has since become the dominant database model for commercial applications.

A relational database organizes data in tables. A table is made up of rows and columns. A row is also called a record. A column is also called a field.

MS-ACCESS is a relational database management system. Relational databases allow you to organize your data into tables; each table focuses on a specific topic; the various tables can then be linked to each other for inquiry and reporting purposes.

PSEB 9th Class Computer Notes Chapter 5 Introduction to MS-Access

Guidelines to design a Database:

  1. Identify all the fields needed by you to produce the required information
  2. Organize each piece of data into its smallest useful part to make the design perfect.
  3. Make group related fields into tables
  4. Determine each table’s primary key which will uniquely identified.
  5. You will have to Include a common field in related tables.

Some Technical Words of Access:

Access arranges and divided database as under:

  1. Database file: The database file is the main file of database which consists the whole data of the document.
  2. Table: A table is the basic element of a Database and contains the data entered by users. Each row (or record) contains information about a particular item.
  3. The record is made up of several fields; each field contains one piece of information relating to the item.
  4. Fields: A field is an individual set of data items that are of the same type.
  5. Data Types: Databases consist of tables, tables consist of fields and fields are of a certain data type.

Components of MS Access:

  1. Table: Tables are the data storage facilities in MS Acfcess. Each table contains rows called records and columns called fields. A record is a collection of facts about a particular person or an organization. Each record in a table should be unique.
  2. Queries: A query that copies or changes data. Queries include append, delete, make-table, and update queries. A query that asks a question about the data stored in your tables and returns a result set in the form of a datasheet, without changing the data.
  3. Forms: Forms provides us friendly environment to view the data in which it shows a single record at a time.
  4. Reports: Reports provide a means of organizing and summarizing data. A report can be a simple list, a student’s report or a school report.
  5. Macros: Macro is an automatic action that should be performed to an object of the data. It allow users to their work automatically.
  6. Modules: A module is collection of procedure statement and declaration which are stores as unit. Module are verv similar to macros.
  7. Database objects: Databases in Access 2010 are composed of four objects: tables, queries, forms, and reports.

Data Types:

In access many types of data types can be used the data type is decided before creating a table. We know there are different data types of table. Some of the important data types of access are given below:

Data types Size/Format Storage Capacity Functions
Text Up to 255 characters Text – including numeric text (eg phone numbers) Text consists of digits/ numbers, letters or their combination. It can have maximum of 255 letters.
Number Long Integer Integer Single and double bytes Whole numbers Numbers been used only from the prescribed size which we will declare in document.
Data types General Both date & time It is used for date and time. The data can vary from 100 to 9999. it is 8 byte long
Yes/no Yes/No True/False On/Off N.A For data with only 2 possible values. It is used for logical values.
Currency Currency Scientific, percentage Up to 15 figures It can also be use in mathematics or scientific functions.
Auto Number N.A Automatic counter- incremented by 1 for each record It is used in all numeric programs it automatically give increment to a number.
Memo Up to 65535 characters Longer pieces of text Memo is used in where we have to enter a longer text
OLE
Object video
N.A For pictures, sound, videos, word/excel, documents or any other docs. It is been used to insert picture, sound, videos, word/excel, documents
Hyperlink N.A N.A It is used For links to the WWW or e-mail
Calculated N.A N.A This data type allow you to create a field that is based on a calculation of other fields in the same table

PSEB 9th Class Computer Notes Chapter 5 Introduction to MS-Access

Advantages of Access:

  1. Convenient storage capacity: A Microsoft Access database can hold up to 2 GB of data. *
  2. Easy installation and work: Access gives data managers a fully functional, relational database management system.
  3. Easy to participate: Access works well with many of the developing software programs based in Windows like Microsoft SQL Server and non-Microsoft products like Oracle and Sybase.
  4. Importing data: Microsoft Access allow user to import their important data.
  5. Multi-user support: More About ten users in a network can use an Access application.
  6. Popular Rdbms: Microsoft Access is the most popular desktop Relational database system in the world.
  7. Saves your money: Microsoft Access is more economical than other larger systems; offering the same functions and usage.
  8. Secure Database: MS access is secure database system information is secure which you saved on it.

Starting access:

To start access 2010 from the start menu:
Click the start button, click all programs, click Microsoft office, and then click Microsoft access 2010. The new page of the backstage view opens, displaying thumbnails of the available templates and template categories.
PSEB 9th Class Computer Notes Chapter 5 Introduction to MS-Access 1
Another shortcut way to open access is Press windows kev with R it will open run command window on Run command type MS access is blank box.
PSEB 9th Class Computer Notes Chapter 5 Introduction to MS-Access 2

After the open of MS access you have to click on the blank database available Under templates.
PSEB 9th Class Computer Notes Chapter 5 Introduction to MS-Access 3

PSEB 9th Class Computer Notes Chapter 5 Introduction to MS-Access

Working with Tables:

A table is a database object that vou define and use to store data update DATA. A table consists of records and fields. Every record contains data about one instance of the subject.

Creating and Modifying tables:

When you create a new table, you have complete control over the number of fields, the names of the fields, and what sort of data they can store. You can create a new table in the either datasheet view or design view.
PSEB 9th Class Computer Notes Chapter 5 Introduction to MS-Access 4

Creating tables in datasheet view

To create a table in datasheet view:

On the create tab, in the tables group, click the table button. A new blank table opens in the object window in datasheet view.

Adding fields by entering data:

Whenever you add a new column to the datasheet, a new field is defined in the table.

  1. Click in the first cell in the click to add COLUMN, ENTER the first item of data for the new record, and then press the tab or enter key to move the first cell in the column to the right.
  2. Access AUTOMATICALLY ASSIGNS the value 1 to the id field.
  3. WHEN THE record has been changed, but has not yet been saved.
  4. Click the pencil icon in the row selector. This saves the first record with the value 1 assigned to the id field; subsequent records will be numbered sequentially.
  5. Continue entering items of data in consecutive cells, and pressing the tab or enter key.
  6. When you finish entering all the data for the first record, click anywhere in the row below to save the record.
  7. After entering so many records as per your requirement you have to save the table

PSEB 9th Class Computer Notes Chapter 5 Introduction to MS-Access

Creating Tables in design view:

In Design view, the Object window consists of two panes. The field Entry pane, located at the top of the window, is used to enter each field’s name, data type, and description. The field properties pane, located at the bottom of the window, is used to specify the field’s properties. The properties available in the Field properties pane depend on the data type assigned.
PSEB 9th Class Computer Notes Chapter 5 Introduction to MS-Access 5

To create a table in Design view:

On the create tab, in the Table Design button. A New, blank table opens in the object window in Design view.
PSEB 9th Class Computer Notes Chapter 5 Introduction to MS-Access 6
1. In the field name column, type a name for the first field. Field names can be up to 64 characters long. They can include any combination of letters, numbers, spaces, and brackets etc.
2. In the data type column click the down arrow and select a data type from the list).
3. In the description column, type a description for the field.
4. Repeat steps 2 through 4 to add additional fields to the table. After entering the all fields save the table.

Setting a primary key:

A primary key consists of one or more fields that uniquely identify each record in the table there are several advantages to setting a primary key.

To set a primary key follow these steps:
1. Click the row selector of the field you want to designate as the primary key.
PSEB 9th Class Computer Notes Chapter 5 Introduction to MS-Access 7
2. In the design tab, in the tools group, click the primary key button. A key icon appears to the left of the field that you specify as the primary key.

PSEB 9th Class Computer Notes Chapter 5 Introduction to MS-Access

Saving tables:

To save a table for the first time:
1. On the quick access toolbar, click the save button. The save as dialog box opens
2. In the table name box, type a name for the table.
PSEB 9th Class Computer Notes Chapter 5 Introduction to MS-Access 8
Click the ok button. The table appears in the tables list in the navigation pane.

Closing database
To close a database:
Click the file tab, and then click close database.

Exiting access
To exit access 2010:
1. Click the file tab, and then click exit. Or, click the close button in the upper- right corner of the program window.
2. Another option is to exit Access is Press ALT+F4 key together. With this option you will exit from access in very easy way

Forms:

Forms are used for entering, modifying, and viewing records. The reason forms are used so often is that they’re an easy way to guide people into entering data correctly.

Creating forms:

It is always very convenient to work in forms. It is more comfortable easier and popular to enter data by forms that by datasheet view. Forms can be prepared by following two methods.

Create a form to display your data
1. To create a quick screen in MS Access 2010 simply go to the navigation pane and click to highlight the table you wish to base the form on.
2. Now click on the create tab.
PSEB 9th Class Computer Notes Chapter 5 Introduction to MS-Access 9
3. In the forms section click on the button named ‘Form’.
PSEB 9th Class Computer Notes Chapter 5 Introduction to MS-Access 10
4. MS Access creates a nice simple form. Click on any of the text boxes to position the cursor and edit the data.
At the bottom you have navigation buttons to move you from record to each record

PSEB 9th Class Computer Notes Chapter 5 Introduction to MS-Access

Sorting:

1. Result could be sorted by Name or by the marks of the students who were appear in exam
2. Students could be sorted by name or by the roll no.
3. Students could be sorted by class.
You can sort both text and numbers in two ways: in ascending order and descending order. Ascending means going up, so an ascending sort will arrange numbers from smallest to largest and text from A to Z.

Descending means going down, or largest to smallest for numbers and Z to A for text. The default ID number sort that appears in your tables is an ascending sort, which is why the lowest ID numbers appear first.
PSEB 9th Class Computer Notes Chapter 5 Introduction to MS-Access 11

Steps to sort student table are as follows:
1. Select a field in the cell you want to sort by. In student table, we will sort by student name.
2. Click the Home tab on the Ribbon, and locate the Sort & Filter group.
3. Sort the field by selecting the Ascending or Descending command.
(a) Select Ascending to sort text A to Z or to sort numbers from smallest to largest.
(b) Select Descending to sort text Z to A or to sort numbers from largest to smallest.
PSEB 9th Class Computer Notes Chapter 5 Introduction to MS-Access 12
The table will now be sorted by the selected field.
To save the new sort, click the Save command on the Quick Access toolbar.

Data Filters:

Filters is the concept in MS-Access which allow you to view only the data you want to see. The filter then searches all of the records in the table, finds the ones that meet your search criteria, and temporarily hides the other data.

Filters are useful because they allow you to look upon on specific records without any distraction by the uninterested data. Viewing this data with a filter would be far more convenient than searching for it in a large table.
PSEB 9th Class Computer Notes Chapter 5 Introduction to MS-Access 13
Follow these steps to apply filter:
To create a filter
1. Click the drop-down arrow next to the field you want to filter by.
(A drop-down menu with a checklist will appear. Only checked items will be included in the filtered results. Use the following options to determine which items will be included in your filter)
1. Select and deselect items one at a time by clicking their check boxes.
Here, we will deselect all of the options except for Class .
2. Click Select All to include every item in the filter. Clicking Select All a second time will deselect all items.

2. Click Blank to set the filter to find only the records with no data in the selected field.
Click OK. The filter will be applied.

PSEB 9th Class Computer Notes Chapter 5 Introduction to MS-Access

Reports:

Reports allow you to print assembled data in a custom layout. You can create reports based on tables and/ or queries. There are several methods for creating a report. We will focus on the Reports wizard.

To create a report:
(i) Click on the Create tab and then select Report Wizard from the Reports group.
PSEB 9th Class Computer Notes Chapter 5 Introduction to MS-Access 14
1. Click on the down arrow beside the Tables/Queries selection window and choose the table or query you’re basing your report on.

2. Add fields – (All the fields from your selected tables/ queries appear in the Available Fields: window.)
1. To add fields to the Selected Fields window, one-at-a-to move all available fields into the Selected Fields window at once.
2. To remove individual fields from Selected Fields, click on each field and press to remove all fields, press
3. When done, click Next.
PSEB 9th Class Computer Notes Chapter 5 Introduction to MS-Access 15
3. When done, click Next.
(You can select a sort order for up to four fields. Click on the down arrow to select a field and then choose ascending or descending order.)
PSEB 9th Class Computer Notes Chapter 5 Introduction to MS-Access 16
4. When done, click Next and select layout options.
PSEB 9th Class Computer Notes Chapter 5 Introduction to MS-Access 17
5. Click Next and add title to the form.
PSEB 9th Class Computer Notes Chapter 5 Introduction to MS-Access 18
PSEB 9th Class Computer Notes Chapter 5 Introduction to MS-Access 19
6. Click finish to finish the repeat.
PSEB 9th Class Computer Notes Chapter 5 Introduction to MS-Access 20

PSEB 12th Class History Notes Chapter 4 Guru Nanak Dev Ji’s Life and His Teachings

This PSEB 12th Class History Notes Chapter 4 Guru Nanak Dev Ji’s Life and His Teachings will help you in revision during exams.

PSEB 12th Class History Notes Chapter 4 Guru Nanak Dev Ji’s Life and His Teachings

Early Career of Guru Nanak Dev Ji:

  • Guru Nanak Dev Ji was born on 15th April, 1469 A.D. at Rai Bhoi Ki Talwandi.
  • The name of his father was Mehta Kalu Ji and the name of his mother was Tripta Ji.
  • Guru Nanak Dev Ji was quite serious and thoughtful by nature since his childhood.
  • Guru Sahib’s teachers were surprised to see his spiritual knowledge.
  • Guru Nanak Dev Ji’s father tried to keep him busy in work through various occupations but Guru Ji showed no interest in them.
  • At the age of 14 years, he was married to Sulakhni Ji, the daughter of Mool Chand, a resident of Batala.
  • At the age of 20 years, he was employed at the Modikhana (foodgrain store) at the Sultanpur Lodhi.
  • While at Sultanpur Lodhi, Guru Nanak attained enlightenment while bathing in the Bein rivulet.
  • He was 30 years old at that time.

Chapter 4 Guru Nanak Dev Ji’s Life and His Teachings

Udasis of Guru Nanak Dev Ji:

  • After attaining enlightenment in 1499 A.D., Guru Nanak Dev Ji set out on long travels (Udasis) in India and in foreign countries.
  • He spent 21 years in these travels or Udasis.
  • The main objective of the Udasis of Guru Nanak Dev Ji was to remove the ignorance of the people and to give the message of the unity of Godhead and universal brotherhood of mankind.
  • Guru Nanak Dev Ji started his first Udasi in 1499 A.D. with Bhai Mardana.
  • Guru Nanak Dev Ji travelled Saidpur, Talumba, Kurukshetra, Panipat, Delhi, Haridwar, Gorakhmata, Banaras, Kamrup, Gaya, Jagannath Puri, Lanka and Pakpattan.
  • Guru Nanak Dev Ji started his second Udasi at the end of 1513 A.D.
  • In this Udasi Guru Ji travelled the Hilly states, Kailash Parbat, Ladakh, Kashmir, Hasan Abdal, and Sialkot.
  • During his third Udasi, which was started at the end of 1517 A.D., Guru Nanak Dev Ji travelled to Multan, Mecca, Madina, Baghdad, Kabul, Peshawar, and Saidpur.
  • Thousands of people became his followers, being greatly impressed by his personality and his teachings.

Chapter 4 Guru Nanak Dev Ji’s Life and His Teachings

Teachings of Guru Nanak Dev Ji:

  • Guru Nanak Dev Ji’s teachings were simple but impressive.
  • Guru Nanak Dev Ji believed in one God only.
  • According to Guru Nanak Dev Ji, God is the Greater, Sustainer and Destroyer of the world.
  • He is without form and omnipotent.
  • According to him, Maya is the biggest obstacle in the way of man to attaining salvation.
  • Haumai (Ego) is the root cause of man’s all troubles.
  • Guru Ji vehemently opposed casteism and hollow customs and traditions.
  • Guru Ji raised their voice to uplift the status of women in society.
  • Guru Ji emphasized the recitation of Nam.
  • He regarded the Guru as the most important mean to reach God.

Chapter 4 Guru Nanak Dev Ji’s Life and His Teachings

Immessed in Eternal Light:

  • Guru Nanak Dev Ji immessed in Eternal Light on 22 September 1539 A.D.
  • Before his immersion in Eternal Light, he nominated Bhai Lehna Ji as his successor.

PSEB 12th Class History Notes Chapter 2 Sources of the History of the Punjab

This PSEB 12th Class History Notes Chapter 2 Sources of the History of the Punjab will help you in revision during exams.

PSEB 12th Class History Notes Chapter 2 Sources of the History of the Punjab

Difficulties Regarding the History of Punjab:

  • The Janam Sakhis related to the Sikh Gurus have several inconsistencies in them.
  • The Muslim writers who were fanatics and biased have distorted the facts of history.
  • The Sikhs did not have any time for writing their own history during this period of anarchy.
  • Moreover, whatever meager historical books had already been written were destroyed during the foreign invasions.
  • Several historical sources were also destroyed during the partition of Punjab in 1947 A.D.

Kinds of Sources:
The main sources related to the history of Punjab are as follows:

PSEB 12th Class History Notes Chapter 2 Sources of the History of the Punjab

Religious literature of the Sikhs:

  • The Adi Granth Sahib gives us the most authentic information of this period.
  • It was compiled by Guru Arjan Dey Ji in 1604 A.D.
  • The Dasam Granth Sahib is a compilation of the works of the tenth Guru, Guru Gobind Singh Ji, and the poets of his court, of these, the ‘Bachitar Natak’ and ‘Zafarnama’ are historically the most important.
  • The 39 Vars written by Bhai Gurdas Ji give us important information about the lives of the first six Gurus and the famous pilgrimages.
  • Among the Janam Sakhis based on the life of Guru Nanak Dey Ji, the most important are Puratan Janam Sakhi,
  • Meharban’s Janam Sakhi, Janam Sakhi of Bhai Bala, and Janam Sakhi of Bhai Mam Singh Ji.
  • The Hukamnamas issued by the Sikh Gurus provides us with very valuable information about the contemporary society of these 34
  • Hukamnamas were issued by Guru Gobind Singh Ji and 23 Hukamnamas were issued by Guru Tegh Bahadur Ji.

Historical and Semi-Historical works in Punjabi and Hindi:

  • ‘Sri Gursobha’ gives us an eye-witness account of the events that took place from 1699 to 1708 A.D.
  • Gursobha was written by Sainapat a famous court poet of Guru Gobind Singh Ji in 1741 A.D.
  • Sikhan Di Bhagatmala provides valuable information about the social contention of the periods of the Gurus.
  • It was written by Bhai Maui Singh Ji.
  • ‘Bansavali Nama’ written by Kesar Singh Chhibbar describes the incidents from the Guru period to the middle of the 18th century.
  • ‘Gurpratap Suraj Granth’ written by Bhai Santokh Singh and ‘Prachin Panth Prakash’ written by Rattan Singh Bhangu has an important position in the construction of the history of Punjab.

Historical works in Persian:

  • ‘Babarnama’ written by the Mughal emperor Babar gives us historical information about Punjab at the beginning of the 16th century.
  • Ain-i-Akbari’ and ‘Akbarnama’ written by Abul Fazi give us information about the relations of Akbar with the Sikh Gurus.
  • Dabjstan-j-Mazahib’ written by Mubid Zulfiqar Ardistani gives us valuable information pertaining to the Sikh Gurus’.
  • Khulasat-ut.Tawarjkh’ written by Sujan Rai Bhandari, ‘Muntakhibut-Lubab’ written by Khafi Khan, and ‘Jang Nama’ written by Qazi Nur Muhammad gives us information about the Punjab of the ‘8th century’.
  • Umdat-ut-Tawarjkh’ written by Sohan Lai Suri and ‘Char-Bagh-i-Punjab’ written by Ganesh Das Wadhera gives us a detailed account of the incidents related to the reign of Maharaja Ranjit Singh.

PSEB 12th Class History Notes Chapter 2 Sources of the History of the Punjab

Bhat Vahis:

  • The Bhats used to write down all the important events with dates in their Vahis.
  • These give us useful information about the lives of the Sikh Gurus, their travels, and their battles.

Khalsa Darbar Records:

  • These are the official records of Maharaja Ranjit Singh’s time.
  • They were written in Persian and their number is more than 1 lakh.
  • The Khalsa Darbar Records give useful information on the life and times of Maharaja Ranjit Singh.

Writings of Foreign Travellers and Europeans:

  • The writings of foreign travelers and Europeans contribute greatly to the construction of the history of Punjab.
  • Prominent among them are ‘A Journey from Bengal to England’ by George Forster, ‘Sketch of the Sikhs’ by Malcolm, ‘Origin of Sikh Power in the Punjab’ by H.T. Princep, ‘The Court and Camp of Ranjit Singji’ by Captain William Osborne, ‘The Punjab’ by Steinbach, ‘History of the Sikhs’ by J.D. Cunningham.

PSEB 12th Class History Notes Chapter 2 Sources of the History of the Punjab

Historical Buildings, Paintings, and Coins:

  • The historical buildings, paintings, and coins of Punjab are also very valuable sources for tracing out the history of Punjab.
  • The architecture of Khadur Sahib, Goindwal Sahib, Amritsar, Tarn Taran, Kartarpur, and Paonta Sahib, various forts, paintings in the Gurdwaras, and coins of Sikh leaders also throw ample light on the contemporary society.

PSEB 10th Class Computer Notes Chapter 6 Operating Systems

This PSEB 10th Class Computer Notes Chapter 6 Operating Systems will help you in revision during exams.

PSEB 10th Class Computer Notes Chapter 6 Operating Systems

An operating system is an integrated collections of programs that acts as an interface between user program and computer hardware. It takes control over the operation of the computer to the extent of being able to allow a number of programs to be run on the computer without user intervention.

Operating system provides an environment in which a user may execute programs. The primary goal of an operating system is to make computer system convenient to use. It controls execution of processes and handles interrupts so that user can easily proceed.

PSEB 10th Class Computer Notes Chapter 6 Operating Systems

Definitions of Operating System:

According to Rouse , “An operating system (OS) is the program that, after being initially Iqaded into the computer by a boot program, manages all the other programs in a computer.”

According to Computer Dictionary, “An operating system, or “OS,” is software that communicates with the hardware and allows other programs to run.” 1

According to Dictionary.com, “Operating system is the collection of software that directs a computer’s operations,controlling and scheduling the execution df other programs, andmanaging storage, input/output, and communication resources.”
PSEB 10th Class Computer Notes Chapter 6 Operating Systems Notes 1PSEB 10th Class Computer Notes Chapter 6 Operating Systems Notes 1

Services Provided by Operating System

An Operating System provides services to both the users and to the programs.

  • It provides programs an environment to execute.
  • It provides users the services to execute the programs in a convenient manner.

Following are a few common services provided by an operating system :

Program Execution

Operating systems handle many kinds of activities from user programs to system programs like printer spooler, name servers, file server, etc. Each of these activities is encapsulated as a process.A process includes the complete execution context (code to execute, data to manipulate, registers, OS resources in use).
Following are the major activities of an operating system with respect to program management:

  1. Loads a program into memory.
  2. Executes the program.
  3. Handles program’s execution.
  4. Provides a mechanism for process synchronization.
  5. Provides a mechanism for process communication.
  6. Provides a mechanism for deadlock handling.

PSEB 10th Class Computer Notes Chapter 6 Operating Systems

I/O Operation:

An I/O subsystem comprises of I/O devices and their corresponding driver software. Drivers hide the peculiarities of specific hardware devices from the users.
An Operating System manages the communication between user and device drivers. .
1. I/O operation means read or write operation with any file or any specific I/O device.
2. Operating system provides the access to the required I/O device when required.

File System Manipulation:

File manipulation refers to wide variety of operations which are available and allow us to delete ,copy, move. As we know a file represents a collection of related information. Computers can store files on the disk (secondary storage), for longterm storage purpose. Examples of storage media include magnetic tape, magnetic disk and optical disk drives like CD, DVD.

Each of these media has its own properties like speed, capacity, data transfer rate and data access methods. A file system is normally organized into directories for easy navigation and usage. These directories may contain files and other directions.
Following are the major activities of an operating system with respect to file management:
Program needs to read a file or write a file.

  1. The operating system gives the permission to the program for operation on file.
  2. Permission varies from read-only, read-write, denied and so on.
  3. Operating System provides an interface to the user to create/delete files.
  4. Operating System provides an interface to the user to create/ delete directories.
  5. Operating System provides an interface to create the backup of file system.

Communication:

In case of distributed systems which are a collection of processors that do not share memory, peripheral devices, or a clock, the operating system manages communications between all the processes. Multiple processes communicate with one another through communication lines in the network. The OS handles routing and connection strategies, and the problems of contention and security.

Following are the major activities of an operating system with respect to communication:
Two processes often require data to be transferred between them:
1. Both the processes can be on one computer or on different computers, but are connected through a computer network.
2. Communication may be implemented by two methods, either by Shared Memory or by Message Passing.

Error Detection:

Errors can occur anytime and anywhere. An error may occur in CPU, in I/O devices or in the memory hardware.
Following are the major activities of an operating system with respect to error detection:
1. The OS constantly checks for possible errors.
2. The OS takes an appropriate action to ensure correct and consistent computing.

PSEB 10th Class Computer Notes Chapter 6 Operating Systems

Resource Management

In case of multi-user or multi-tasking environment, resources such as main memory, CPU cycles and files storage are to be allocated to each user or job.
Following are the major activities of an operating system with respect to resource management :
1. CPU scheduling algorithms are used for better utilization of CPU.
2. It acts like a resource manager. The OS manages all kinds of resources using schedulers.

Protection:

Considering a computer system having multiple users and concurrent execution of multiple processes, the various processes must be protected from each other’s activities.Protection refers to a mechanism or a way to control the access of programs, processes, or users to the resources defined by a computer system.

Following are the major activities of an operating system with respect to protection:
1. The OS ensures that all access to system resources is controlled.
2. The OS ensures that external I/O devices are protected from invalid access attempts.
3. The OS provides authentication features for each user by means of passwords.

Types of Operating Systems:

An operating system may be single user or multi user. There are mainly five types of operating systems:

Batch Processing

Batch processing is one of the oldest method’s of running programs that are being used by many data processing centers for processing their jobs. It is based on the idea of automatic job-to-job transaction facility provided by almost all operating systems. In a batch mode, each user prepares his program off-line and submits it to the computer center.

A computer operator collects the program which have been punched on cards and stacks one program or job on top of another. When a batch of programs have been collected, the operator loads this batch of program into the computer. At one time they are executed one after another. Finally the operator retrieves the printed outputs of all these jobs and return them to the concerned users.

An operating system does the following activities related to batch processing:
1. The OS defines a job which has predefined sequence of commands, programs and data as a single unit.
2. The OS keeps a number a jobs in memory and executes them without any manual information.
3. Jobs are processed in the order of submission, i.e., first come first served fashion.
4. When a job completes its execution, its memory is released and the output for the job gets copied into an output spool for later printing or processing.
PSEB 10th Class Computer Notes Chapter 6 Operating Systems Notes 2

Advantages:
1. Batch processing takes much of the work of the operator to the computer.
2. Increased performance as a new job get started as soon as the previous job is finished, without any manual intervention.

PSEB 10th Class Computer Notes Chapter 6 Operating Systems

Disadvantages:

  • Difficult to debug program.
  • A job could enter an infinite loop.
  • Due to lack of protection scheme, one batch job can affect pending jobs.

Time-Sharing:

A real-time system is defined as a data processing system in which the time interval required to process and respond to inputs is so small that it controls the environment. The time taken by the system to respond to an input and display of required updated information is termed as the response time. So in this method, the response time is very less as compared to online processing.

Real-time systems are used when there are rigid time requirements on the operation of a processor or the flow of data. A real-time operating system must have well-defined, fixed time constraints, otherwise the system will fail.

Distributed Operating System

Distributed systems use multiple central processors to serve multiple real-time applications and multiple users. Data processing jobs are distributed among the processors accordingly.The processors communicate with one another through various communication lines (such as high-speed buses or telephone lines). These are referred as loosely coupled systems or distributed systems. Processors in a distributed system may vary in size and function. These processors are referred as sites, nodes, computers, and so on. The advantages of distributed systems are as follows:

  1. With resource sharing facility, a user at one site may be able to use the resources available at another.
  2. Speedup the exchange of data with one another via electronic mail.
  3. If one site fails in a distributed system, the remaining sites can potentially continue operating.
  4. Better service to the customers.
  5. Reduction of the load on the host computer.
  6. Reduction of delays in data processing.

Network Operating System:

A Network Operating System runs on a server arid provides the server the capability to manage data, users, groups, security, applications, and other networking functions. The primary purpose of the network operating system is to allow shared file and printer access among multiple computers in a network, typically a local area network (LAN), a private network or to other networks.
Examples of network operating systems include Microsoft Windows Server 2003, Microsoft Windows Server 2008, UNIX, Linux, Mac OS X, Novell NetWare and BSD.

The advantages of network operating systems are as follows:

  1. Centralized servers are highly stable.
  2. Security is server-managed.
  3. Upgrades to new technologies and hardware can be easily integrated into the system.
  4. Remote access to servers is possible from different locations and types of systems.

The disadvantages of network operating systems are as follows:

  1. High cost of buying and running a server.
  2. Dependency on a central location(server) for most operations.
  3. Regular maintenance and updates are required.

Multi Programming. Multi Programming Operating System is the name given to the interleaved execution of two or more different and independent programs by the same computer. Interleaving of programs mean chain of programs that are either in running phase, ready or blocked phase. It is an efficient way to improve the system performance.

Multi programming approach permits more than one job to utilize the CPU time at any moment by applying the scheduling techniques like first come first serve, shortest job first etc . The more the number of programs requesting for system resources, resource utilization would be better. The operating system picks up any of the programs as scheduled and starts execution.

An OS does the following activities related to multiprogramming.

  1. The operating system keeps several jobs in memory at a time, This set of jobs is a subset of the jobs kept in the job pool.
  2. The operating system picks and begins to execute one of the jobs in the memory.
  3. Multiprogramming operating systems monitor the state of all active programs and system resources using memory management programs to ensure that the CPU is never idle, unless there are no jobs to process.

PSEB 10th Class Computer Notes Chapter 6 Operating Systems

Advantages:

High and efficient CPU utilization.
User feels that many programs are allotted CPU almost simultaneously.

Disadvantages:

CPU scheduling is required.
To accommodate many jobs in memory, memory management is required.

Real-Time Processing:

It is a form of operating system that are used in environments where a large number of events mostly external to computer systems,- must be accomplished and proceed in a short time or within certain deadline. Processing method is one that controls the environment by receiving the data, processing them and taking action or returning results sufficiently quickly to affect the functioning of the environment at that time. The term real time refers to the technique of updating files with the transaction data immediately after the event that it relates. It is quite different from batch processing that processors related data in batches at predefined periods of time.

Real time systems are basically on-line systems with one specialty in inquiry processing. The response of the system to the inquiry itself is used to control the activity. An on line production data collection system that simply accepts input and utilizes it for payroll and costing purposes cannot be terminated as real time but on the other hand, the system is designed to provide immediate information to monitor the production processes.

Differences Between Dos and Windows:

The differences between DOS and Windows are as follows:

DOS Windows
1. It is single User operating system 1. It is multi User operating system
2. It is single-tasking operating system 2. It is Multi-tasking operating system
3. It does not time-sharing 3. It uses time-sharing
4. Keyboard is main input device 4. Keyboard and Mouse are mainly used.
5. It is character user interface 5. It is graphical user interface
6. It is light software. 6. It is heavy software
7. It doesn’t support multimedia 7. It supports multimedia.
8. It is mainly used to manage files 8. It is used for many purposes.
9. It can be stored on floppy disk 9. It cannot be stored on floppy disk.
10. Its production is slopped. 10. It is still developed by Microsoft.
11. It can connect to internet 11. It cannot connect to internet
12. It cannot use mouse 12. It can use mouse for input.

PSEB 10th Class Computer Notes Chapter 6 Operating Systems

LINUX:

Just like Windows XP, Windows 7, Windows 8, and Mac OS X, Linux is an operating system. An operating system is software that manages all of the hardware resources associated with your desktop or laptop. To put it simply – the operating system manages the communication between your software and your hardware. Without the operating system (often referred to as the “OS”), the software wouldn’t function.

Linux is one of popular version of UNIX operating System. It is open source as its source code is freely available. It is free to use. Linux was designed considering UNIX compatibility. Its functionality list is quite similar to that of UNIX.

Basic Features

Following are some of the important features of Linux Operating System:

  • Portable: Portability means softwares can works on different types of hardwares in same way. Linux kernel and application programs supports their installation on any kind of hardware platform,
  • Open Source: Linux source code is freely available and it is community based development project. Multiple teams works in collaboration to enhance the capability of Linux operating system and it is continuously evolving.
  • Multi-User: Linux is a multiuser system means multiple users can access system resources like memory/ ram/ application programs at same time.
  • Multi Programming: Linux is a multiprogramming system means multiple applications can run at same time.
  • Hierarchical File System: Linux provides a standard file structure in which system files/ user files are arranged.
  • Shell: Linux provides a special interpreter program which can be used to execute commands of the operating system. It can be used to do various types of operations, call application programs etc.
  • Security: Linux provides user security using authentication features like password protection/ controlled access to specific files/ encryption of data. Components of Linux System

Linux Operating System has primarily three components

  • Kernel: KemeHs the core part of Linux. It is responsible for all major activities of this operating system. It consists of various modules and it interacts directly with the underlying hardware. Kernel provides the required abstraction to hide low level hardware details to system gr application programs.
  • System Library: System libraries are special functions or programs using which application programs or system utilities accesses Kernel’s features. These libraries implement most of the functionalities of the operating’system and do not requires kernel module’s code access rights.
  • System Utility: System utility programs are responsible to do specialized, individual-level tasks.

Computer Security:

Computer Security is the process of detecting and preventing any unauthorized use of your laptop/computer. It involves the process of safeguarding against trespassers from i jing your personal or office based computer resources with malicious intent or for their own gains, or even for gaining any access to them accidentally.

PSEB 10th Class Computer Notes Chapter 6 Operating Systems

Install Antivirus Protection:

Antivirus and anti-malware software are essentials in your arsenal of online security weapons as well.

Anti Spyware Software:

Spyware are different from viruses. Because they do not destroy our hardware or software. They get installed in the system and send senstive information like passwords, credit card information etc. to server. We need latest Anti spyware software to identify and remove spywares.

Use Strong Passwords:

Strong passwords are vital to good online security. Make your password difficult to guess by:

  • using a combination of capital and lower-case letters, numbers and symbols
  • making it between eight and 12 characters long
  • avoiding the use of personal data
  • changing it regularly
  • never using it for multiple accounts
  • using two-factor authentication.

Create a password policy for your business to help staff follow security best practice. Look into different technology solutions to enforce your password policy, e.g., scheduled password reset.

Update Programs and Systems Regularly:

Updates contain vital security upgrades that help protect against known bugs and vulnerabilities. Make sure that you keep your software and devices up-to-date to avoid falling prey to criminals.

PSEB 10th Class Computer Notes Chapter 6 Operating Systems

Put Up a Firewall:

Firewalls are effectively gatekeepers between your computer and the internet, and one of the major barriers to cyber threats such as viruses and malware. Make sure that you set up your firewall devices properly; otherwise they may not be fully effective.

PSEB 10th Class Computer Notes Chapter 5 Desktop Publishing

This PSEB 10th Class Computer Notes Chapter 5 Desktop Publishing will help you in revision during exams.

PSEB 10th Class Computer Notes Chapter 5 Desktop Publishing

Desktop publishing is a term coined after the development of a specific type of software. It’s about using that software to combine and rearrange text and images and creating digital files. Desktop publishing (also known as DTP) combines, a personal computer and WYSIWYG(What You See Is What You Get) page layout software to create publication documents on a computer for either large scale publishing or small scale local multifunction peripheral output and distribution.

PSEB 10th Class Computer Notes Chapter 5 Desktop Publishing

Desktop Publishing:

The term “desktop publishing” is commonly used to describe page layout skills. However, the skills and software are not limited to paper and book publishing. The same skills and software are often used to create graphics for point of sale displays, promotional items, trade show exhibits, retail package designs and outdoor signs. Desktop publishing refers to the act of using software on a personal computer to combine mixed-media elements such as text, photos, or charts into printable documents.

Once created, these documents can either be printed on a home printer or outsourced to a professional printing service. One of the key features is the ability to preview a page layout before prior to printing, via a feature called What You See Is What You Get (WYSIWYG), pronounced wizzy-wig. While this Was once taught through advanced education programs, advancements in software means that the process is less difficult to master than in past decades.

Definition of DTP

Desktop publishing is the process of using a computer and specific types of software to combine text, images and artwork to produce documents properly formatted for print or visual consumption.

DTP opened visual communication to all with the advent ofdesktop publishing software and affordable desktop computers, a wide range of people, including non-designers and others without graphic design experience, suddenly had the tools to become desktop publishers.

Freelance and in-house graphic designers, small business owners, secretaries, teachers, students and individual consumers do desktop publishing. Non-designers can create visual communications for commercial digital printing, printing on a printing press, and for desktop printing at home or in the office.

PSEB 10th Class Computer Notes Chapter 5 Desktop Publishing

Visual Communication using DTP

Now, anyone can do desktop publishing. We dont need any professional for that. Designing and printing both are included in desktop publishing but usually it is considered a process of creating a digital file of product only.

Desktop-Publishing Software:

The primary software used in desktop publishing is page layout software and web design software. Graphics software, including drawing software, a photo editor and word processing software, are also important tools of the graphic designer or desktop publisher. The list of available software is lengthy, but some software is seen on just about everyone’s must-have list depending on what they are trying to accomplish.

Page Layout Software for Printing:

  • Adobe InDesign
  • PagePlus Series from Serif
  • QuarkXpress

Page Layout Software for Office:

1. Microsoft Office Suite Apple iWork Suite

Graphics Software:

  • Adobe Illustrator
  • Corel Draw
  • Inkscape

Photo Editing Software:

  • Adobe Photoshop
  • Corel PaintShop Pro

Web Design Software:

  • Adobe Dreamweaver CC
  • Adobe Muse

PSEB 10th Class Computer Notes Chapter 5 Desktop Publishing

Word Processing and Desktop Publishing:

The similarities between the two are:

  • Both deal with text that can be formatted.
  • Both can work with tables and pictures.
  • Both have many similar features like WordArt, Clip Art, and text styles.

The Differences between DTP and Word Processing:

Word processing involves creation, editing, and printing of text while desktop publishing involves production of documents that combine text with graphics. Word processing is difficult to layout and design as compared to desktop publishing. Thus, desktop publishing is used to work on things like newsletters, magazines, adverts, and brochures where layout is important. Word processing documents are common for simple memos, letters, manuscripts, and resumes.

The difference between desktop publishing and word processing software is as follows:

Desktop Publishing Word Processing
1. DTP involves production of documents that combine text and graphics.

2. Layout designing is easy.

3. Main products are newsletter, magazines adverts etc.

4. They involve more graphics.

5. Its products are coloured mainly.

Word processors deals with creation, edition of text.

Layout designing is difficult.

Main products are documents and resumes.

They involve more text.

They are used to get black and white documents.

Wysiwyg Feature:

A WYSIWYG is a system in which content (text and graphics) can be edited in a form closely resembling its appearance when printed or displayed as a finished product, such as a printed document, web page, or slide presentation. WYSIWYG is especially popular for desktop publishing.

With desktop publishing, we can increase productivity, minimize production cost, enhance the appearance of our documents, improve the level of creativity, reduce the time taken for printing and produce customized documents. The best part about DTP is that we can create professional-looking documents, without the need for graphic designer.

PSEB 10th Class Computer Notes Chapter 5 Desktop Publishing

Graphics:

A graphic is an image or visual representation of an object. Therefore, computer graphics are simply images displayed on a computer screen. Graphics Eire often contrasted with text, which is comprised of characters, such as numbers and letters, rather than images.

Computer graphics can be either two or three-dimensional. Early computers only supported 2D monochrome graphics, meaning they were black and white. Eventually, computers began to support color images. While the first machines only supported 16 or 256 colors, most computers can now display graphics in millions of colors.

Bitmap or Raster Graphics

Bitmap graphics consist of many tiny dots called pixels. It is possible to edit each individual pixel using bitmap graphics software like Adobe Photoshop. Examples of bitmap graphics are a digital photograph or a scanned image. The amount of detail we can draw depends on the number of pixels per square inch (PSI). Since the computer has to store information about every single pixel in the image, the file size of a bitmap graphic is often quite large. When we resize a bitmap graphic, it tends to lose its quality.

Vector Graphics

Vector graphics are based on control points which are connected by lines and curves called vector paths or vectors. Vector paths can be used to make shape objects. It is possible to edit each shape object separately, for example, to change the shape, outline type (stroke), fill, size or position.
PSEB 10th Class Computer Notes Chapter 5 Desktop Publishing Notes 1
The difference between vector and bitmap graphics is as follows :

Vector Graphics Bitmap Graphics
1. Vector Graphics are passed on Vector Paths

2. They do not lose quality

3. The file size is less

4. These are used in advanced programmes

They are based on Pixels

They lose quality when expended

The file size is more.

These are used for basic programmes

Margins:

A margin is the area between the main content of a page and the page edges. The margin helps to define where a line of text begins and ends. A page to include top, Bottom, Left and Right margin.

The default margins are usually defined as one inch on all sides. However, depending on the requirement, the margins may vary. These margins create a frame around the content of the page so that the text does not run all the way to the edges. The white space along the edges of the document makes the page look cleaner and the text is easier to read.
PSEB 10th Class Computer Notes Chapter 5 Desktop Publishing Notes 2

Gutter Position

A gutter margin setting adds extra space to the side margin or top margin of a document that we plan to bind. A gutter margin helps ensure that text isn’t hidden by the binding.

PSEB 10th Class Computer Notes Chapter 5 Desktop Publishing

Fonts:

A font is a set of printable or displayable text character s in a specific style and size or we can say that a font is a specific typeface of a certain size and style. A typeface is a set of characters of the same design. These characters include letters, numbers, punctuation marks, and symbols. Some popular typefaces include Arial, Helvetica, Times, and Verdana. While most computers come with a few dozen typefaces installed, there are thousands of typefaces available.
PSEB 10th Class Computer Notes Chapter 5 Desktop Publishing Notes 3

Printer:

A printer is an external output device that takes data from a computer and generates output on a paper in the form of graphics/text. There are two types of printers.

Impact Printers

An impact printer has a head that contains pins to make, contact with the paper. It usually forms the print image by striking its pins on a inked ribbon against the paper. Following are some examples of impact printers:

1. Dot-Matrix Printers. The dot-matrix printer uses print heads containing from 9 to 24 pins.
These pins produce patterns of dots on the paper to form the individual characters. The 24 pin dot-matrix printer produces more dots that a 9 pin dot-matrix printer, which results in much better quality and clearer characters.
PSEB 10th Class Computer Notes Chapter 5 Desktop Publishing Notes 4
The general rule is, the more pins, the clearer the letters on the paper. The pins strike the ribbon individually as the print mechanism moves across the entire print line in both directions, i.e, from left to right, then right to left, and so on. The user can produce a color output with a dot-matrix printer (the user will change the black ribbon with a ribbon that has color stripes). Dot-matrix printers are inexpensive and typically print at speeds of 100-600 characters per second.

2. Daisy-Wheel Printers. It is called daisy-wheel printer because the print mechanism looks like a daisy; at the end of each “Petal” is a fully formed character which produces solid-line print. A hammer strikes a “petal” con-taining a character against the ribbon, and the character prints on the paper. Its speed is slow typically 25-55 characters per second.
PSEB 10th Class Computer Notes Chapter 5 Desktop Publishing Notes 5

3. Line Printers. Line printers, or line-at-a-time printers, use special mecha¬nism. that can print a whole line at once; it can typically print the range of 1,200 to 6,000 lines per minute. Drum, chain, and band printers are line-at- a-time printers.

PSEB 10th Class Computer Notes Chapter 5 Desktop Publishing

Non-Impact Printers:

Non-impact printers do not use a striking device to produce characters on the paper; and because these printers do not hammer against the paper its much quieter. Following are some non-impacted printers:

1. Ink-Jet Printers

Ink-jet printers work in the same fashion as dot-matrix printers in the form images or characters with little dots. However, the dots are formed by tiny droplets of ink.
PSEB 10th Class Computer Notes Chapter 5 Desktop Publishing Notes 6
Ink-jet printers form characters on paper by spraying ink from tiny nozzles through an electrical field that arranges the charged ink particles into characters at the rate of approximately 250 characters per second. The ink is absorbed into the paper and dries instantly. Various colors of ink can also be used.

2. Laser Printers

A laser printer works like a photocopy machine. Laser print¬ers produce images on paper by directing a laser beam at a mirror which again directs the beam onto a drum. The drum has a special coating on it to which toner (an ink powder) sticks. Using patterns of small dots, a laser beam conveys information from the computer to a positively charged drum to become neutralized. From all those areas of drum which become neutralized, the toner detaches. As the paper rolls by the drum, the toner is transferred to the paper printing the letters or other graphics on the paper. A hot roller bonds the toner to the paper.
PSEB 10th Class Computer Notes Chapter 5 Desktop Publishing Notes 7
Laser printers use buffers entire page at a time. When a whole page is loaded, it will be printed. The speed of laser printers is high and it print quietly without producing much noise. Many home-use laser printers can print eight pages per minute, but faster and print approximately 21,000 lines per minute, or 437 pages per minute (if each page contains 48 lines). When high speed laser printers were introduced they were expensive.

PSEB 10th Class Computer Notes Chapter 8 Microsoft Publishers-II

This PSEB 10th Class Computer Notes Chapter 8 Microsoft Publishers-II will help you in revision during exams.

PSEB 10th Class Computer Notes Chapter 8 Microsoft Publishers-II

Advertisements:

Microsoft Publisher is a desktop publishing program that is part of the Microsoft Office suite. With Microsoft Publisher, you can create many professional-quality custom publications such as brochures, greeting cards, and signs. The publisher also allows you to create items that are larger than standard printer paper sizes, such as banners, by making them on multiple sheets of paper you can print and assemble.

PSEB 10th Class Computer Notes Chapter 8 Microsoft Publishers-II

Brochure:

A brochure is an informative paper document often used for advertising that can be folded into a template, pamphlet, or leaflet. Brochures are promotional documents, primarily used to introduce a company, organization, products, or services to the public. Brochures are distributed inside newspapers, handed out personally, or placed in brochure racks in high-traffic locations. They may be considered grey literature.

Now day’s brochures are also available in electronic format and are called e-brochures. They have the added benefit of having unlimited distribution and cost savings when compared to traditional paper brochures.

The most common types of single-sheet brochures are the bi-fold (a single sheet printed on both sides and folded into halves) and the tri-fold (the same, but folded into thirds). A bi-fold brochure results in four panels (two panels on each side), while a tri- fold results in six panels (three panels on each side).

Booklet brochures are made of multiple sheets most often saddle stitched stapled on the creased edge, or perfect bound like a paperback book, and result in eight or more panels.

How to Create a Banner in Microsoft Publisher:

Microsoft Publisher is a tool that enables users at home to create professional looking publications, banners, and flyers. Real estate professionals use Publisher to create banners and flyers for homes they are trying to sell. Banners can be made for special occasion parties, or advertising and marketing products. Save time and money by creating your own wonderful banner.
PSEB 10th Class Computer Notes Chapter 8 Microsoft Publishers-II Notes 1
Following are steps that are used to create a banner in Microsoft Publisher:
1. In the Publication Types list, click Banners.
2. In the Banners gallery, do one of the following:

  • Click the banner design that you want – for example, Apartment for Rent.
  • Click View templates from Microsoft Office Online, click the banner design that you want to download, and then go to step 4.

3. Under Customize and Options, select any options .that you want.
4. Click Create.
5. In the Format Publication task pane, do any of the following:

  • To change the width and height of the banner, click Change Page Size in the task pane, and then choose the page size, or click Create custom page size.
  • To change the banner’s color scheme, click Color Schemes in the task pane, and then choose the scheme that you want.
  • To change the banner’s font scheme, click Font Schemes in the task pane, and then choose the scheme that you want.

6. In your banner, replace the placeholder text and pictures with the text and pictures or other objects that you want.
7. On the File menu, click Save As.
8. In the Save in box, click the folder where you want to save the new banner publication.
9. In the File name box, type a name for your banner publication.
10. In the Save as type box, click Publisher Files.
11. Click Save.

PSEB 10th Class Computer Notes Chapter 8 Microsoft Publishers-II

How to Create a Newsletter in Microsoft Publisher:

Newsletters are a great way to share information with family, friends and customers. Microsoft Publisher’s newsletter function provides complete design and layout flexibility. Use the program to select a design layout and color scheme, format text and insert images quickly and easily to create a custom newsletter.
PSEB 10th Class Computer Notes Chapter 8 Microsoft Publishers-II Notes 2
Following are steps that are used to create a newsletter in Microsoft Publisher:
1. Choose a newsletter design. On the main menu click “File” and then “New” to open the Catalog Window. Click the “Newsletters” option on the Wizards menu, select the desired design from the options and then click “Start Wizard.” Enter your contact information in the window prompt. Delete the sample text in the field to leave a field blank. Click “Include color scheme in this set” and select the desired colors. Click “Update” when finished. Complete the steps in the Wizard or click “Finish” to exit the Newsletter wizard.

2. Enter the text. Place the mouse inside the desired text box and click once. Type the text or cut and paste from a Word document. Format the font style, size and appearance by using the main menu at the top of the screen. Place the mouse over the border until the word “Resize” appears. Click and drag the border to the desired size.

3. Insert images by clicking “Insert” and then “Picture.” Select from clip art or photos stored on your computer. Resize the image. Click and drag the mouse diagonally towards the center of the photo until the photo reaches the desired size.

4. Edit the text box-and image layouts as needed. Create a new text box by , clicking the text frame tool (“A”). Place the mouse in the desired location, then click and drag to create the desired box size. Place the mouse over the item until the word “Move” appears. Click and hold down the mouse and drag to the desired location. Place the mouse inside the box and click once, on the main menu click “Edit” and then “Delete Object” if you need to delete a text box.

5. Change the number of pages in the newsletter as needed. Click “Insert” and then “Page” and follow the instructions in the pop up window. Click the desired page number at the page display on the bottom of the screen and click “Edit” and then “Delete Page” to remove pages.

6. Finalize the newsletter. Proofread and spell check. Print the document on paper and place the pages in order to ensure the page numbers line up properly before copying. This is helpful if you plan to copy two-sided or convert to 11 × 17 inch paper.

PSEB 10th Class Computer Notes Chapter 8 Microsoft Publishers-II

How to create a Poster in Microsoft Publisher:

To create a poster in Publisher, create a banner, and then change the page size to the poster size that you want. Given ahead are steps that are used to create a poster in Microsoft Publisher:
PSEB 10th Class Computer Notes Chapter 8 Microsoft Publishers-II Notes 3
1. In the Publication Types task pane, click Banners, do one of the following:

  • Under Banners, click Blank Sizes.
  • Click View templates from Microsoft Office Online, click the poster design that you want to download, and then go to step 3.

2. Under Blank Sizes, click the paper size thafyou want, or click Create custom.
3. Page size and create a custom page size.
4. Click Create.
5. In the Format Publication task pane, do any of the following:

  • To change the color scheme, click Color Schemes in the task pane, and then choose the scheme that you want.
  • To change the font scheme, click Font Schemes in the task pane, and then choose the scheme that you want.

6. On the File menu, click Save As.
7. In the Save in box, click the folder where you want to save the new publication.
8. In the File name box, type a name for your publication.
9. In the Save as type box, click Publisher Files.
10. Click Save.

How to Make a Decorative Envelope Using Microsoft Publisher:

Special occasion cards get piled away with the rest of the mail when they are in plain envelopes with no special decal or design to separate them from others. Design a special envelope using Microsoft Publisher for a single use birthday card envelope or to use on all your mailings, so that people will see your envelopes and know that they are from you. Relatives and close friends will also appreciate the time you took to make their envelope special.
PSEB 10th Class Computer Notes Chapter 8 Microsoft Publishers-II Notes 4
Following are steps that are used to create an envelope in Microsoft Publisher:

1. Launch Microsoft Publisher and click “Publications for Print.” A list of options will appear underneath this section. You can choose from several pre-made envelopes. These envelope designs are for several different types of businesses.

2. Delete any option or area of the envelope you do not need for your purpose. Select the area by left-clicking on the area once and it will bring up a border around the box. Right-click on the selection and choose “Delete.”

3. Move any of the pre-selected fields by dragging it to where you would prefer it. Select the area; move the mouse pointer till it becomes a four arrowed figure. Left click and hold the mouse button and drag the box to where you want it.

4. Fill in the address fields by highlighting and entering in the correct information.

5. Insert pictures and designs to the envelope to make it more personal. Click “Insert” and “Clipart”, “Object” or “Textbox.” Recipients of your letters will love having designs on the envelopes that display your personality.

6. Choose to make your own envelope from scratch by selecting “Blank Print Publication” from under the New section on the left-hand side of the Microsoft Publisher screen. Select “File”, “Page Setup” and a new window will appear. Hit “Envelope” from under the Publication Type and adjust any height and width dimensions you may need. This is easy, just measure your envelope.

7. Insert and edit till your message is clear from the design on your envelope. Try printing in grayscale and on regular paper before printing on any envelopes. This will save money and trees.

PSEB 10th Class Computer Notes Chapter 8 Microsoft Publishers-II

Greeting Card/ Invitation Card/ Compliment Card:

A greeting card/ Invitation card/ compliment card is a piece of card or high quality paper expressing friendship or any other sentiment. Although these cards are usually given on special occasions such as Birthdays, Anniversary, Christmas, Diwali or other holidays, they are also sent to convey thanks or express other feelings. These cards are usually packaged with an envelope, come in a variety of styles. There are both mass-produced as well as handmade versions that are distributed by hundreds of companies. These can also be designed with the help of MS Publisher.

Award Certificates:

  1. An award is something given to a person, a group of people, or an organization in recognition of their excellence in a certain field. An award may be accompanied by trophy, title, certificate, medal, badge, pin, or ribbon.
  2. Certification refers to the confirmation of certain characteristics of an object, person, or organization. This confirmation is often, but not always, provided by some form of external review, education, assessment, or audit.
  3. Certificates of achievement, merit, and honor can be powerful tools when used at the right time and presented in the right way.
  4. Receiving an award certificate gives a person the warm glow of knowing someone took the time to acknowledge them. And being the person who motivates others can be rewarding, too.
  5. Award certificates may include: Community Service Award, Great Job, Good Behavior or Course Completion. MS Publisher provides many templates for creating Award Certificates.

Envelops:

An envelope is a common packaging item, usually made of thin flat material. It is a flat paper container with a sealable flap designed to enclose a flat object, such as a letter, card or document. Traditional envelopes are made from sheets of paper. They are most commonly used for enclosing and sending mail (letters) through a prepaid-postage postal system. We can create envelop with MS publisher. After selecting the required envelop design, edit the color scheme and click on Create button. Now we can edit the envelop information and save it as a publication.

Labels:

A label is a piece of paper, polymer, cloth, metal, or other material affixed to a container or product. Information printed directly on a container or item can also be considered labeling. Labels have many uses, including providing information on a product’s origin, manufacturer (e.g., brand name), use, shelf- life and disposal etc. Many hazardous products such as poisons or flammable liquids must have a warning label.

Labels can be used for:

  1. Products. Permanent product labels need to remain secure throughout the life of the product. For example, a food label must.be secure until the food has been used.
  2. Packaging. Packaging may have labeling attached to or integral with the package. These may carry pricing, barcodes, UPC (Universal Product Code) identification, usage guidance, addresses, advertising, recipes, and so on.
  3. Assets: In industrial or military environments, asset labeling is used to clearly identify assets for maintenance and operational purposes. Such labels are frequently made of engraved Trifoliate or a similar material.
  4. Textiles. Garments normally cany separate care/treatment labels which typically indicate how the item should be washed for e.g. machine washed or diy cleaned. Textile labels may be woven into the garment or attached, and may be heat resistant, colorfast, washable. Printed labels are an alternative to woven labels.
  5. Mailing. Mailing labels identify the addressee, the sender and any other information which may be useful in transit.
  6. Security Labels. They are used for authentication, theft reduction, and protection against counterfeit and are commonly used on ID cards, credit cards, packaging, and products from CDs to electronics to clothing.
  7. Labels may be used for any combination of identification, information, and warning, instructions for use, environmental advice or advertising. They may be stickers, permanent or temporary labels or printed packaging.

PSEB 10th Class Computer Notes Chapter 8 Microsoft Publishers-II

Letterhead:

It is stationery with a printed heading. The heading usually consists of a name and an address, a logo or corporate design, and sometimes a background pattern. The term “letterhead” is often used to refer to the whole sheet imprinted with such a heading. Many companies and individuals prefer to create a letterhead template in a word processor or other software application. This generally includes the same information as pre-printed stationery, but at lower cost. Letterhead can then be printed on stationery or plain paper as needed or sent electronically.

Calendar:

A calendar is a system of organizing days for social, religious, commercial or administrative purposes. This is done by giving names to periods of time, typically days, weeks, months and years. Calendars are also used to help people manage their personal schedules, time and activities.

Calendars are also used as part of a complete timekeeping system: date and time of day together to specify a moment in time.

Resumes:

A resume provides a summary of our education, work history, credentials, and other accomplishments and skills. There are also optional sections, including a resume objective and career summary statement. Resumes are the most common document requested of applicants in job applications. A resume should be as concise as possible. Typically, a resume is one page long, although sometimes it can be as long as two pages. Often resumes include bulleted lists to keep information concise.

Curriculum vitae(CV)

Like resume, a curriculum vitaE (CV) provides a summary of one’s experience and skills. Typically, CVs are longer than resumes – at least two or three pages. CVs include information on one’s academic background, including teaching experience, degrees, research, awards, publications, presentations, and other achievements. CVs are thus much longer than resumes, and include more information, particularly related to academic background. We can create CVs with the help of MS Publisher in same way we have created Resumes above.

PSEB 10th Class Computer Notes Chapter 8 Microsoft Publishers-II

Menus:

In a restaurant, there is a menu of food and beverage offerings. A menu may be a list from which guests use to choose options available. Basically Menu is the main way to give or take order from guest. Guest may order properly to see the menu and be aware about our food and price. MS Publisher provides many templates for creating a Menu.

Signs:

A sign is a piece of paper, clothe, wood or any other material which is painted with pictures or words and which gives some information about a particular place, product, or event. We can create any of these sign using publisher.

Paper Folding Projects:

The paper folding templates include patterns for paper airplanes and origami projects alike. They include pages (that may require trimming) with “fold- lines” and others with instructions to create our paper masterpieces. We can enjoy these Paper Folding Projects in our leisure time and can make some creative things.

Microsoft Publisher offers templates for kids. These templates.consist of different paper folding projects like airplanes, boats, cups, and more.

PSEB 10th Class Computer Notes Chapter 7 Microsoft Publishers-I

This PSEB 10th Class Computer Notes Chapter 7 Microsoft Publishers-I will help you in revision during exams.

PSEB 10th Class Computer Notes Chapter 7 Microsoft Publishers-I

Microsoft Publisher is a desktop publishing application from Microsoft. It is an entry-level application, differing from Microsoft Word in that the emphasis is placed on page layout and design rather than text composition and proofing. The current version is Microsoft Publisher 2010 for Windows, there is no version for other operating systems like Linux and Unix.

PSEB 10th Class Computer Notes Chapter 7 Microsoft Publishers-I

Microsoft Publisher:

Microsoft Publisher is differing from Microsoft Word in that the emphasis is placed on page layout and design rather than text composition and proofing.

Microsoft Publisher is a business desktop publishing program that enables users to easily create professional-looking marketing materials. The Microsoft Publisher offers more design options with over 2,000 professionally designed publication templates and hundreds of design elements for users to mix and match within their publications.

A flexible wizard model allows users to work the way they want, and automated design expertise helps them achieve professional results without design expertise. Stronger office integration and a complete print-to-web publishing solution enable users to deliver professional-looking results.

Differences between Word and Publisher:

The differences in Word and Publisher are as follows:

Word Publisher
1. Word is an example of Word Processing Software 1. Publisher is an example of DTP software
2. Word Document has extension .doc 2. Publisher document has extension of .pub
3. Word is mostly used of common typing purpose 3. Publisher is used for designing professional objects.

How to Start Publisher:

Microsoft Publisher is a great tool to create posters for personal or professional events.
PSEB 10th Class Computer Notes Chapter 7 Microsoft Publishers-I Notes 1PSEB 10th Class Computer Notes Chapter 7 Microsoft Publishers-I

Creating a Publication:

We can create new publication by following methods:

  1. By using blank layout.
  2. By using installed templates.
  3. By using online templates.

Creating a publication using blank layout:

Following are the steps to start with a blank publication:

  1. Click the File menu, and then click New.
  2. Under Available Templates, click a blank publication template, and then click Create.
  3. Now, we can create a publication with our own specifications in publication. We can also add the objects to the blank layout like text, picture, word art, and auto shapes etc.
  4. After creating publication, save the publication by clicking on save option in File menu. The Save As dialog box appears, type a name for bur publication, select the folder in which you want to save it, and then click save button. The publication is saved with a .pub extension.
  5. Close the publication by clicking close button in File menu. A dialog box appears, if we want to save the changes, then click yes button, otherwise click no.
  6. Before exiting Publisher, we should close all the publications, then Click Exit in File menu or click cross button on title bar.

Components of publisher window:

There are three most important components that we should remember as we work within Publisher 2010. These are:
PSEB 10th Class Computer Notes Chapter 7 Microsoft Publishers-I Notes 2

PSEB 10th Class Computer Notes Chapter 7 Microsoft Publishers-I

Components of Publisher Window:

1. Quick Access Toolbar:

The quick access toolbar is a customizable toolbar that contains commands that we may want to use. We can place the quick access toolbar above or below the ribbon. To change the location of the quick access toolbar, click on the arrow at the end of the toolbar and click Show below the Ribbon. We can also add items to the quick access toolbar, simply click on any item and if will be added to our toolbar.

2. Ribbon:

The ribbon is the panel at the top portion of the document it has six tabs: Home, Insert, Page Design, Mailings, R9eview, and View. Each tab is divided into groups

3. File Window:

When we click on the File menu, we are brought to the Info screen. It looks like that our document is gone, but it is not. As we click on the options in the File menu, the screen will change accordingly.

  1. Save: Save the file as a 2010 file.
  2. Save As: Allows you to choose a different file type (i.e. PDF, Word).
  3. Open: Browse to a Publisher file.
  4. Close: Closes the file but keeps Publisher running.
  5. Info: Edit Business information, use Design Checker, and set Commercial Print Information.
  6. Recent: List of our recently used Publisher files.
  7. New: New Publication Screen.
  8. Print: Print Options.
  9. Save & Send: Options for saving e mailing the file.
  10. Help. Microsoft Help.
  11. Options. Set default options.
  12. Exit. Closes Publisher (file and program).

Working in Publication:

1. Adding Text:

  1. From the Home or Insert Tab, select Draw Text Box.
  2. Place the cursor on the page where we want to draw a text box. _
  3. Click and drag the cursor across the page to the desired size. The size of the text box can be changed after we have drawn it.
  4. When we let go of the left click on the mouse, we are brought to the format tab which gives us more options for the text box.
  5. Type the text in text box.

2. Editing Text:

1. Highlight the text you want to edit.
2. If you are not brought to the Text Box Tools Format Tab, then select it.
3. Text Group Options.
(a) Text Fit! Defines how the text will fit in the text box: Best Fit, Shrink Text on Overflow, Grow Text Box to Fit, Do Not Auto-Fit.
(b) Text Direction. Changes direction to horizontal or vertical.
(c) Hyphenation. Changes hyphenation behavior of selected text.
4. Font Group Options. Style, Font Size, Bold, Italics, Underline, Text Spacing, & Color.
5. Alignment Group Options. Text Box Alignment, Columns, Margins.
6. Effects Group Options. Shadow, Outline, Engrave, Emboss.

3. Change Style of Text Box:

  1. Click on Text box.
  2. Click on Drawing tools on Format tab.
  3. Use shape style group options to change style, shape fill, shape outline, or shape change options.
  4. Use arrange group options to change Wrap Text, Bring Forward or Backward, Rotate.

4. Inserting Clip Art:

To insert the clip art follow these steps:

  1. Click on the Insert Tab.
  2. Click Clip Art. The Clip Art window appears on the right side of the screen.
  3. Type in a keyword.
  4. Click Go.
  5. Browse through the results.
  6. When we find clipart, click on the thumbnail from the Clip Art Window.
  7. The Clip Art image will then appear on our page.

PSEB 10th Class Computer Notes Chapter 7 Microsoft Publishers-I

5. Inserting a Picture:

To insert a picture follow these steps:

  1. Click on the Home or Insert tab.
  2. Click on Picture.
  3. Browse to the location of the picture we have saved on our computer.
  4. Select the picture and click Insert.

6. Insert a Shape:

To insert a shape follow the steps:

  1. Click on the Home or Insert tab.
  2. Click on Shapes.
  3. Select a shapeirom the drop down menu.
  4. On the page, click and drag to create the shape.
  5. The shape appears on the page, and we are brought to the Drawing Tools.
  6. Format tab. From this tab, we can edit the style, fill, outline, and more.

7. Text Wrapping:

Text wrapping is the way our object is set on the page in reference to the text. To do text wrapping following are the steps:

  1. Select the object.
  2. Click on the Format tab (Text Box, Drawing or Picture Format).
  3. In the arrange group, click on Wrap Text. This will determine how text will be arranged around the object.

8. Resizing Objects:

Resizing enables us to resize our objects :
1. Click on the object.
2. Click and drag the handles to resize.
(a) The corner handles will resize the object proportionally.
(b) The handles centered on the lines of the box will stretch the object vertically and horizontally.
The green handle allows us to rotate the object.

9. Moving Objects:

  1. Click on the object.
  2. Place our cursor over the solid line so that we see the crosshairs.
  3. Click and drag the object to the desired location.

10. Deleting Objects:

We can also delete any object, if do not require it in our publication.
1. Click on the object.
2. Press Delete button on the keyboard.

PSEB 10th Class Computer Notes Chapter 7 Microsoft Publishers-I

Frame:

Most publications are divided into several different areas called frames. A frame can contain a variety of objects such as graphics, tables, or text boxes. Frames can be resized, moved and manipulated to suit your needs.

Working with Frames:

Each publication is composed of different frames, such as text frames, picture frames, table frames, and shape/object frames. Click on different areas of the publication to identify the different frames. Handles, little circles on the corners and sides of the frame will appear. The handles help us to show which frame we have selected. These are also used in resizing frames.

Handles:

When we click on a frame, small circles appear around the edge of the frame. These are called handles. We can click and drag on the handles to resize our frame. To move a Picture Frame:
1. Click on the picture.
2. When our cursor turns into a four directional arrow, click and drag the picture frame to the desired location.

To move a Text Frame:
1. Click on the text frame.
2. Rest our cursor near the border of the text frame. When our cursor turns into a four directional arrow, click and drag the text frame to the desired location.

Resizing Frames:

To resize a picture frame:

1. Click on the picture.
2. Rest our cursor on a corner handle. When our cursor turns into a diagonal line with arrows on the ends, click and drag inwards at a diagonal to make it smaller or outwards at a diagonal to make it larger. Using comer handles to resize pictures allows us to keep the picture’s proportions.

To resize a Text Frame:

1. Click on the text frame.
2. Rest your cursor on one of the handles. When your cursor turns into a line with arrows on the ends, click and drag inwards or outwards to resize the text area.

Deleting Frames:

Right-click on the frame that we would like to delete. Select Delete Object from the list of choices. .

Inserting Additional Text Frames

1. Click on Text box from the Insert Tab.
2. Click and drag over an area of the publication.
3. Type the text ypu want to appear.

Viewing Pages in Our Publication:

There are three ways to view pages in a publication:
1. Click on the thumbnails of the pages in the publication from the Page Navigation Window on the left hand side of the screen.
2. From the View tab, we can switch from, single page to two-page spread view as well as choose other viewing options.

Template:

A Template is a tool used in Publisher to help us easily create basic publications. The template has a set of prechosen design styles that we can use as it is or customize as we see fit.

Each template is customizable. Click on a template from the center. On the right side of the screen, we can change the template colors, fonts, and more. Once we have found a template and customized it, click Create. After we click create, we can edit the text boxes, images, and shapes that have been set up by the template as needed.

PSEB 10th Class Computer Notes Chapter 7 Microsoft Publishers-I

Customizing a Template

1. Changing the Design of a Template
To change the design template follow the following steps:
1. Click on the Page Design tab.
2. To change the entire template, click Change Template.

  • Choose a template from the pop-up window. If we are currently working in a template and changing to a different template, the information we have entered will conform to the new template.

3. To change the color scheme, browse through the color schemes available in the Schemes group.

  • However the mouse over the color scheme to preview.
  • To select a color scheme, click on it.

4. To change the font scheme, click on Fonts in the Schemes group.

  • Browse through the available font schemes.
  • However the mouse over the font scheme to preview.
  • To select a font scheme, click on it.
  • If we want to create our own font scheme, click.

Page Design:

1. Click the tab Page Design if needed, to change templates, adjust page margins, apply ruler guides, or apply built-in color schemes to the chosen template.
2. We can use the Built-in Ruler Guide templates to help in aligning text boxes, pictures, or other objects. To apply a Built-in Ruler Guide template click on the command Guides in the group Layout, and then choose a template.
3. To add a vertical or horizontal ruler guide repeat the above step, then click on Add Vertical or Horizontal Ruler Guide.
4. To add additional guides, move the mouse pointer oyer the vertical or horizontal ruler, drag the guide in the desired direction when the pointer changes to a two headed arrow.

Creating a publication with Templates:

We can create a publication in Publisher by using template.
Available Publication Types: Publisher 2010 allows us:
1. To apply built-in templates.
2. To apply our own custom templates.
3. To search from a variety of templates available on Office.com. Office.com provides a wide selection of popular Publisher templates, including newsletters and flyers.

To find and apply a template in Publisher 2010, dp the following:
1. On the File tab, click New.
2. Under Available Templates, do one of the following:

  • To use a template that we already have installed, click My Templates, click the template that we want, and then click Create.
  • To use one of the pre-built templates installed in Publisher, under Most Popular or More Templates, click the category that we want, click the template that we want, and then click Create.
  • To find and apply a template on Office.com, under Most Popular or More Templates, click the category that we want, click the template that we want, and then click Download.

PSEB 10th Class Computer Notes Chapter 7 Microsoft Publishers-I

Creating Publication with Installed Templates:

We can create any publication easily with the help of the installed templates available in Publisher. We can use pre designed templates in publisher and create so many publications like Brochures, Business Cards, Calendars, Greeting Cards, Labels, Newsletters, Postcards, Advertisements, Award Certificates, Banners, Business Forms, Catalogs, E-mail, Envelops, Flyers, Gift certificates, Invitation cards, Letterhead, menus, resumes and so many quick publications.

Creating Publication with Online Templates:

We can create any publication easily with the help of the internet because we have also a option to create publication using online templates. For online templates, internet facility is available in our system. To find and apply a template on online Templates, click the category that we want, click the template that we want, and then click Download, and then apply that template.

Saving Your Publication:

There are two basic ways to save our publication. First one is to Point and click on the save icon on our toolbar.
Or
Follow these steps:

  1. Click on the File menu and Save As.
  2. When the Save As Dialogue Box appears Click Browse and find the location on computer where we want the file saved.
  3. Type the name of our publication in the File Name field.
  4. Click on the Save button.

PSEB 10th Class Computer Notes Chapter 7 Microsoft Publishers-I

Printing Your Publication:

There are two basic ways to print your publication.
First one is to click on the print icon on toolbar. This will print one copy of our publication with the default print options.
Or

  1. Click on the File menu and click Print.
  2. When the print window appears, select the desired number of copies.
  3. Choose any other Print Settings- All Pages, Selection, Current Page or Custom Range Manually enter page numbers we want to print How many pages print per sheet of paper Paper Size 1-sided or 2-sided printing Click Print.