
This PSEB 7th Class Computer Notes Chapter 3 Microsoft Word Part-I will help you in revision during exams.
PSEB 7th Class Computer Notes Chapter 3 Microsoft Word Part-I
Introduction:
Word processing is the most commonly used software in computers, with the help of this, we can create documents, save the documents, print the documents and also we can edit the already created document. Let’s learn about these features of word processing.
Wort Processing:
We make a lot of mistakes when typing a document with the help of typewriter, which we can’t correct again, we have to type the document again to make it better, but word processing gives us a facility through which we can easily correct our mistakes in typed documents without having to retype them.
Word processing is a process by which we can create, save and print any type of document in a computer and it can be used anytime in the future and can be edited if required.
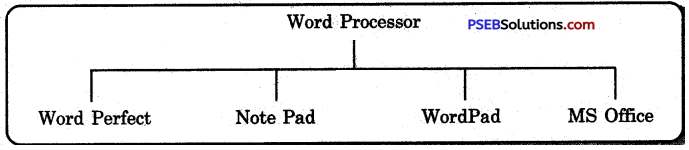
The software that is used for word processing process called word processor. For example: MS Word, NotePad, WordPad and word perfect all are word processors.
Features of Word Processing:
Following are the features of word processor:
- A word processor provides an easier and faster method to type the text.
- It offers so many styles, size, color, effects for text.
- Using a word processor, you can apply editing operations to the text.
- It stores all your documents for. future use.
- It allows you to insert photos, music, background etc. into the document.
- It can move any document from one place to another with the help of cut, copy, and paste option.
- You can delete, edit, update the data in the pre-created document at any time.
- It helps us to find and correct mistakes in the typed text.
- It also provide the facility to check the grammar mistakes in the typed text.
![]()
Word Processing – Software:
A word processor is a software program capable of creating, saving and printing typed documents. Today, the word processor is one of the most widely used software programs on the computer, it can create different types of files and to create these files requires different software such as WordPad, Microsoft Office, Microsoft Word, etc are some examples of word processors.
Today in this lesson we will read about MS Word word processor.
Microsoft Word
Microsoft Word is a word processor software program published by Microsoft Company also called MS Word, WinWord, Word. Microsoft Word provides advanced features for creating and saving different types of documents. For example, we can create letter typing, emails, reports, tables, etc. in Microsoft Word.
Some of the basic applications of MS Word are as follows:
- Creating and saving a text document.
- Editing and formatting existing documents.
- Make the document attractive with the help of different styles, size, colors and effects.
- Creating graphical documents with images, charts, smart art etc.
- Identify grammatical and spelling errors in the document.
Features of Microsoft Word
Some of the special features of Microsoft word are as follows:
- MS Word allows us to include text anywhere in the document.
- We can delete any word, line or page from the document as easily as we erase the words written on paper.
- We can cut and copy the text and paste it anywhere in the same document or any other document.
- MS Word allows us to set the page margin and page size according to our needs.
- We can add Bold, Italic and Underline effects to the text.
- We can change the size, style, color of the text.
- We can add header on the top of pages and footer on the bottom of the page.
- We can add pictures, chart, graphs and smart art.
- We can convert the text into tables.
- You can also set different margins in a document and also determine the different locations to start a paragraph.
- It also provides us with the facility of macro. This is a list of many commands with which our time is saved.
- MS Word also provides us the facility of spelling checks. It shows a red line below the words that are incorrect.
- MS Word also provides us the facility of grammar checks.
- It also provides Find and Replace option.
- It also provides the facility of dictionary with which we can find many words with the same meaning and use them in our document.
Starting MS Word
The steps to start MS Word are as follows:
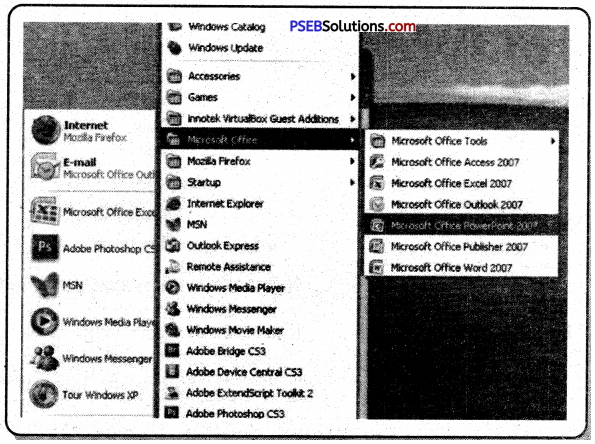
1. First, click the Start button

on the desktop
2. Now click on All Program from the popup menu as shown in the picture below.
3. Now click MS Office! MS Word.
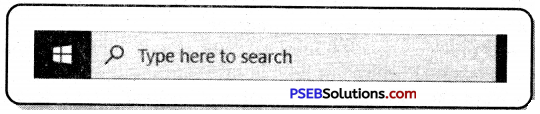
Or
Type “Word” in the search bar as shown in the picture below and press Enter key from the keyboard
Components of MS Word Window
When you start the Word application then a window opens on the screen as shown in the picture below. Let us understand the different important parts of this window.
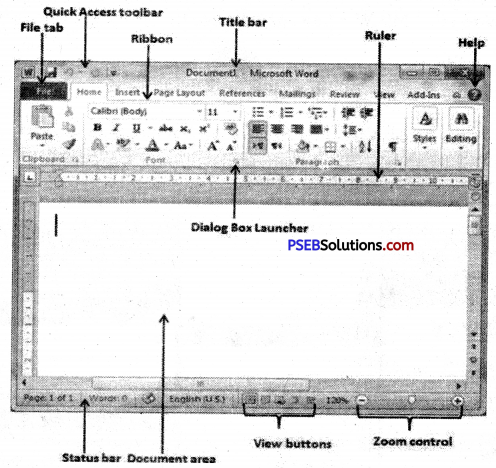
1. File Menu: This option is available in the upper left corner of the window, it contains many of the following commands:
(a) Home: It has options like font color, font size, font style, alignment, bullets, line spacing, etc. All the basic elements that someone might need to edit their document are available in the Home option.
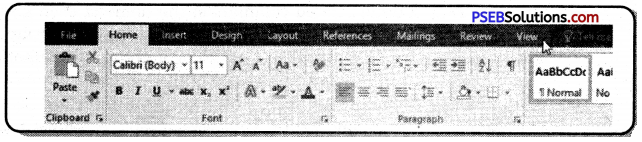
(b) Insert: Tables, sizes, images, charts, graphs, headers, footers, page numbers, etc. are available in insert options.
(c) Design: The template (pre-created document design) or the design in which you want your document to be created can be selected under the Design tab.
(d) Page layout: Under the Page Layout tab we can find the options such as Margins, Orientation, Columns, Lines, Indentations, Spacing, etc.
(e) Reference: This tab is most useful for those who are preparing thesis or writing books or working on a long document. Footnote, table of content, bibliography, captions etc. options can be found under this tab.
(f) Review: Spell check, grammar, thesaurus, word count, language, translation, comments, etc. can all be tracked under the Review tab.
2. Quick Access Toolbar: Collection of buttons that provide one click access to commonly used commands such as Save, Undo or Redo. You can also customize this according to your preference.
3. Title Bar: This bar window is at the top of the screen and the name of the open document appears on it. Above this bar are three control buttons:
![]()
minimize, maximize, close button
4. Ribbon: The ribbon consists of three organized commands:
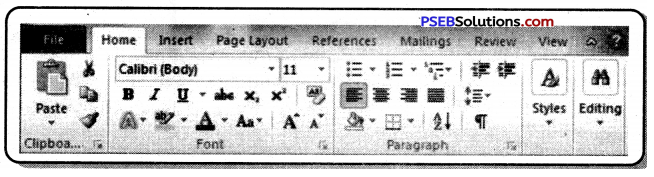
(a) Tabs: These appear on the top of the ribbon and contain groups of related commands. For example: home, insert, page layout ribbon, references, mailings Review etc. all are tabs. We have already read about them.
(b) Group: They handle related commands; the name of each group appears below the group on the ribbon. For example, a group of commands related to fonts (Font Group) or a group of commands related to alignment (paragraph group), etc.
(c) Commands: Commands appear in each group as described above. For example: Cut, Copy, Paste, Font Size, Color, Alignment etc. are all commands.
5. Ruler: There are two rulers in the word window – a horizontal ruler and a vertical ruler. The horizontal ruler appears just below the ribbon and is used to set margins and tab stops. The vertical ruler appears on the left side of the word window and is used to determine the vertical position of the page.
6. Help: The help icon can be used whenever you want to get help related to MS Word. It provides excellent tutorials on various topics related to Word.
7. Document Area: Right below the ruler, there is a large space called the text area. This is the area where we type our document; the blinking line in this area is called the insertion point which indicates that your typing will start from this place.
8. Status Bar: It displays the information of the document as well as the position of the insertion point. From left to right, this bar contains information on the total number of pages and words, document language, etc.
9. Dialog Box Launcher: This appears as a very small arrow in the lower-right corner of most groups of the ribbon. Clicking this button opens a dialog box or task pane that provides more options about the group.
10. View buttons: At the bottom right of the window screen is a set of 5 buttons that allow us to view the document in a different view.
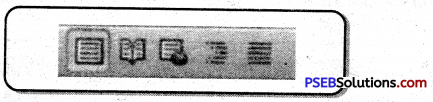
(a) Prints Layout: This is the default document view in Word. The Print Layout view shows the document as it would appear after printing.
(b) Full-Screen Layout View: This view opens the document to a full screen. This layout helps us to make our document easily readable above the screen.
(c) Web Layout: This view displays a document on the screen the way it will look when viewed in a Web browser if you saved it as a web page.
(d) Out Line View: The outline view shows the document as an outline form.
(e) Draft View: This is the most commonly used view, in this view we can edit our document very quickly and easily.
![]()
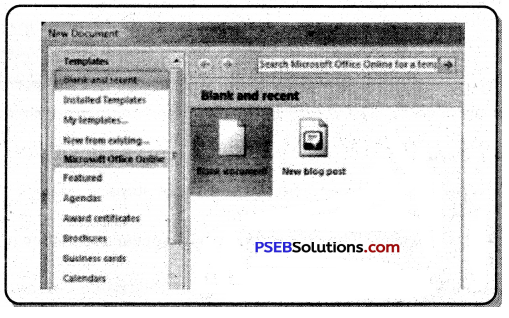
Creating a New Document
Follow these steps to create a new document:
- Click the office button and then click File menu
- Now click on New option from the drop down menu, as shown in the picture.
- A New Document dialog box will appears on the screen.
- Click Blank Document option from this dialog box and then Click Create Option as shown in picture.
- Now a blank document will appear on the screen
Or
You can create a new document by pressing the Ctrl + N keys from the keyboard.
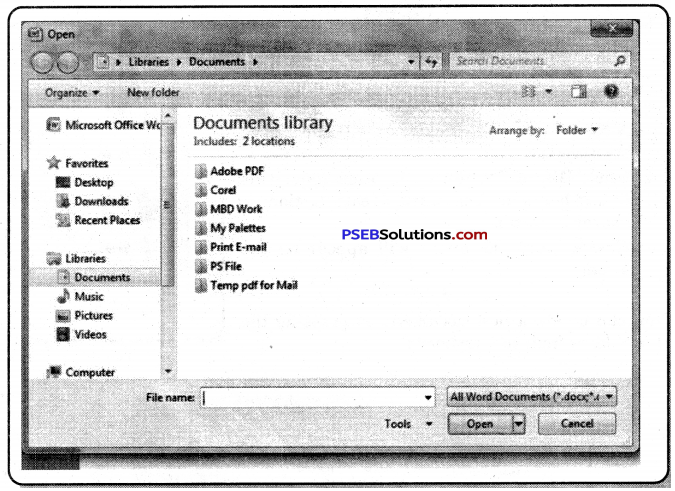
Open an Existing Document
Follow these steps to open an existing document:
- Click the File tab or Office Button.
- Click Open option. The Open dialog box appears.
- As shown in picture below select a document which you want to open and then Click Open button.
- Now your document will open on the screen.
Or
You can open an existing document by pressing the Ctrl + 0 keys from the keyboard.
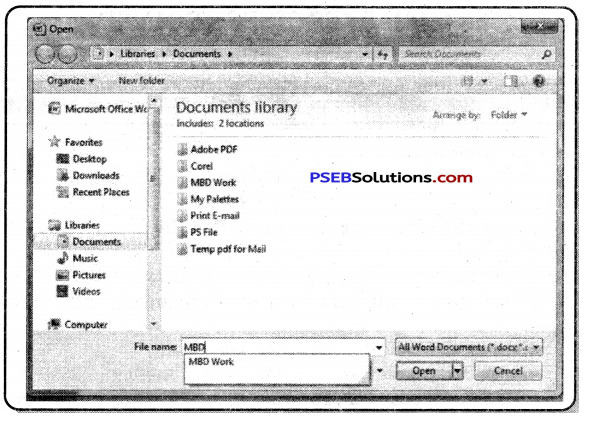
Saving a Document
To save a newly created document follows these steps:
- Click the File tab or Office Button.
- Click Save option. The Save dialog box appears. As shown in picture below.
- Now type the name of your document in File name box and then click Save button.
Or
You can also save your document by pressing the Ctrl + S keys from Keyboard Now your document is safe for future use.
![]()
Note:
- Word processing is a process by which we can create, save and print any type of document
- The software that is used for word processing process called word processor.
- MS Word, NotePad, WordPad and word perfect are all word processors.
- Microsoft Word is a word processor software program, provides advanced features for creating and saving different types of documents.
- Tabs appear on the top of the ribbon and contain groups of related commands.
- Group handle related commands; the name of each group appears below the group on the ribbon.
- The large area at the bottom of the ruler is called the text area. We can type our document in this text area.
- Text can be viewed on a computer screen before it is printed, errors can be detected and corrected.
- A dialog box launcher is present in the lower right corner of each group.
- Word allows us to view the document in 5 different views. Prints Layout. Full screen layout view, Web Layout, Out Line View, Draft view.