
Punjab State Board PSEB 7th Class Computer Science Book Solutions Chapter 5 Microsoft Word (Part-III) Textbook Exercise Questions and Answers.
PSEB Solutions for Class 7 Computer Science Chapter 5 Microsoft Word (Part-III)
Computer Guide for Class 7 PSEB Microsoft Word (Part-III) Textbook Questions and Answers
1. Fill in the Blanks
Question 1.
After selecting the picture tab appears.
(a) Format
(b) Page Layout
(c) insert
(d) View.
Answer:
(a) Format
Question 2.
For text wrapping, we can use option.
(a) Square
(b) Tight
(c) Behind Text
(d) All of these.
Answer:
(d) All of these.
![]()
Question 3.
To remove any unwanted parts of picture, option s used.
(a) Crop
(b) Rotate
(c) Group
(d) Compress.
Answer:
(a) Crop
Question 4.
Which of the following option is not available in the Adjust group of Format tab?
(a) Corrections
(6) Artistic Effects
(c) Remove Background
(d) Picture Styles.
Answer:
(d) Picture Styles.
Question 5.
We can find the number of words in the bar at the bottom of the window.
(a) Task Bar
(b) Status Bar
(c) Title Bar
(d) Scroll Bar.
Answer:
(b) Status Bar
![]()
2. Very Short Answer Type Questions
Question 1.
Which option splits the text into two or more Columns?
Answer:
The Columns option from the Page Setup group in the format tab divides the text into two or more sections.
Question 2.
Which page orientation sets the page in horizontal direction?
Answer:
Landscape Orientation.
Question 3.
Which option is used to group two or more images together so that they can be treated as a single object?
Answer:
Two or more images can be grouped together as one object using the Group command from the Arrange group in the Layout tab.
![]()
Question 4.
Which option can be used to change the colors of the picture in MS Word?
Answer:
From the Picture Format tab, the color of the picture can be changed with the Color option from the Adjust group.
Question 5.
Which option is used to count words in MS Word?
Answer:
Words can be counted using the Word Count option from the Proofing group in the Review tab or the Word Count Dialog box from the Status bar.
3. Short Answer Type Questions
Question 1.
What are Margins?
Answer:
A margin is the space between the text and the edge of the page. By default, a new document’s margins are set to Normal, which means it has a one-inch space between the text and each edge. Depending on your needs, Word allows you to change your document’s margin size.
![]()
Question 2.
What do you mean by Compress Picture?
Answer:
With this button the image can be compressed. To reduce the size of documents, pictures can be reduced in storage size. You can change the resolution of an image or delete a cropped part of an image.
Question 3.
Write about Reset Picture.
Answer:
If you want to remove all formatting changes to a picture in the document, “Reset Picture’ command will be used. This button is used to undo all formatting changes made to the picture and restore it to its original format.
- Select the picture.
- in the Format tab, click on the Reset picture option from the Adjust group.
Question 4.
What is Crop option?
Answer:
Crop button is used to delete the unwanted part of an image. When you crop an image, an unselected part of the picture is removed. Steps to crop the image are as follows:
- Select the image you want to crop. The Format tab appears.
- On the Format tab, click the Crop command.
- Black handles will appear around the image. Click, hold and drag a handle to crop the image.
- Click the Crop command again. The image will be cropped.
![]()
Question 5.
Give the name of two page orientation in MS Word.
Answer:
To change the position of a document from a portrait to a landscape, click this button. To change the position of the page, steps are as follows:
- Select the Page Layout tab.
- in the Page Setup group, click on the “Orientation” command.
- Click “Portrait” or “Landscape” to change the position of the page. Landscape format means the page is horizontal, while portrait format means it is vertical.
Question 6.
Write the name of various options available in the adjust group of Picture Tools Format tab.
Answer:
Correction, Picture Color, Artistic Effect, Compress Picture, Change Picture, Reset Picture, Remove Background.
4. Long Answer Type Questions
Question 1.
What is Watermark? Write steps to add watermark in a word document.
Answer:
Watermark: it is just like a stamp. it is used for confidential documents. A watermark is an image that appears blurred behind the text on a page. The steps to add a watermark to the document are given ahead:
- Open the document to which you want to include the water-mark.
- Click the Page Layout tab and then click the “Watermark” button to display a list of standard watermark options.
- You can select any available standard watermark by clicking on it. This will apply to all pages of the document.
![]()
Question 2.
Write the steps to run a Spelling and Grammar Check.
Answer:
To do Spelling and Grammar check, steps are as follows:
- From the Review tab, click the Spelling & Grammar command.
- The Spelling and Grammar dialog box will appear.
- This dialog box offer one or more suggestions for spellings and grammatical errors.
- You can select a suggestion and click “Change” to correct the error.
Question 3.
Explain the steps to Print a Document.
Answer:
Once you’ve created your document, you may want to print it to view and share your work offline. it’s easy to preview and print a document in Word using the Print option.
- On the File tab or Office button, click Print command.
- A print dialog box will appear.
- In the “Name” drop-down list select the name of you printer.
- In the “Copies” box, enter the number of copies you want.
- In “Page Range” option select “All” option if you want to print all pages of your document.
- If you want particular page to print then click “Pages” radio button and type page number in the box.
- Now click “Print” option. Your document will be print.
PSEB 7th Class Computer Guide Microsoft Word (Part-III) Important Questions and Answers
1. Fill in the Blanks
Question 1.
The text of the paragraph is selected by pressing the arrow keys and the ………….. key together.
(a) Special
(b) Shift
(c) Number
(d) Function.
Answer:
(b) Shift
![]()
Question 2.
The default line spacing is …………… point.
(a) Single
(b) Double
(c) Triple
(d) Four.
Answer:
(a) Single
Question 3.
The fill color option is used to color in ………………… .
(a) Text
(b) Line
(c) Shape
(d) Word.
Answer:
(c) Shape
Question 4.
For border and shading …………… menu is used.
(a) File
(b) Edit
(c) Format
(d) Home.
Answer:
(c) Format
Question 5.
Auto Shapes are submitted from the …………….. tool bar.
(a) Shapes
(b) Home
(c) Word
(d) Drawing.
Answer:
(d) Drawing.
![]()
2. True/False
1. The left mouse button is clicked three times to select the entire paragraph.
Answer:
True.
2. By default paragraph text is right aligned.
Answer:
False
3. indentation command is used for shading.
Answer:
False
4. To fill ClipArt, Click insert Picture then click ClipArt command.
Answer:
True.
5. Arial and Times New Roman are the names of the fonts.
Answer:
True.
![]()
3. Match the Columns
| Column A | Column B |
| 1. Ctrl + B | (a) For double line spacing |
| 2. Ctrl + E | (b) For bold the text |
| 3. Ctrl+ 2 | (c) For Left, Right, Center, Justify |
| 4. Font style | (d) For Center Alignment |
| 5. Alignment | (e) Bold, Italic, Underline |
Answer:
| Column A | Column B |
| 1. Ctrl + B | (b) For bold the text |
| 2. Ctrl + E | (d) For Center Alignment |
| 3. Ctrl+ 2 | (a) For double line spacing |
| 4. Font style | (e) Bold, Italic, Underline |
| 5. Alignment | (c) For Left, Right, Center, Justify |
![]()
4. Short Answer Type Questions
Question 1.
What is Picture Border?
Answer:
Picture border means the line around a picture.
Question 2.
What is picture position?
Answer:
Picture position means where the picture is located into the document.
Question 3.
What are the various options available in page layout tab?
Answer:
The Page Layout tab has more than one Page layout and Formatting options. This affects the look of a page’s content. Depending on how we want to present our document, we can choose Page Orientation, Paper Segment and Page Margin commands.
![]()
Question 4.
Write steps for formatting page margins.
Answer:
- Click on the Page layout tab.
- Click on the Margins command from page setup group. A drop-down menu will appear. By default “Normal” margin will be selected.
- Click on the Predefined margin as you want.
Question 5.
Describe the steps for using custom margin.
Answer:
- Click on Margin command from the Page Layout tab.
- A drop-down menu will appear. From this menu click “custom margin” option.
- A Page Setup dialog box will appear.
- Adjust the margin size for each side of the page, and click Ok.
Question 6.
What is Orientation?
Answer:
To change the position of a document from a portrait to a landscape, click this button. To change the position of the page, steps are as follows:
- Select the Page Layout tab.
- in the Page Setup group, click on the “Orientation” command.
- Click “Portrait” or “Landscape” to change the position of the page. Landscape format means the page is horizontal, while portrait format means it is vertical.
![]()
Question 7.
What are the steps to change the paper size?
Answer:
- Select Page Layout.
- Click on the Page-Size command and a drop-down menu will appear. The current page size will be highlighted.
- Click on the Size option as per your requirement. The page size of the document will change.
Question 8.
What does the column option do?
Answer:
This option splits the written text into two or more columns.
5. Long Answer Type Questions
Question 1.
What are corrections? How are they used?
Answer:
Adjust Group:
You do not need to use additional picture editing software to create high quality images for your document. Instead, you can use Adjust tools to correct and improve your photos.
1. Select photo.
2. In the Format tab, click on the Correction option from the Adjust group. A drop-down menu will now open. From this menu, select 3. Sharpen/Soften and Brightness/ Contrast settings according to your needs.

To make these settings more detailed, go to Picture Format>> Corrections>> “Picture Corrections Options” option. The Format Picture sidebar appears. This allows you to provide special settings for Sharpness, Brightness and Contrast.
![]()
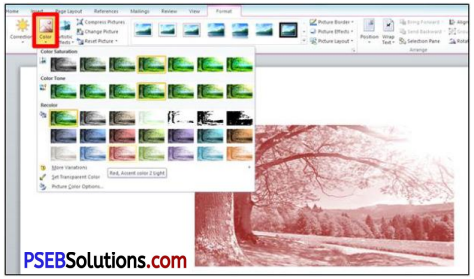
Question 2.
Write the steps for using the color option.
Answer:
Picture Color:
Microsoft Word allows you to control the color and tone of your picture and you can repaint the whole picture for special effects.
Steps to change the picture color are as follows:
(a) Select picture.
(b) In the Format tab, click on the Color option from the Adjust group. A drop-down menu will open.
(c) In this menu there are 3 options:
- Color Saturation: This controls how bright the colors are in the image.
- Color Tone: This controls the temperature of the color, from cool to warm.
- Recolor ; This controls the overall color of the image. Use this option to make the image black and white or gray scale, or to colorize it with a different color.
(d) Choose any of the options as per your need.
Question 3.
Write the steps for compressing a picture.
Answer:
Compress Picture: With this button the image can be compressed. To reduce the size of documents, pictures can be reduced in storage size. You can change the resolution of an image or delete a cropped part of an image. The steps to compress a picture are given below:
- Select the picture.
- In the Format tab, click on the Compress picture option from the Adjust group.
- Now a Compression Settings dialog box will open.
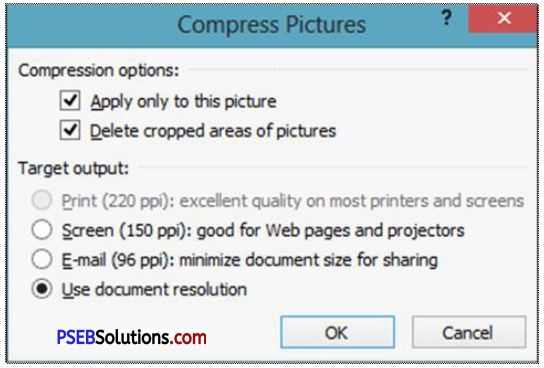
- If you want to print the picture, click on the Print (220 ppi) option.
- If you want to reduce the size of the file to e-mail, click on the E-mail (96 ppi) option.
- If you want to upload the file to a web page or projector, click on Project Options.
![]()
Question 4.
Write the steps to remove the background of the picture.
Answer:
Remove Background:
This option is used to automatically remove unwanted parts of an image. Areas to remove or keep can be marked in the picture. Following are the steps to remove the background of a photo:
(a) Select the image from which you want to remove the background.
(b) Click the “Remove Background” option from the Adjust group in the Format tab.
(c)Now the default background area will be marked with magenta color, while the foreground will remain its natural color.
(d)If the default area isn’t correct, go to Background Removal > Picture Tools and do one or both of the following:
- If parts of the picture that you want to keep are magenta, select
- “Mark Areas to Keep” option and use the drawing pencil to mark the areas on the picture that you want to keep.
- To remove more parts of the picture, select Mark Areas to
- Remove option and use the drawing pencil to mark those areas
When you’re done, select “Keep Changes” or “Discard All Changes”.

![]()
Question 5.
Write down the steps to apply a picture style.
Answer:
Picture Style Group:
Picture Styles Gallery offers many preset styles that make it easy for you to add borders and special effects with one click.
1. Picture Style Gallery:
This field provides a list of different formats that can be applied to an image. To see what each style will do, just move the mouse pointer over each style. To apply the style on a picture steps are as follows:
(a) Select the photo whose style you want to change.
(b) On the Format tab, in the Picture Styles group, click any style you like.

2. Picture Border:
Use this command to change the color, width, or line style of the border of the image. Steps to add border as follows:
- Select the image to which you want to add a border.
- On the Picture Format tab, in the Picture Styles gallery, select Picture Border command. A drop-down menu will appear.
- From this menu select color for border line.
- Select weight (thickness) of boarder line.
- Select whether the line of the border is dashed.
3. Picture Effects:
Click this button to add visual effects to the picture such as shadows, 3-D effects, and glows. Steps to add an effect to a picture are as follows:
- Select the picture for which you want to add or change an effect.
- Under the Format tab, in the Picture Styles group, click Picture Effects command.
- A drop-down list will appear. From this menu select appropriate effect for image.
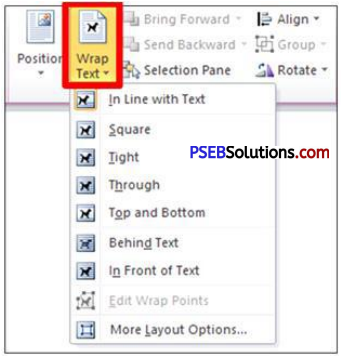
Question 6.
Write the steps of wrapping text.
Answer:
Text Wrapping:
This feature is used to apply wrapping to an image. When wrapping is applied, text can be typed around the image. Make it easy to move images from one place to another in a document. To apply the text wrapping on the image follow these steps:
(a) Select the image which you want to apply wrapping.
(b) From the Picture Tools tab, in the Arrange group, click on the “Text Wrapping” option.
Do one of the following:
- Click “Square” command to type the text around the border of your picture.
- Click ‘Tight” command to type text around a clip art image or an irregularly shaped image.
- Click “Behind Text” command to display the text on the image.
- Click “In Front of Text” command to display the image on the text.
- Click “Top and Bottom” command to place the image on your line.
- Click “More Layout Options” command for more layout Options.
From this dialog box, specify the distance between the text and the image.
![]()
Question 7.
Write the steps for adding background color or texture.
Answer:
Page Color:
With the help of this option we can apply different colors, textures and pictures to the background of the page in our document. Steps to add background color or texture are as follows:
- Click on “Page color” command in the Page Background group from the Page Layout tab.
- A drop-down menu will appear.
- Choose one of the following options from this drop-down menu:
- To apply the background color click any color from “Theme Colors or Standard Colors”.
- To apply the texture, Gradient, pattern and pictures into the background, click “Fill Effects” option.
- A Fill Effect dialog Box will appear. Select appropriate design for you background.