Punjab State Board PSEB 7th Class Computer Science Book Solutions Chapter 6 Microsoft Word (Part-IV) Textbook Exercise Questions and Answers.
PSEB Solutions for Class 7 Computer Science Chapter 6 Microsoft Word (Part-IV)
Computer Guide for Class 7 PSEB Microsoft Word (Part-IV) Textbook Questions and Answers
1. Fill in the Blanks
Question 1.
……………….. key is used to move the cursor in the next adjoining cell of a table.
(a) Ctrl
(b) Shift
(c) Tab
(d) Home.
Answer
(c) Tab
Question 2.
The table button is present on the …………. tab.
(a) Home
(b) Layout
(c) Insert
(d) View.
Answer
(c) Insert
![]()
Question 3.
We can change the width of the column by selecting the ………….. button in the Table Group.
(a) Select
(b) View Grid lines
(c) Properties
(d) None of these.
Answer:
(c) Properties
Question 4.
A ………………. consists of a number of columns and rows.
(a) Document
(b) Table
(c) View
(d) Data.
Answer:
(b) Table
Question 5.
A ………….. is an intersection of columns and rows.
(a) Cell
(b) Table
(c) View
(d) Data.
Answer:
(a) Cell
![]()
2. Very Short Answer Type Questions
Question 1.
Which key is used to move the cursor to the next cell in a table?
Answer:
Pressing the Tab key or right arrow keys moves the cursor to the next cell.
Question 2.
Intersection of a column and row is called?
Answer:
The intersection area of the row and column is called the cell.
Question 3.
Which group of Layout tab contains the split cells option?
Answer:
The split cell option is in the Merge group of the Layout tab.
Question 4.
Which option can be used to join two or more cells?
Answer:
Two or more cells can be merged using the Merge option.
![]()
3. Short Answer Type Questions
Question 1.
Define Table.
Answer:
A table is a collection of rows and columns where data is grouped together. Rows are placed horizontally and columns are placed vertically in the table and the intersection of a row and column is known as Cell. Cells are small boxes in the worksheet where we enter data.
Question 2.
Write the name of options for inserting a table in Word document?
Answer:
In MS Word, we can create tables in three ways:
- With the help of Table Buttons.
- With the help of Insert Table option.
- With the help of Draw Table option.
Question 3.
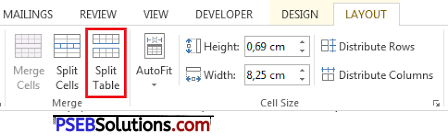
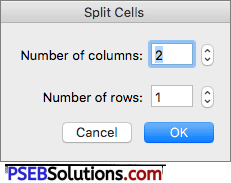
What is the use of Split Cells option?
Answer:
Microsoft Word allows cells to be divided into multiple cells. Steps to divide a cell into several smaller sub-cells are as follows:
- Place mouse pointer inside the cell that you want to split into several cells.
- Now click on the “Layout” tab and then click on the “Split cells” button from the “Merge” group.
- A “Split Cells” dialog box will open and ask about the Number of columns/ Number of Rows.
- Select the required number of rows and columns.
- Click the OK button.
![]()
Question 4.
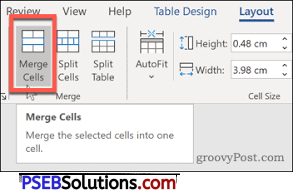
What is the use of Merged Cells option?
Answer:
Microsoft Word allows two or more cells to merge to form one large cell. You will often need to combine the columns in the top row to create a table title. You can combine cells row-by-column or column-by-column, you can’t mix cells diagonally.
The steps for merging cells are as follows:
- Select the cells we want to merge.
- Click the Merge Cells button from the Merge group on the Layout tab.
- When clicked, this option will convert all selected cells into one cell.
Question 5.
How will you enter data in Table Cells?
Answer:
The steps for inserting text into a table are given below:
1. Click on the cell in which you want to insert the text.
2. Now type.
Or
You can also add text using copy paste.
![]()
4. Long Answer Type Questions
Question 1.
How do you insert a table in your document? Explain any method briefly.
Answer:
In MS Word, we can create tables in three ways:
1. With the help of Table Buttons.
2. With the help of Insert Table option.
3. With the help of Draw Table option.
1. Creating a table using the Table Button
The following are the steps to create a table with the help of table button:
- Place your cursor where you want to create the table.
- In the Insert tab, click on the “Table” command from the Table group.
- Now a grid will open.
- From this grid, select the rows and columns according to your need.
- The table you selected will now appear on the screen.
2. Creating a table using the Insert Table option
Below are the steps to create a table using the Insert Table option:
- In the Insert tab, click on the “Table” command from the Table group.
- A drop-down menu will open. Click on the “Insert Table” option from this menu.
- The Insert Table dialog box will appear.
- In this box, specify the number of rows and columns and click on the ok button.
3. Creating a table with the help-of a Draw table option
The steps to create a table with the help of a draw table option are as follows:
- In the Insert tab, click on the Table command from the Table group.
- A drop-down menu will open, click on the Draw Table option from this menu.
- The mouse pointer will turn into a pencil.
- Draw a rectangle on the page with the help of a pencil.
- Draw vertical and horizontal lines to form columns and rows as needed.
Question 2.
Explain Properties button of Layout Tab.
Answer:
With the Table Properties dialog box we can adjust the alignment of the table and the size of the row, column or cell.
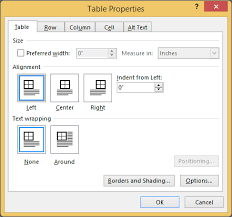
In MS Word we can also split or merged the Cells into a table.
![]()
PSEB 7th Class Computer Guide Microsoft Word (Part-IV) Important Questions and Answers
1. Fill in the Blanks
Question 1.
Tables can be drawn in Word using the…………….and ……………. buttons.
(a) Home, Insert, Design table
(b) Table, Insert, Draw table
(c) Both Options are Correct
(d) Both Options are Incorrect.
Answer:
(b) Table, Insert, Draw table
Question 2.
……………. is called a set of rows and columns.
(a) Cell
(b) Table
(c) Documents
(d) None.
Answer:
(b) Table
Question 3.
The table command is available on the……………. tab.
(a) Home
(b) Design
(c) Review
(d) Insert.
Answer:
(d) Insert.
![]()
Question 4.
With the…………….option we can draw tables as we wish.
(a) Insert Table
(b) Add Table
(c) Draw Table
(d) Quick Table.
Answer:
(c) Draw Table
Question 5.
Clicking the ……………. arrow button moves the cursor to the next cell.
(a) Left arrow
(b) Right arrow
(c) Down arrow
(d) Up arrow.
Answer:
(b) Right arrow
Question 6.
The ……………. option is used to convert text to a table.
(a) Insert Table
(b) Convert Table to Text
(c) Draw Table
(d)Convert Text to Table.
Answer:
(b) Convert Table to Text
Question 7.
Split table is present in ……………. group of Layout tab.
(a) Merge
(b) Clipboard
(c) Style
(d) Design.
Answer:
(a) Merge
Question 8.
The ……………. option adds a new cell to the right of the existing cell.
(a) Auto fill
(b) Insert right
(c) Insert left
(d) Merge cell.
Answer:
(b) Insert right
![]()
Question 9.
……………. option is used to delete the table.
(a) Merge Table
(b) Split Table
(c) Remove
(d) Delete Table.
Answer:
(d) Delete Table.
Question 10.
The ……………. option is used to add a new row at the above of insertion point.
(a) Insert Row
(b) Insert Below
(c) Insert Above
(d) All of these.
Answer:
(c) Insert Above
![]()
2. Short Answer Type Questions
Question 1.
Write the steps to covert text into table.
Answer:
Steps to convert text into table are as follows:
- Select the text which you want to convert into table.
- Click on the “Table” command in the ‘Table” group of the Insert tab.
- Select the command “Convert Text To Table”.
- The “Convert Text to Table” dialog box opens.
- Select the desired option in the Separate text at section.
- Click OK button.
Question 2.
With which tabs we can modify the table?
Answer:
Design and layout tabs are used to modify the tables.
![]()
Question 3.
Write the steps to add a row into the table.
Answer:
In MS Word we have 2 ways to add row into the table. Which are as follows:
Method 1.
Below are the steps to add rows to the table:
- Place the cursor in the table where you want to add the new row.
- Now right click on the mouse, a drop-down menu will appear on the screen.
- Click on the Insert option from this menu.
- If you want to add a new row above the insertion point, click on the “Insert Row Above” option.
- If you want to add a new row below the insertion point, click on the “Insert Row Below” option.
- A new row will appear above the insertion point.
Method 2.
The step of adding rows to the table is given below:
- Place the cursor in the table where you want to add the new row.
- From the “Rows & Columns” group of the “Layout tab”, click on the “Insert Above/Insert Below” option.
- A new row will appear below/above the insertion point
Question 4.
Write the steps to add columns from right click.
Answer:
- Place the insertion point where you want to add new column.
- Right-click on the mouse. A menu will appear.
- Click on the Insert option from this menu.
- If you want to add a new column to the left of the insertion point, click on the “Insert Column to the left” option.
- If you want to add a new column to the right of the insertion point, click on the “Insert Column to the right” option.
- A new column will now appear to the right or left of the cursor.
![]()
Question 5.
Write the steps to remove a column.
Answer:
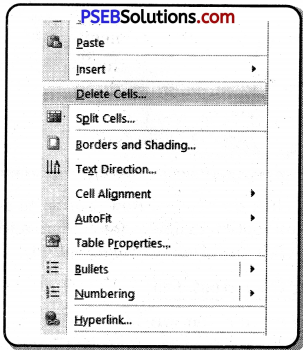
Here are the steps to delete a row or column from the table:
- Select a row or column.
- Right click your mouse. A menu will appear.
- Click on the Delete Cells option.
- A Delete Cell dialog box will now open.
- Click “Delete entire column” option to delete the column.
- The appropriate column will be deleted.
Delete columns using the Layout tab
- Select the row or column you want to delete.
- Click the “Delete” button from the Rows & Columns group of the Layout tab.
- A drop-down menu will open.
- From this menu, click the “Delete Column” option to delete the column.
3. Long Answer Type Questions
Question 1.
How can a table be converted into text and text into a table?
Answer:
Below are the steps for inserting text into a table:
1. Click on the cell in which you want to insert the text.
2. Now type
Or
You can also add text using copy paste
To Convert Text to a Table
Steps to convert text into table are as follows:
- Select the text which you want to convert into table.
- Click on the “Table” command in the “Table” group of the insert tab.
- Select the command “Convert Murine of rows: Text To Table”.
- The “Convert Text to Table” dialog box opens.
- Select the desired option in the Separate text at section.
- Click OK button.
Convert Table into Text:
Steps to convert table into text are as follows:
- Select the rows of tables you want to convert to text.
- On the Layout tab, in the Data section, click “Convert To Text”.
- In the Convert Table box, under Separate Text With, click on the different character you want to use instead of the column boundaries. Rows will be separated by paragraph symbols.
![]()
Question 2.
Write about the inclusion of a cell in a table.
Answer:
Adding Cells to Tables:
In MS Word, you can add a new cell around the selected cell, such as right, left, up or down. The steps to add a new cell are as follows:
- Click in the cell.
- Press the right mouse button inside the cell.
- From this menu click “Insert” and then click “insert cell” option.
- Choose which side of the selected cell you want new cell.
![]()
Question 3.
What are table properties and how they can be used?
Answer:
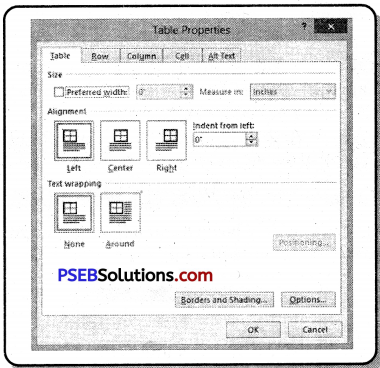
Properties of Tables
With the Table Properties dialog box we can adjust the alignment of the table and the size of the row, column or cell.
In MS Word we can also split or merged the Cells into a table.
Question 4.
What is ‘Splitting’ and how to split a table, a cell?
Answer:
Splitting the Cell:
Microsoft Word allows cells to be divided into multiple cells. Steps to divide a cell into several smaller sub-cells are as follows:
1. Place mouse pointer inside the cell that you want to split into several cells.
2. Now click on the “Layout” tab and then click on the “Split cells” button from the “Merge” group.
3. A “Split Cells” dialog box will open and ask about the Number of columns/ Number of Rows.
4. Select the required number of rows and columns
5. Click the OK button.
Splitting the Table:
Microsoft Word allows a table to be split into multiple tables but a single operation always splits the table into two tables.
The following are simple steps to split a table into two tables in a World Document.
1. Place the cursor in the row that you want to be the first row of the second table.
2. Click the Split Table button ‘ from the Merge group on the Layout tab.