Punjab State Board PSEB 10th Class Computer Book Solutions Chapter 1 Office Tools Textbook Exercise Questions and Answers.
PSEB Solutions for Class 10 Computer Science Chapter 1 Office Tools
Computer Guide for Class 10 PSEB Office Tools Textbook Questions and Answers
1. Multiple Choice Questions
Question 1.
Which tool is used to maintain a budget, financial statements, and sales records?
(a) Multimedia
(b) Spreadsheet
(c) Presentation
(d) Database
Answer:
(b) Spreadsheet
Question 2.
Word automatically inserts a page break when we reach the ………… of a page.
(a) Starting
(b) End
(c) Mid of page
(d) None of these
Answer:
(b) End
![]()
Question 3.
As we type our document, …………. wavy lines will appear under any word that is spelled incorrectly.
(a) Blue
(b) White
(c) Red
(d) Black
Answer:
(c) Red
Question 4.
The most common types of effects include entrances and exits.
(a) Animation
(b) Sound Effect
(c) Design
(d) Transition
Answer:
(a) Animation
Question 5
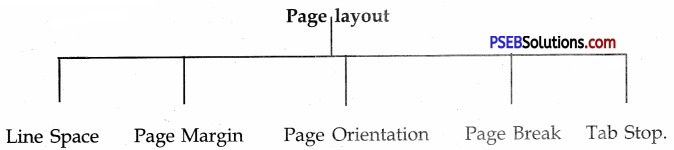
…………. is the blank space around the edges of the page.
(a) Graphics
(b) Design
(c) Margin
(d) None of these
Answer:
(c) Margin
2. Fill in the Blanks
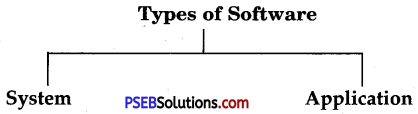
1. Computer software is classified into two categories ………. and ………….
Answer:
System software and Application software
2. Database software is a collection of related data. The purpose of this tool is to ………… and ………. data.
Answer:
Organize and Manage
3. We can choose either ……….. (vertical) or ………….. (horizontal) orientation for all or part of our document.
Answer:
Portrait or Landscape
4. The image file extensions supported by PowerPoint include ………… TIFF (.tiff) and Bitmap (.bmp)
Answer:
JPEG (.jpg),GIF
5. Multimedia software is tool that allows the user to create ……….. and …………. with the help of media players and real players.
Answer:
Audio and Videos.
![]()
3. True or False
Question 1.
The main purpose of Spread sheet tool is to produce documents.
Answer:
False
Question 2.
Application software is software that can perform a specific task for the user
Answer:
True
Question 3.
We can drag existing tab stops left or right along the ruler to a different position.
Answer:
True.
Question 4.
Print Preview automatically displays when we click on the Print tab.
Answer:
True
4. Very Short Answer Type Questions
Question 1.
Write extension of Word document in Ms Office 2010.
Answer:
.docx
Question 2.
Write extension of Spread Sheet in Ms Office 2010.
Answer:
.xlsx
![]()
Question 3.
Write extension of Power Point Presentation Ms Office 2010.
Answer:
.pptx
Question 4.
Write the full form of bmp (Image file).
Answer:
BitMaP
Question 5.
Write the full form of PDF.
Answer:
Portable Document Format
PSEB 10th Class Computer Book Chapter 1 Office Tools
5. Short Answer Type Questions
Question 1.
Define System Software?
Answer:
System software are the set of software which are used for the working of computer system and its hardware. It includes operating system, language translators etc.
Question 2.
Explain database software?
Answer:
Database is a collection of related data. The purpose of database tools is to organize and manage data. The advantage of these tools is that we can change the way data is stored and displayed. SQL Server, MS access, data Base, FoxPro, Paradox, and Oracle are some of the examples of database software tools.
Question 3.
Explain multimedia software.
Answer:
Media players and real players are the examples of multimedia tools. These tools allow the user to create audio and video files. The different forms of multimedia tools are audio converters, audio and video players, video encoders and decoders.
![]()
Question 4.
What is Page Break? How to insert a page break?
Answer:
Page break is a way to tell MS word that the page has ended. These can be automatic and manual.
Inserting a Page Break:
1. Click where we want to start a new page.
2. On the Insert tab, in toe pages group, click Page Break.
We can also insert breaks into our document by going to the Insert tab, Pages group and clicking on the Page Breaks command to view a variety of page.
6. Long Answer Type Questions
Question 1.
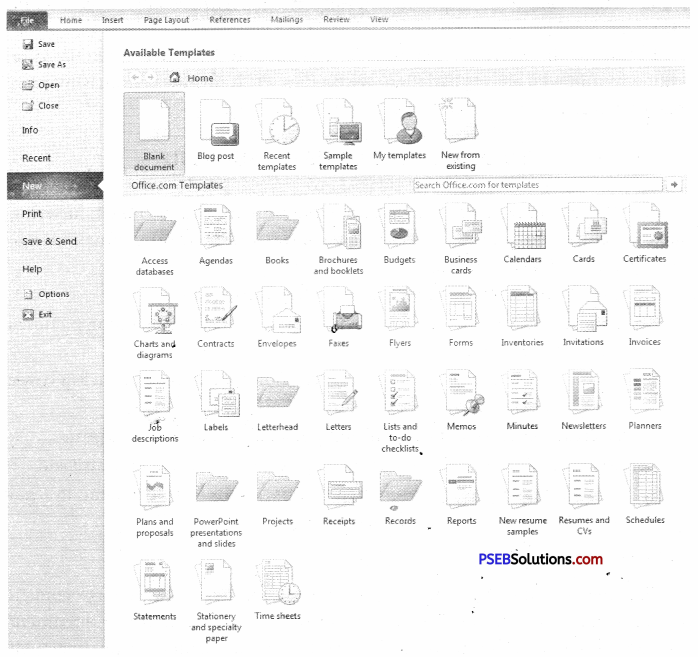
What is office tool ? Explain any five types of office tools?
Answer:
Office tools are software programs designed to make computer users more productive and efficient at our workplace. Office productivity tool is a category of application programs that help users produce things such as documents, databases, graphs, worksheets and presentations.
Types of office tools are-
1. Word Processing Tools:
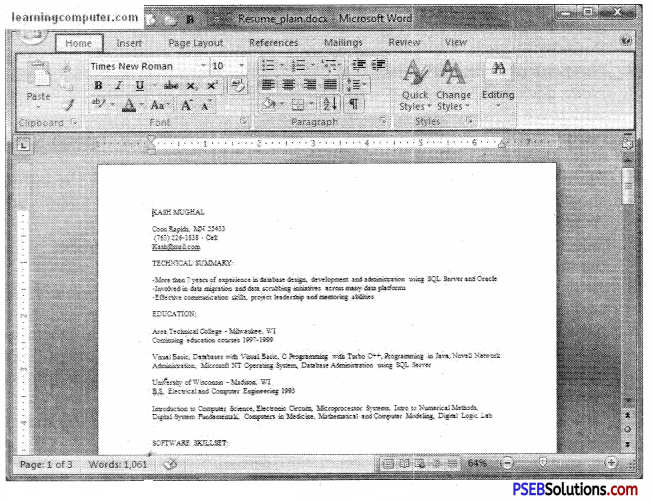
The main purpose of word processing tools is to produce good looking documents. MS-Word, WordPad, Notepad and Adobe Pagemaker are some of the examples of word processing tools.
2. Database Software Tools:
Database is a collection of related data. The purpose of database tools is to organize and manage data. The advantage of these tools is that we can change the way data is stored and displayed. SQL Server, MS access, dataBase, FoxPro, Paradox, and Oracle are some of the examples of database software tools.
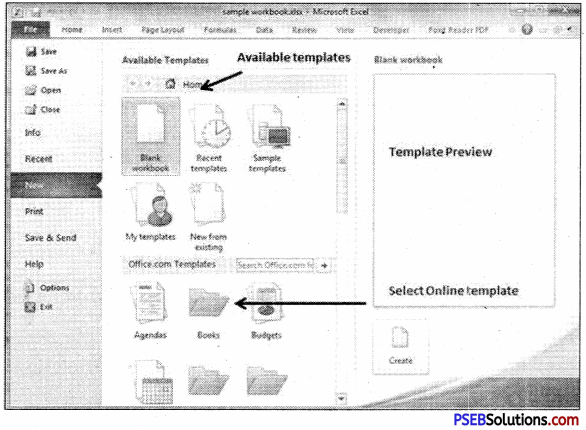
3. Spreadsheet Tools:
The spreadsheet tools are used to make calculations, maintain budget, financial statements, and sales records. The purpose of these tools is to work with numbers. It allows the users to perform simple as well as complex calculations on the numbers. MS-Excel, Open Office are examples of spreadsheet tools.
4. Presentation Tool:
Presentation tools are used to display the information in the form of slide shows. The main functions of presentation tools is editing that allows insertion and formatting of text, including graphics in the text and executing the slide shows. The examples for these tools are Microsoft PowerPoint, Open Office Present.
5. Multimedia Software:
Media players and real players are the examples of multimedia tools. These tools allow the user to create audio and video files. The different forms of multimedia tools are audio converters, audio and video players, video encoders and decoders.
![]()
Question 2.
Write steps to create Student Annual Report using mail merge with spreadsheet?
Answer:
Student Annual Report can be created using MS Word and MS Excel using following steps:
1. Prepare the annual report format in MS word. Mention student’s detail like admission no, roll no, name, father’s name, marks of each subject, overall result and percentage of marks of student.
2. On the other side, prepare a excel worksheet, in which student’s admission no, roll no, name, father’s name, subject-wise marks obtained in subjects Punjabi, English, Maths, Science, Social Studies and grades etc. are-entered.
3. Next calculate the percentage of marks of each student using a formula.
4. Now, click on Mailing Tab, and start mail merge. Then, choose Letter option which we already prepared.
5. Next Click on Select Recipients and select Use Existing List option. Choose excel sheet from Select Table dialog box and click OK.
6. Place the cursor where you want to insert the value of field from excel sheet. Now go to Insert Merge Field option in Write & Insert Fields group. A dropdown menu will be displayed having field names.
7. Select the field names one by one after placing the cursor in proper place in the student annual report. All fields will be displayed.
8. After inserting all the clicking Preview Results next and previous button, you can preview the result of students by option.
9. Now click on Finish & Merge option and select Edit Individual Documents from the menu. A dialog box Merge to New Document will open. Choose option All and click OK to show the report card of all the students in excel worksheet.
10. Now a new Word document will open having report card of all the students. Save this document and we can also take printouts.
Question 3.
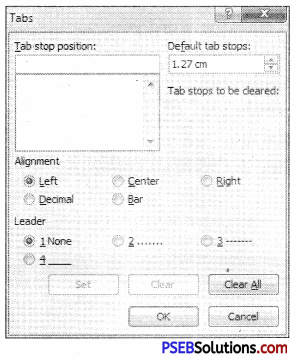
What are Tab Stops? Explain setting manual tab stops.
Answer:
Tabs are the facility which help to display the content in more structured and tabular form without using tables.
Setting up the Tab Stops:
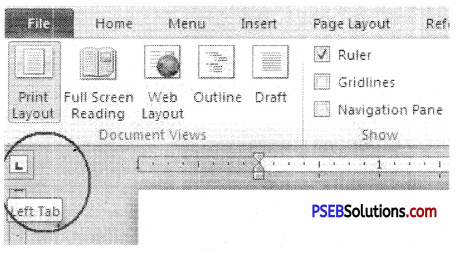
1. Click the tab selector at the left end of the ruler it displays the type of tab that you want.
2. Click in the ruler at the top of our page, where we want to set the tab stop.
The different types of tab stops are:
- Left Tab stop sets the start position of text that will then run to the right as we type.
- Center Tab stop sets the position of the middle of the text. The text centers on this position as we type.
- Right Tab stop Sets the right end of the text. As we type, the text moves to the left.
- Decimal Tab stop aligns numbers around a decimal point. Independent of the number of digits, the decimal point will be in the same position. (We can align numbers around a decimal character only)
Bar Tab stop doesn’t position text. It inserts a vertical bar at the tab position. Desired Tab stop will be placed at the point in the present paragraph.
![]()
Question 4.
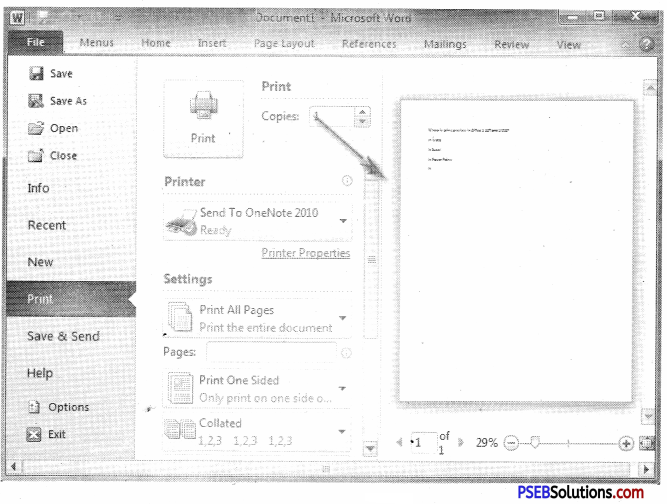
Explain Print Preview and Print Command?
Answer:
Print Preview. Print Preview displays the document as it will appear when printed. When we make a change to a print-related setting, the preview is automatically updated. To print preview of the document, following steps are used:
Click the File tab, and then click Print. To go back to our document, click the File tab.
A preview of our document automatically appears. To view each page, click the arrows below the preview.
Print Command. Print command is used to print a document using some printer. Following steps are followed to print a document in
MS-Word:
- Click the File tab.
- Click the Print command to print a document.
- Click the Print button to print our document.
- This dropdown shows the currently selected printer. Clicking the dropdown will display other available printers.
- These dropdown menu show currently selected gettings.
- Select the printer and other setting and click on Print.
PSEB 10th Class Computer Guide Office Tools Important Questions and Answers
Multiple Choice Questions
Question 1.
What are the types in which PowerPoint files can be saved?
(a) PDF
(b) Video file
(c) Presentation
(d) All of the above
Answer:
(d) All of the above
Question 2.
What are the extension of an image file?
(a) .jPg
(b) .gif
(c) .bmp
(d) All of the above
Answer:
(d) All of the above
Question 3.
Which one is system software?
(a) Word
(b) Excel
(c) Windows
(d) PowerPoint
Answer:
(c) Windows
Question 4.
Mail merge is a feature of which software?
(a) Word
(b) Excel
(c) Windows
(d) PowerPoint
Answer:
(c) Windows
![]()
Question 5.
Which one is not a type of office tools?
(a) Word Processing
(b) DBMS
(c) Multimedia Software
(d) None of these
Answer:
(d) None of these
Fill In The Blanks
1. Word processing tool prepares ………….. .
Answer:
Documents
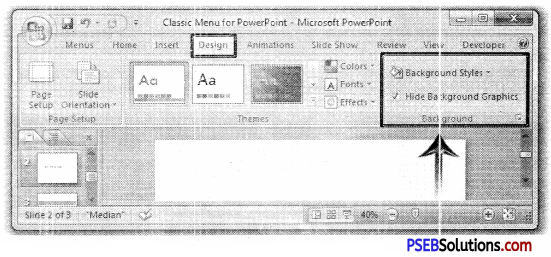
2. Theme helps to choose ……………… in PowerPoint.
Answer:
Background
3. …………. is pre defined document structure.
Answer:
Template
4. ……………is used for calculation.
Answer:
Excel.
True Or False
Question 1.
Application software is used for specific work
Answer:
True
Question 2.
Any document can have two orientations.
Answer:
True
![]()
Question 3.
Presentation can be saved as PDF.
Answer:
False
Question 4.
We cannot do calculations in Excel.
Answer:
False
Question 5.
Page margins are empty space in mid of page.
Answer:
False
Very Short Answer Type Questions
Question 1.
What are the different type of Softwares?
Answer:
System Software and Application Software.
Question 2.
Beneficial software for our work are called?
Answer:
Office tools.
Question 3.
Note pad is an example of?
Answer:
Word processing tool.
Question 4.
Give an example of spreadsheet software.
Answer:
MS Excel.
![]()
Question 5.
PowerPoint is an example of?
Answer:
Presentation tool.
Short Answer Type Questions
Question l.
What are Page Margins?
Answer:
Page margins pre the blank space around the edges of the page. In general, we insert text and graphics in the printable area inside the margins. When we change a document’s page margins, we change where text and graphics appear on each page.
Question 2.
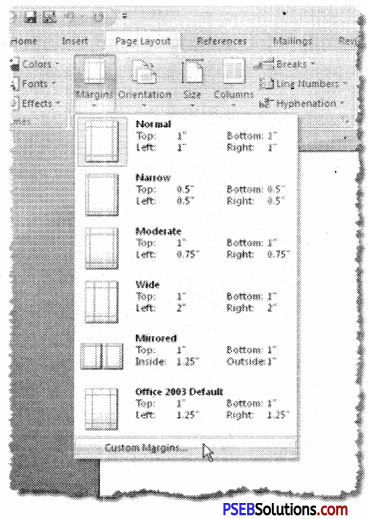
Write steps of setting predefined page margins.
Answer:
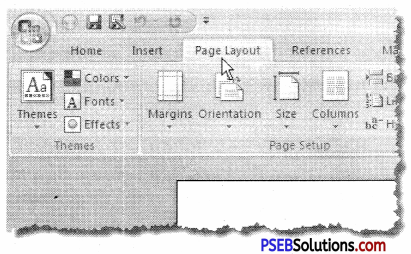
- On the Page Layout tab, in the Page Setup group, click Margins. The margins gallery dropdown menu Will appear.
- Click the margin type that we want to apply
Question 3.
Write steps to change Page Orientation.
Answer:
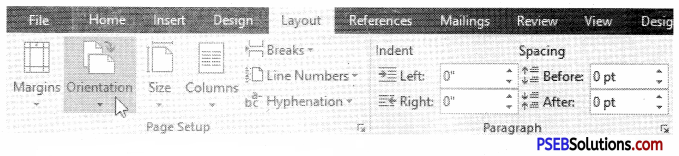
- On the Page Layout tab, in the Page Setup group, click Orientation.
- Click Portrait or Landscape.
Question 4.
Write steps to apply different page orientations.
Answer:
1. Select the pages or paragraphs that we want to change to portrait or landscape orientation.
2. On the Page Layout tab, in the Page Setup group, click Margins.
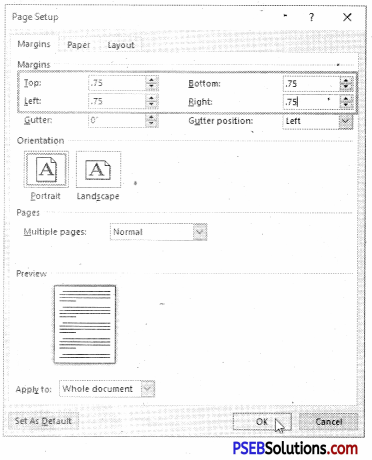
- Click Custom Margins at the bottom of the dropdown menu.
- A Page Setup dialog box will appear.
- On the Margins tab, click Portrait or Landscape.
- In the Apply to list, click Selected text or This point forward.
![]()
Question 5.
Write steps to apply custom margins.
Answer:
- On the Page Layout tab, in the Page Setup group, click Margins.
- At the bottom of the margins gallery dropdown menu, click Custom Margins.
- The Page Setup dialog box will appear.
- Enter new values for the margins in all or some of the top, bottom, left or right text boxes.
- Click OK.
Question 6.
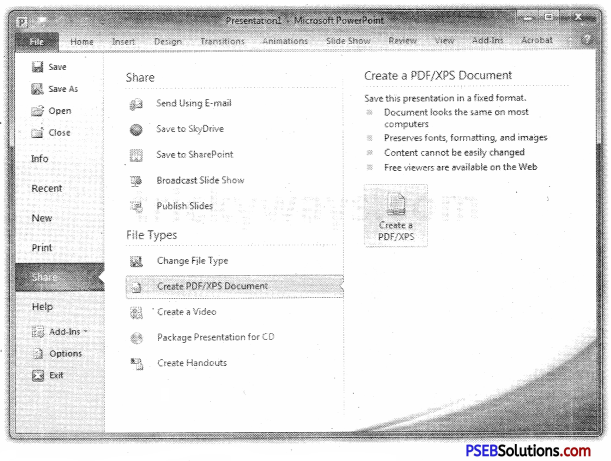
Write steps to save presentation as PDF.
Answer:
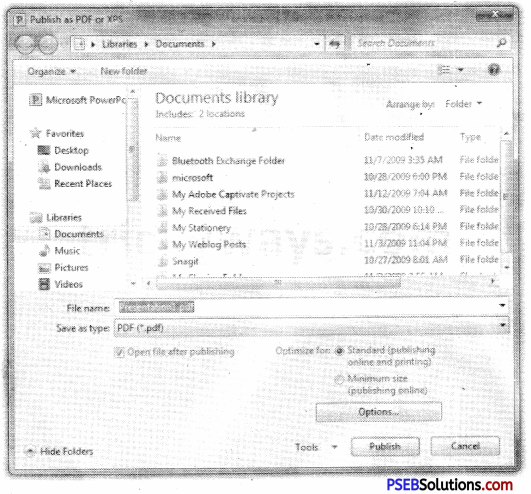
Steps to save a presentation as a pdf file are:
- Go to the backstage view under the File tab.
- Click on Save As to open the Save As dialog.
- Add a proper name to the file.
- Select the file type as. .pdf from the list of supported file types and click save.
- The .pdf file is created in the specified location.
Question 7.
Explain PPT broadcast slide show.
Answer:
PowerPoint 2010 offers users to broadcast their presentations on the internet to audience worldwide. Microsoft offers the free broadcast Slide Show service; all we need to do is share the link with our audience and they can watch the presentation from anywhere. There is no special setup or charges required to do this, all we need is a Windows Live account.
Question 8.
What is PPT Packaging Presentation?
Answer:
Certain presentations are better suited for distribution as a CD to audience. In such cases, we can create a CD packaging which can be burned into a CD and distributed. These CDs are called PPT packaging presentation.
![]()
Long Answer Type Questions
Question 1.
Write steps to save a presentation as a Video file.
Answer:
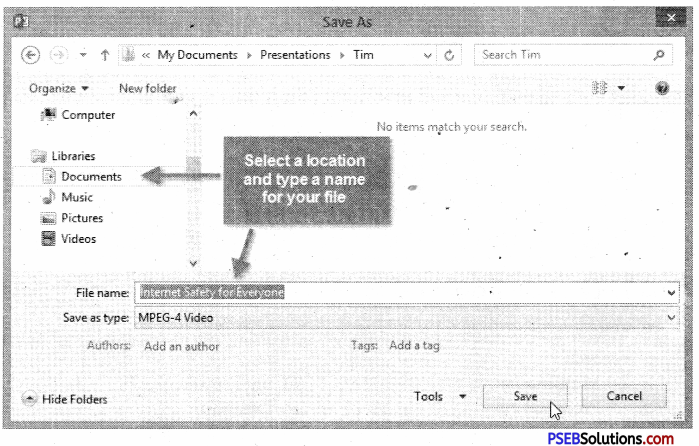
Saving Presentation as Video File:
PowerPoint allows presentations to be saved as files that can be posted on video sharing platform like YouTube or just played on any other-media.
Steps to save a presentation as a video file are:
- Go to the backstage view under the File tab.
- Click on Save As to open the Save As dialog.
- Add a proper name to the file.
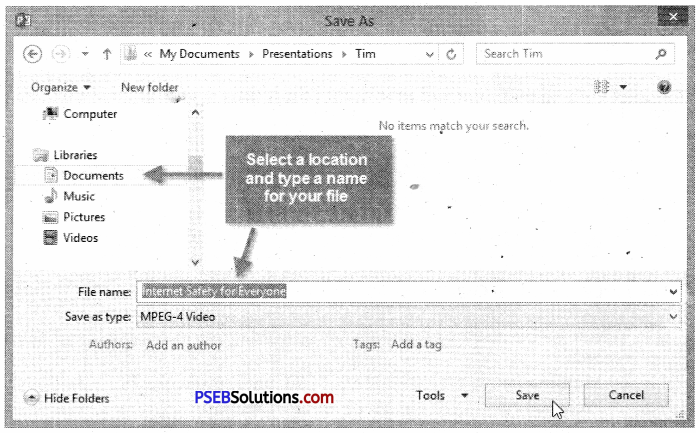
- Select the file type as .wmv from the list of supported file types and click Save.
- The video creation is not an instant process like other file types as PowerPoint needs to create the video file. We can track the progress of video creation at the bottom of our presentation window.
- Once the creation is complete, the video file is created in the specified location.
Question 2.
What are the steps of clearing Tab stops.
Answer:
Clear Tab Stops:
We can clear tab stops in a variety of ways, the simplest is going to the ruler, click and hold on the tab stop and drag in down towards the document. The tab stop will disappear. To quickly clear multiple tab stops and start fresh:
- Click the Home tab, click the Paragraph Dialog Box Launcher.
- A Paragraph box will appear, click on the Tabs button at the bottom left of the dialog box.
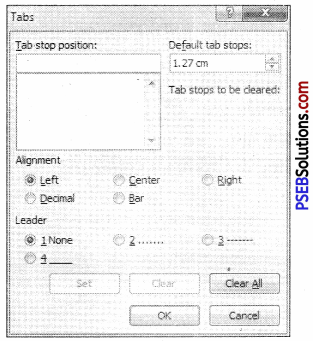
- A Tabs dialog box will appear.
- In the list under Tab stop position, click the tab stop position that we want to clear, and then click Clear. To remove the spacing from all manual tab stops, click Clear All.
- Click OK.
Question 3.
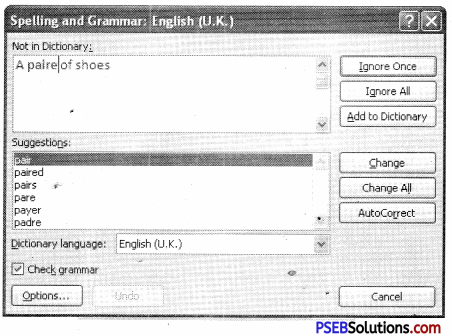
What are the ways to use Spell Check feature?
Answer:
Using the “Spell Check” Feature:
As we type our document, red wavy lines will appear under any word that is spelled incorrectly. The fastest way to fix spelling errors is to:
- Put the cursor over the misspelled word and right click.

- A drop down box will appear with correct spellings of the word.
- Highlight and left click the word you want to replace the incorrect word with.
To complete a more comprehensive Spelling and Grammar check, we can use the Spelling and Grammar feature:
- Click on the Review tab.
- Click on the Spelling & Grammar command.
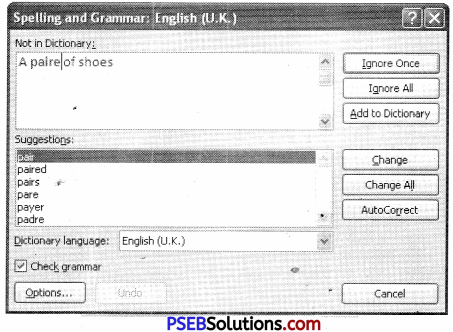
- A Spelling and Grammar box will appear.
- We can correct any Spelling or Grammar issue within the box.
Question 4.
Write steps to print a document.
Answer:
Print Command:
The Print tab is the place to go to make sure that we are printing what we want.
- Click the File tab.
- Click the Print command to print a document.
- Click the Print button to print your document.
- This dropdown shows the currently selected printer. Clicking the dropdown will display other available printers.

- These dropdown menu show currently selected Settings. Rather than just showing us the name of a feature,, these dropdown menu show us what the status of a feature is and describes it.
![]()
Question 5.
Write a note on Transition in PowerPoint.
Answer:
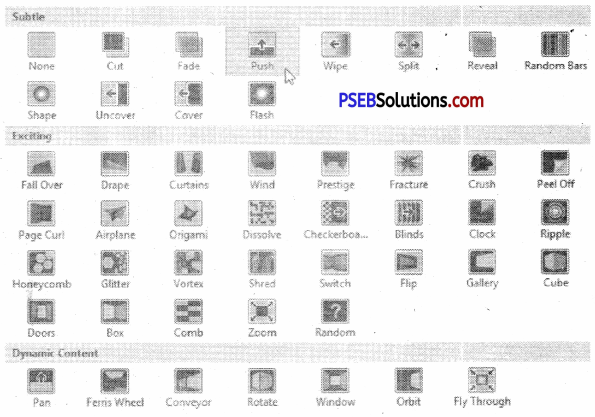
Transitions in MS – Power Point:
PowerPoint supports slide transition feature which allows us to specify how the slides should transition during the slide show.
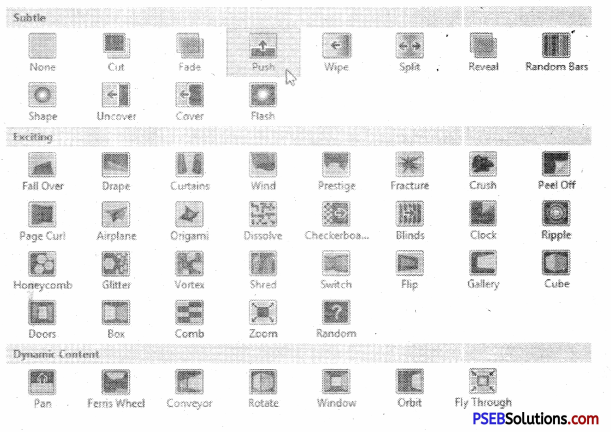
PowerPoint presentation that had special effects between each slide, are slide transitions. A transition can be as simple as fading to the next slide or as complex as a flashy effect. This means we can choose transitions to fit the style of any presentation. There are three categories of unique transitions to choose from, all of which can be found on the Transitions tab:
1. Subtle (slight transitions)
2. Exciting (Strong Transition)
3. Dynamic Content (strong transitions that affect only the content, such as text or images)
The steps to add and preview slide transitions are:
1. Select the slide to which we want to apply the transition.
2. Go to the Transition Scheme under the Transitions ribbon.
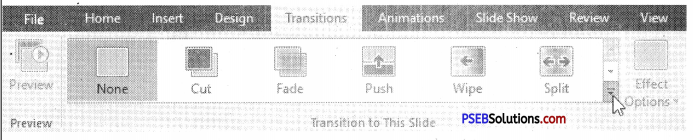
3. Select one of the transition schemes from the list available. PowerPoint will instantly show us a preview of the scheme. If we are not satisfied, we can pick an alternate scheme. The last selected scheme will apply to the slide.
4. We can change the effects on the selected transition scheme from the Effect Options menu. Every scheme has a unique set of effect options.

We can also modify the transition timing settings from-the Timing section. To preview the slide transition, click on Preview.