
This PSEB 10th Class Computer Notes Chapter 3 HTML II will help you in revision during exams.
PSEB 10th Class Computer Notes Chapter 3 HTML II
A hyperlink is a reference to Webpage that the reader can directly follow either by clicking, tapping or hovering. A hyperlink points to a whole document or to a specific element within a document. The text that is linked is called anchor text. A software system that is used for viewing and creating hypertext is a hypertext system, and to create a hyperlink is to hyperlink. A user following hyperlinks is said to navigate or browse the hypertext.
A webpage can contain various links that take you directly to other pages and even specific parts of a-given page. These links are known as hyperlinks. Hyperlinks allow visitors to navigate between Web sites by clicking on words, phrases, and images. Thus you can create hyperlinks using text or images available on a webpage.
![]()
Linking Documents (Anchor Tag)
A link is specified using HTML tag <a>. This tag is called anchor tag and anything between the opening <a> tag and the closing </a> tag becomes part of the link and a user can click that part to reach to the lirfked document. Following is the simple syntax to use <a> tag:
<a href = “Document URL” … attributes-list>Link Text</a>
Form:
Apart from common attributes, following is a list of the most frequently used form attributes:
| Attribute | Description |
| 1. action | Backend script ready to process your passed data |
| 2. method | Method to be used to upload data. The most frequently used are GET and POST methods. |
| 3. target | Specify the target window or frame where the result of the script will be displayed. It takes values like Jblank, _self, _parent etc. |
| 4. enctype | The method attribute of the form element tells the web browser how to send form data to a server. Specifying a value of GET means the browser will add the form contents to the end of the URL. This offers a number of advantages for simple forms. It allows the browser to cache the results of the form submission, and it also allows the user to bookmark the page once the form has been submitted. As such, GET is generally used for simple forms where security is not a concern. |
GET Method:
GET results in the entire contents of the submission being visible in the URL. If your form contains sensitive data, you should specify a value of POST for the method attribute. Since GET appends the form data to the current URL, it can only be used where the contents of the submission (including the complete URL) will result in a string that is 2048 characters long, or less. This is the maximum length of a URL. GET can only be used to send ASCII data.
<form method=”POST”>
The method attribute of the form element tells the web browser how to send form data to a server. Specifying a value of POST means the browser will send the data to the web server to be processed. This is necessary when adding data to a database, or when submitting sensitive information, such,as passwords.
![]()
POST Method:
When data is sent using POST, submitting the form twice will result in a duplicated entry. This can be a problem if the form is linked to a membership, purchase, or other one-time action. This is why users cannot bookmark the results of a form submission if the method is POST.
Preparing a Form
Every form starts with <form> tag. It can be placed anywhere in html document. It ends with </form> tag.
Text Input
This control is used for items that require only one line of user input, such as search boxes or names. They are created using HTML <input> tag.
Example
Here is a basic example of a single-line text input used to take first name and last name –
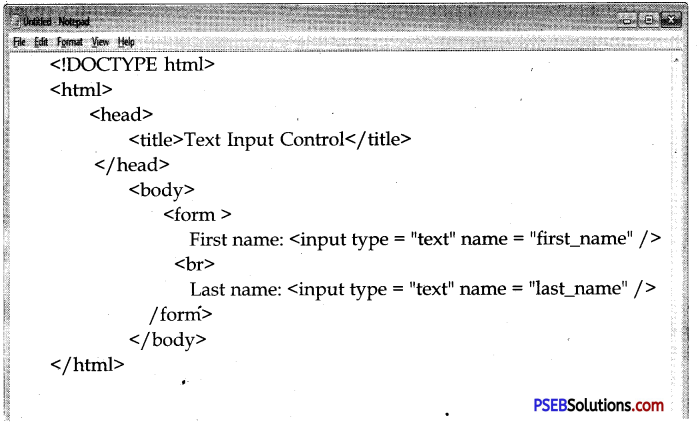
Attributes:
Following is the list of attributes for <input> tag for creating text field:
| Attribute | Description |
| 1. type | Indicates the type of input control and for text input control it will be set to text. |
| 2. name | Used to give a name to the control which is sent to the server to be recognized and get the value. |
| 3. value | This can be used to provide an initial value inside the control. |
| 4. size | Allows to specify the width of the text-input control in terms of characters. |
| 5. maxlength | Allows to specify the maximum number of characters a user can enter into the text box |
Text Area:
This is used when the user is required to give details that may be longer than a single sentence. Multi-line input controls are created using HTML <textarea> tag.
Example
Here is a basic example of a multi-line text input used to take item description:

![]()
Attributes:
Following is the list of attributes for <textarea> tag:
| Attribute | Description |
| 1. name | Used to give a name to the control which is sent to the server to be recognized and get the value. |
| 2. rows | Indicates the number of rows of text area box. |
| 3. cols | Indicates the number of columns of text area box |
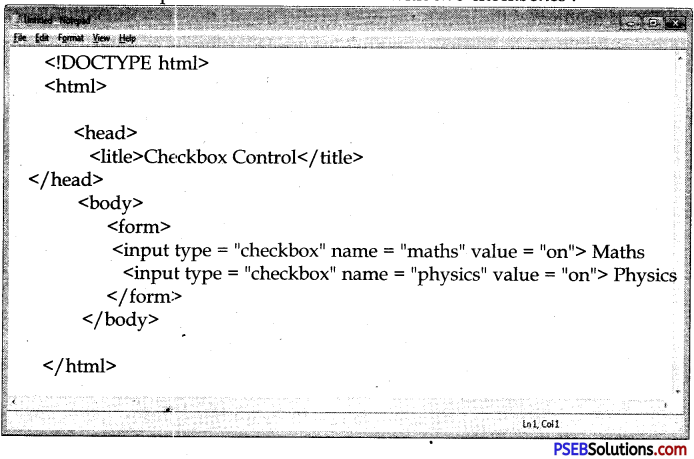
Checkbox Control:
Checkboxes are used when more than one option is required to be selected. They are also created using HTML <input> tag but type attribute is set to checkbox.
Example
Here is an example HTML code for a
Attributes:
Following is the list of attributes for <checkbox> tag:
| Attribute | Description |
| type | Indicates the type of input control and for checkbox input control it will be set to checkbox. |
| name | Used to give a name to the control which is sent to the server to be recognized and get the value. |
| value | The value that will be used if the checkbox is selected. |
| checked | Set to checked if you want to select it by default. |
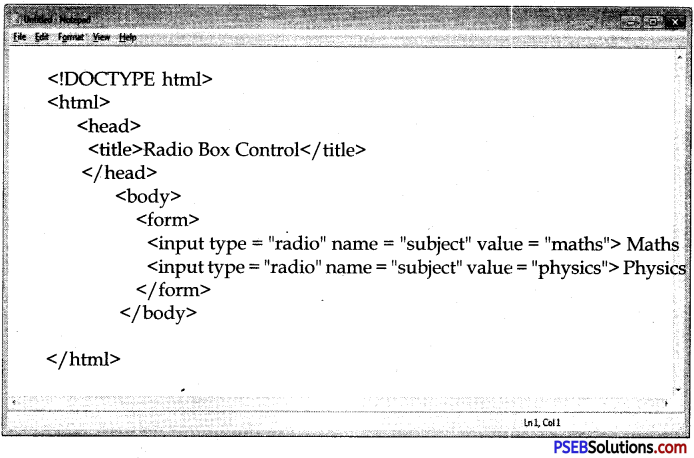
Radio Button
Radio buttons are used when out of many options, just one option is required to be selected. They are also created using HTML <input> tag but type attribute is set to radio.
Example
Here is example HTML code for a form with two radio buttons:
Attributes:
Following is the list of attributes for radio button:
| Attribute | Description ‘ |
| 1. type | Indicates the fype of input control and for checkbox input control it will be set to radio. |
| 2. name | Used to give a name to the control which,is sent to the server to be recognized and get the value. |
| 3. value | The value that will be used if the radio box is selected. |
| 4. checked | Set to checked if you want to select it by default. |
Select Box Control:
A select box, also called drop down box which provides option to list dovm various options looin the form of drop down list, from where a user can select one or more options.
Example
Here is example HTML code for a form with one drop down box
![]()
Attributes:
Following is the list of important attributes of <select> tag:
| Attribute | Description |
| 1. name | Used to give a name to the control which is sent to the server to be recognized and get the value. |
| 2. size | This can be used to present a scrolling list box. |
| 3. multiple | If set to “multiple” then allows a user to select multiple items from the menu. |
Following is the list of important attributes of <option> tag:
| Attribute | Description |
| 1. value | The value that will be used if an option in the select box box is selected. |
| 2. selected | Specifies that this option should be the initially selected value when the page loads. |
| 3. label | An alternative way of labeling options |
Button:
There are various ways in HTML to create clickable buttons. You can also create a clickable button using <input>tag by setting its type attribute to button. The type attribute can take the following values:
| Type | Description |
| 1. submit | This creates a button that automatically submits a form. |
| 2. reset | This creates a button that automatically resets form controls to their initial values. |
![]()
Multimedia in Html:
Multimedia can be added using HTML in many ways :
<Marquee>
An HTML marquee is a scrolling piece of text displayed either horizontally across or vertically*down your webpage depending on the settings. This is created by using HTML <marquees> tag.
Note – The <marquee> tag deprecated in HTML5. Do not use this element, instead you can use JavaScript and CSS to create such effects.
Syntax:
A simple syntax to use HTML <marquee> tag is as follows:
<marquee attribute_name = “attribute_value”….more attributes> ‘
One or more lines or text message or image </marquee>
The <marquee> Tag Attributes
Following is the list of important attributes which can be used with <marquee> tag:
Width:
This specifies the width of the marquee. This can be a value like 10 or 20% etc. height. This specifies the height of the marquee. This can be a value like 10 or 20% etc. direction. This specifies the direction in which marquee should scroll. This can be a value like up, down, left or right, behavior. This specifies the type of scrolling of the marquee. This can have a value like scroll, slide and alternate, scrolldelay. This specifies how long to delay between each jump.
This will have a value like 10 etc. scrollamount. This specifies the speed of marquee text. This can have a value like 10 etc, loop. This specifies how many times to loop. The default value is INFINITE, which means that the marquee loops endlessly, bgcolor. This specifies background color in terms of color name or color hex value, shspace. This specifies horizontal space around the marquee. This can be a value like 10 or 20% etc. vspace. This specifies vertical space around the marquee. This can be a value like 10 or 20% etc.
![]()
Adding Audio/Video files in HTML:
User can link audio/video files in HTML document using anchor (<a>) tag. User has to give the path of audio/video file in href attribute of anchor tag. Whenever the user clicks on the link, the files will automatically gets downloaded and is played in the associated software.