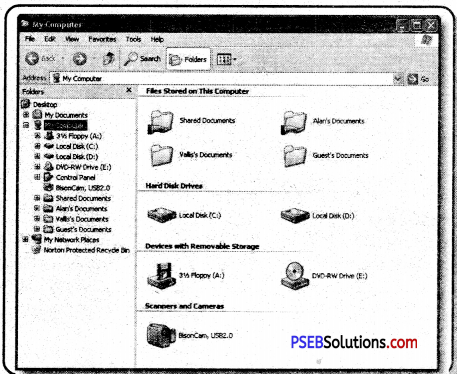
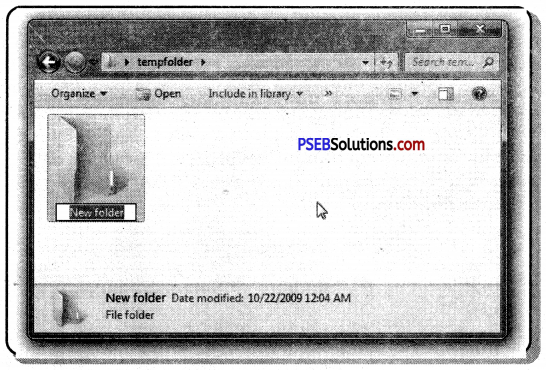
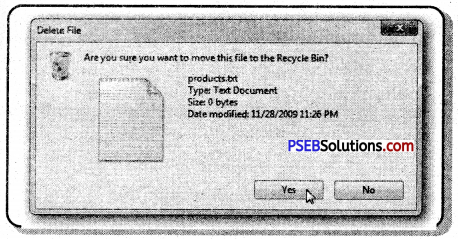
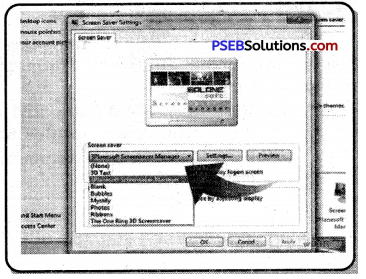
PSEB 10th Class Hindi Vyakaran विशेषण-निर्माण

Punjab State Board PSEB 10th Class Hindi Book Solutions Hindi Grammar visheshan nirman विशेषण-निर्माण Exercise Questions and Answers, Notes.

PSEB 10th Class Hindi Grammar विशेषण-निर्माण

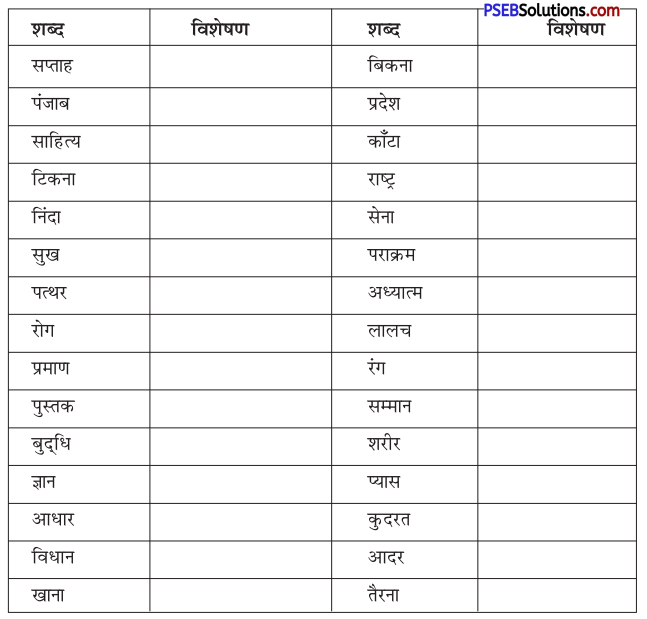
निम्नलिखित शब्दों के विशेषण बनाइए:
PSEB 10th Class Hindi Vyakaran विशेषण-निर्माण 1
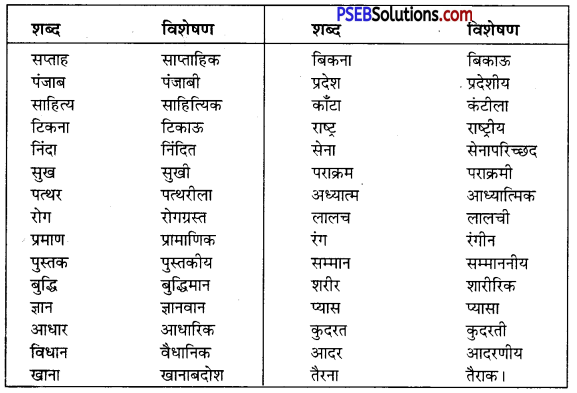
उत्तर:
PSEB 10th Class Hindi Vyakaran विशेषण-निर्माण 2

प्रश्न 1.
इतिहास का विशेषण है
(क) इतिहासीय
(ख) ऐतिहासिक
(ग) इतिहासिक
(घ) ऐतिहासु।
उत्तर:
(ख) ऐतिहासिक

PSEB 10th Class Hindi Vyakaran विशेषण-निर्माण

प्रश्न 2.
घर का विशेषण है
(क) घरेलू
(ख) घरीय
(ग) घरीला
(घ) घरेस्वी।
उत्तर:
(क) घरेलू

प्रश्न 3.
परिवार का विशेषण है
(क) परिवारी
(ख) परिवारू
(ग) पारिवारिक
(घ) परिवारीय।
उत्तर:
(ग) पारिवारिक

प्रश्न 4.
राष्ट्र का विशेषण है
(क) राष्ट्रीय
(ख) राष्ट्र
(ग) राष्ट्रिकता
(घ) राष्ट्रपन।
उत्तर:
(क) राष्ट्रीय

प्रश्न 5.
हृदय का विशेषण है,
(क) हृदयी
(ख) हार्दिय
(ग) हार्दिक
(घ) हार्दित।
उत्तर:
(ग) हार्दिक

प्रश्न 6.
नगर का विशेषण है
(क) नागर
(ख) नागरिक
(ग) नागर्कि
(घ) नागार्कयी।
उत्तर:
(ख) नागरिक

प्रश्न 7.
जिज्ञासा का विशेषण जिज्ञासु है (हाँ या नहीं में उत्तर लिखें)
उत्तर:
हाँ
प्रश्न 8.
भारत का विशेषण भारतीय है। (सही या गलत में उत्तर लिखें)
उत्तर:
सही

प्रश्न 9.
प्रकृति का विशेषण परकृतिय है (हाँ या नहीं में उत्तर लिखें)
उत्तर:
नहीं

प्रश्न 10.
साहित्य का विशेषण साहित्यिक है (सही या गलत में उत्तर लिखें)
उत्तर:
गलत।

PSEB 10th Class Hindi Vyakaran विशेषण-निर्माण

वर्ष
निम्नलिखित में से किसी एक शब्द का विशेषण लिखिए
1. बाहर, पंजाब।
उत्तर:
बाहर = बाहरी
पंजाब = पंजाबी।

2. दिन, धन।
उत्तर:
दिन = दैनिक
धन = धनवान, धनवती।

3. बुद्धि, शहर।
उत्तर:
बुद्धि = बुद्धिमान
शहर = शहरी।

वर्ष
1. रंग, खामोश
उत्तर:
रंग = रंगीला
खामोश = खामोशी।

2. सप्ताह, ज्ञान
उत्तर:
सप्ताह = साप्ताहिक
ज्ञान = ज्ञानी/ज्ञानवान।

3. व्यापार, हित
उत्तर:
व्यापार = व्यापारिक
हित = हितवती/हितैषी।

प्रश्न 1.
विशेषण किसे कहते हैं?
उत्तर:
जिन शब्दों से संज्ञा या सर्वनाम की विशेषता व्यक्त होती है, उन्हें विशेषण कहते हैं; जैसेभोली राधा चतुर कृष्ण की बातों में आ गई। इस वाक्य में भोली राधा का तथा चतुर कृष्ण का विशेषण है।

प्रश्न 2.
मूल रूप से कौन-से शब्द विशेषण हैं?
उत्तर:
मूल रूप से विशेषण शब्द अच्छा, कोमल, बुरा, लाल, पीला, विद्वान, पुराना, कठोर, नया, निपुण, मज़बूत आदि हैं।

प्रश्न 3.
विशेषणों का निर्माण कैसे होता है?
उत्तर:
विशेषणों का निर्माण संज्ञा, सर्वनाम, क्रिया तथा अव्यय शब्दों में प्रत्यय लगाकर तथा कहीं-कहीं कुछ आवश्यक परिवर्तन करके किया जाता है; जैसे-

  1. संज्ञा शब्द ‘पालन’ में ‘अक’ प्रत्यय लगाकर तथा अंतिम वर्ण को हटाकर विशेषण शब्द ‘पालक’ बनता है।
  2. सर्वनाम शब्द ‘वह’ में ‘सा’ प्रत्यय लगाने से विशेषण शब्द ‘वैसा’ बनता है।
  3. क्रिया शब्द ‘पढ़ना’ में ‘आक् प्रत्यय लगाने तथा अंतिम ‘ना’ हटाने से विशेषण शब्द ‘पढ़ाकू’ बनता है।
  4. अव्यय शब्द ‘भीतर’ में ‘ई’ प्रत्यय लगाने से विशेषण शब्द ‘भीतरी’ बनता है।

PSEB 10th Class Hindi Vyakaran विशेषण-निर्माण

प्रश्न 4.
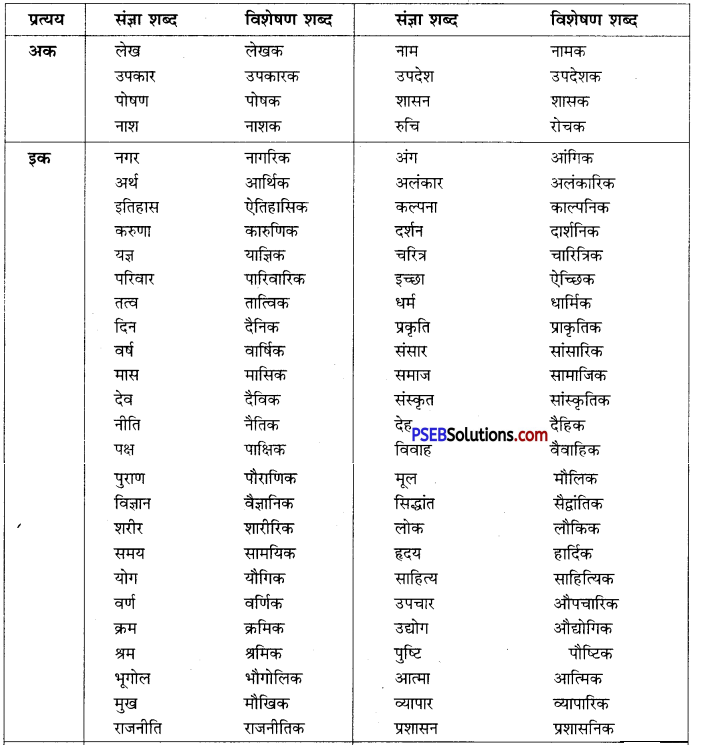
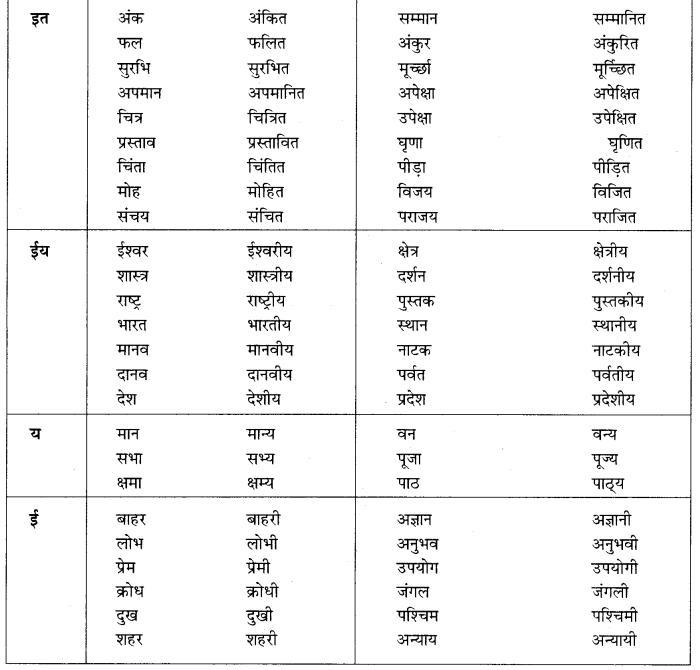
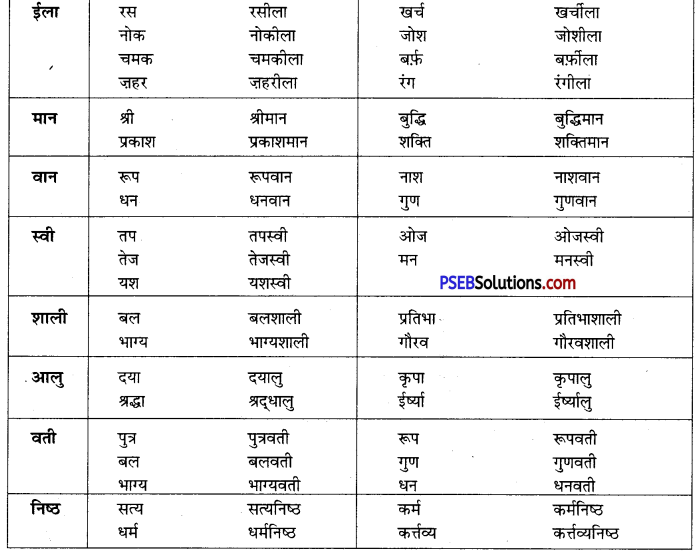
संज्ञा शब्दों से विशेषण शब्दों का निर्माण कीजिए।
उत्तर:
संज्ञा शब्द से विशेषण शब्द का निर्माण
PSEB 10th Class Hindi Vyakaran विशेषण-निर्माण 3
PSEB 10th Class Hindi Vyakaran विशेषण-निर्माण 4
PSEB 10th Class Hindi Vyakaran विशेषण-निर्माण 5

PSEB 10th Class Hindi Vyakaran विशेषण-निर्माण

प्रश्न 5.
सर्वनाम शब्दों से विशेषण शब्दों का निर्माण कीजिए।
उत्तर:
सर्वनाम शब्द से विशेषण शब्द निर्माण
PSEB 10th Class Hindi Vyakaran विशेषण-निर्माण 6

प्रश्न 6.
क्रिया शब्दों से विशेषण शब्दों का निर्माण कीजिए।
उत्तर:
क्रिया शब्द से विशेषण शब्द निर्माण
PSEB 10th Class Hindi Vyakaran विशेषण-निर्माण 7

प्रश्न 7.
अव्यय शब्दों से विशेषण शब्दों का निर्माण कीजिए।
उत्तर:
अव्यय शब्द से विशेषण शब्द निर्माण
PSEB 10th Class Hindi Vyakaran विशेषण-निर्माण 8

PSEB 6th Class Computer Notes Chapter 2 Computer Components

This PSEB 6th Class Computer Notes Chapter 2 Computer Components will help you in revision during exams.

PSEB 6th Class Computer Notes Chapter 2 Computer Components

Introduction to Basic Components of Computer System:
Computer is a device which gets input, processes it and gives output to the user. Input processing and output are called basic tasks of a computer system. For doing these tasks computers need various components. For this computer needs Standard Input Output devices and a Processing Unit.

Standard Input devices include keyboard and mouse. Both of these devices are necessary for a computer. If the keyboard is not attached to the computer, the computer will show an error message at the time of booting. The keyboard is used to enter text messages and the mouse is a pointing device. The most common Output device used in computers is a monitor. It is required to see the result of our work.

The combination of these systems is called the Standard Input Output unit.
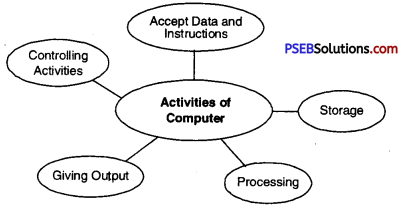
PSEB 6th Class Computer Notes Chapter 2 Computer Components 1

How Computer Works?
The process of processing the data is called the processing cycle of a computer. It is the way of processing within a computer system.

Three steps are involved in this cycle.
1. Input: This part is related with input of data and instruction. Computers cannot work without proper in. To enter the necessary data and instructions in the computer input unit is required. Man can enter the data and instruction in its own language and that is converted into computer languages by this input unit.

There are many types of input devices used for input. Keyboard is the most common input device, used to enter textual data. The second common device for input is the mouse. This device is used to point a special part on the screen or to select a command your mouse pointer. The other common devices which are used for input are microphone touch screen scanner etc.

2. Processing: Processing is the process of acting according to given instructions. This is the main task done by computer as it gets instructions from the computer. The main aim of Computer is to work as per the given instructions. This task is done by the processor of the computer. The processor is just like the brain of a human being. This processor is also known as the Central Processing Unit.

3. Output: After processing the data is converted into some information. The user of the computer needs that information from the computer as its result. This result is shown to the user using output devices. The most common output device is a monitor. The other output devices are speaker, printer, plotters.
PSEB 6th Class Computer Notes Chapter 2 Computer Components 2

PSEB 6th Class Computer Notes Chapter 2 Computer Components

Block Diagram of Computer:
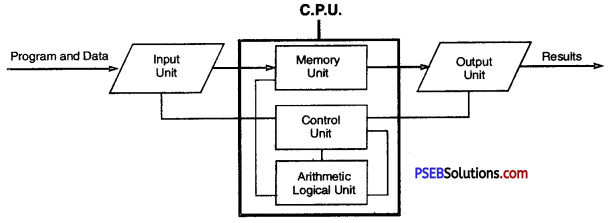
A block diagram of a computer is a Graphical representation of various steps involved in working of a computer. The main parts shown in this block diagram are input unit, processing unit and output unit. The processing unit is divided into three parts namely memory unit, control unit and arithmetic logic unit.
PSEB 6th Class Computer Notes Chapter 2 Computer Components 3

Parts of Central Processing Unit
The Central Processing Unit of a computer system is divided into three parts.

  1. Memory Unit
  2. Control Unit
  3. Arithmetic and Logical Unit

PSEB 6th Class Computer Notes Chapter 2 Computer Components 4
1. Memory Unit: This unit is also known as storage unit. This unit holds the data and instruction in it. It can store data and instruction temporary and permanently. Many types of memories are used in this unit. Type of memory is used for special purposes. These memories vary in size, storage capacity nature of operation, speed and cost.

2. Control Unit: Control unit is meant for controlling all the activities of the computer. This unit works as the brain of a computer. It performs all the operations given in the form of instructions. It also controls the functioning of other components of the computer. It controls both input and output units also.

3. Arithmetic and Logical Unit: This is the third part of the Central Processing Unit. This unit is related to performing all the arithmetic and logical operations. A lot of calculations are done by computer in each type of work. All these calculations are done by this unit of CPU. Part of Central Processing Unit is integrated within the processor.

Types of Computer Memories
Computers can store data in many ways. This is possible due to the use of different types of memory in computers.

Computer memory can be classified into two types.

  1. Primary Memory
  2. Secondary Memory

PSEB 6th Class Computer Notes Chapter 2 Computer Components 5

Primary Memory:
Primary memory is also called main memory. It is directly accessible by the Central Processing Unit of the computer. All the instructions and data are placed in this memory before processing. This memory is also known as main memory.

Primary memory is of two types.

  1. Random Access Memory
  2. Read Only Memory

1. Random Access Memory: This memory is also known as RAM. This memory is very fast. All the data and instructions are stored in this memory when the computer is working. It is a volatile type of memory. It means that when the computer is switched off its contents gets destroyed. This memory cannot store the data permanently. But without this memory the computer cannot work.

2. Read Only Memory: It is also known as ROM. It is a permanent type of memory. This memory is placed on computers and other electronic devices in the form of microchips. The ordinary user cannot write in this memory. He can only read from this memory. That is why this memory is called Read Only Memory. Normally this memory stores the data and information which is required to start a computer. Only users cannot write in this memory. Only the manufacture of this memory can write in it.

PSEB 6th Class Computer Notes Chapter 2 Computer Components

Secondary Memory
Secondary memory is also known as auxiliary memory or external memory. This memory is used to store data and instructions for a long time. This memory is a non-volatile memory. The storage capacity of secondary memory is higher than primary memory. This memory is not directly accessible from the CPU. Different types of memory storage devices are used in this type such as hard disk, CD, DVD, pendrive, Magnetic tape etc.

Categories of Computer:
The computers can be categorised according to their speed, memory processing capability, storage capacities and generations.

There are four main types of computer.

  1. Micro computer or personal computer
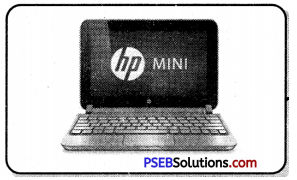
  2. Mini computer
  3. Mainframe computer.
  4. Supercomputer

PSEB 6th Class Computer Notes Chapter 2 Computer Components 6
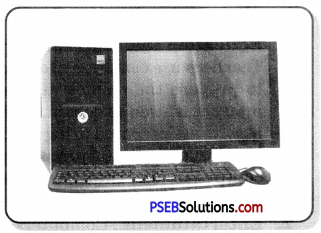
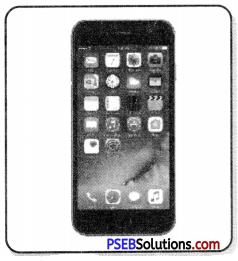
1. Micro Computer or Personal Computer: Micro or Personal Computers are the most common computers. These are the computers which are used in homes, schools and offices. These computers are small in size and the cost of this computer is very less. These computers can be afforded by small businesses, small schools and individuals also. The computer on which we work falls in this category. Examples of computers of this category are desktop computer, laptops, palmtops, tablets, mobile phones etc.

2. Mini Computer: This type of computer has more processing capabilities than a microcomputer.
These computers are also larger in size.
These computers are used by multiple users at a time. The main features of these computers is highest storage capacity sharing of resources and high processing speed. Micro computers are mainly used as small or mid range servers. These computers are used in large businesses, large team based companies and scientific applications.
PSEB 6th Class Computer Notes Chapter 2 Computer Components 7

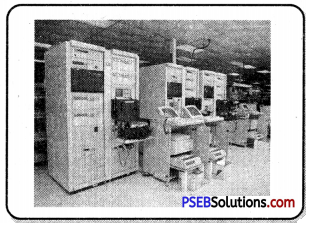
3. Mainframe Computer: The processing speed of Mainframe computers is higher than micro and mini computers. These computers are capable of handling large amounts of data within less time. These computers are capable of performing operations on large amounts of data with high processing speed. Mainframe computers are used in patience such as government offices, banks etc.
PSEB 6th Class Computer Notes Chapter 2 Computer Components 8

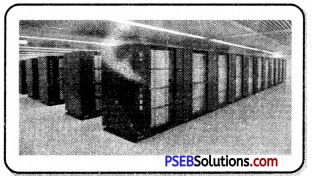
4. Supercomputer: Supercomputer is the most powerful computer invented till now. The processing speed of supercomputers is very fast. It can store a large amount of data. These computers are specially used for complex application. Supercomputers are the most powerful and expensive computers till now. The application areas of these types of computers are weather forecasting climate research, oil and gas exploration and processing of astronomical data.
PSEB 6th Class Computer Notes Chapter 2 Computer Components 9

PSEB 6th Class Computer Notes Chapter 1 Introduction to Computer

This PSEB 6th Class Computer Notes Chapter 1 Introduction to Computer will help you in revision during exams.

PSEB 6th Class Computer Notes Chapter 1 Introduction to Computer

Introduction to Computer:
Computers are used everywhere these days. All the offices, banks, school, colleges use computers for their daily work. Let us try to understand the meaning of computers.

Meaning of Computer:
A computer is an electronic device which gets the data and instructions from the user. It processes the data as per given instructions and gives the result in the desired form. Computer can be defined as:

A computer is an electronic machine that accepts data as input from the user and processes the data under the control of a set of instructions and gives the result as an output.
PSEB 6th Class Computer Notes Chapter 1 Introduction to Computer 1
Literally, the word computer is taken from Latin word compute which means to calculate. So in simple words, we can say that a computer is an electronic device which was made to calculate. Earlier their definition was correct as the main work of the computer was to calculate. Now the computer is doing a lot of work to decide the calculation.

PSEB 6th Class Computer Notes Chapter 1 Introduction to Computer

Uses of Computer:
Following are the uses of computer in Modern Times:

  • We can do mathematical calculations on the computer.
  • We can play games on the computer.
  • We can draw pictures on the computer.
  • We can listen to songs and watch films on the computer.
  • We can use computers to print books and newspapers.
  • We can use computers to book our tickets to travel in trains, buses and airplanes.
  • We can check the arrival and departure time of trains, buses and airplanes with the help of a computer.
  • We can check the weather conditions of any place before travelling.
  • We can print reports, results of our school or time table.
  • We can store our data into a computer for future use.

Applications of Computer
Computers are used in many areas. Some of the application areas of computers are given below:
PSEB 6th Class Computer Notes Chapter 1 Introduction to Computer 2

1. Education: Students and teachers are using computers in their education. Teachers use computers to teach the students and students use computers to prepare their notes making, drawing and making projects etc. The internet is used to search, study material, results, time table and various reports are prepared using the computer. Computers are also used for record keeping, online data, processing etc. Punjab Education Department is using computer on their web portal like www.epunjabschool.gov.in www.pseb.ac.in

2. Entertainment: Computers are a good source of entertainment also. The user can watch movies, listen song and camp. Beautiful presentations can be made on the computer. All the films made in these days use computers for their special effects.

3. Sports: Computers are also used in the sports field. They are used to improve the performance of players to keep data and to evaluate the performance and to display information about various tournaments which will happen in future. Digital scoreboards are also a part of games today. The players can improve their by analysing their record.

4. Communication: Computers have given new ways of communication. The user can make video calls, audio calls, chat using computer data and send email to their friends and relatives. Any type of data can be shared using smartphone, tablet, laptop and computers.

5. Shops: Shopkeepers are also using computers for their various works. They are using computers to manage their stock to generate purchase orders to generate bills to advertise their shop. The use of computers in shops save a lot of time for the shopkeeper and the customer.

6. Hospitals: Hospitals are using computers to maintain patient records and to monitor the health of patients. The medical history of a patient can be stored and communicated by using a computer. Now the doctor is also using a computer to check their patient from a remote place. Computers are also used in Laboratories to do 2x and data analysis.

7. Banks: The hanking system is working by using computers. All types of records of customers are maintained by using computers. Then use a computer to maintain data of accounts withdrawal of money deposit of money, loans etc. Customers can now use e-banking services to do their work from their home. ATMs are totally computer based.

8. Government Offices: Government offices are using computers in governance, bill payment, Income Tax application processing. Most of the government’s work is online these days. The citizens can apply for any government service with the help of using computer and internet from their homes. They can pay to build Taxes and avail other governmental services using the internet.

9. Travel: Computers are also used for travel purposes. The user can book their tickets, get knowledge of some geographical areas, check availability of means of transport, cost, estimation and regional culture etc. The user can also book hotels from their home by using the internet.

Characteristics of Computer
The main characteristics of computer are as given below:
PSEB 6th Class Computer Notes Chapter 1 Introduction to Computer 3
Characteristics of Computer
Speed Accuracy Reliability Diligence Automotion Storage
1. Speed: Computer is a very fast machine. It can do calculation in milliseconds. It can complete days work in seconds. That is why it has reduced human effort.

2. Accuracy: Computer is an accurate machine. It never makes any mistakes. If a mistake is performed in any calculation that is always due to human error. A computer can do any task repeatedly for thousands of times without any error.

3. Reliability: Reliability means the ability of being trusted. A computer is a reliable machine. We cannot doubt the results given by computers because
they are always correct. There is no need of rechecking the results. It gives the same result every time.

4. Diligence: Computer never gets tired. It can to do work for many days or even for years. During this time its efficiency does not decrease and neither it commits errors after long working. In fact, a computer is a hardworking machine.

5. Automation: Automation means to do the work automatically. Computers can be instructed to do the work without any interaction. He can be given the instructions and the computer can do work without asking anything. We just need to start the computer and ask him to do the particular work. After that it will do the whole work without asking anything.

6. Storage: The storage capacity of computers is very large. It can attach many storage devices such as hard disk, pen drive at 17 to it. It can store any type of data such as text, audio, video, animation in it. We can also store the storage capacity of computers. Computers store data for a very long time.

Portable Computing Devices
Portable devices are those devices which can be easily carried from one place to another. Technology has given us many portable devices. Some of them are explained below:
1. Mobile Phone or Smartphone: It is the most common portable computing device used these days. Each one is using their mobile phones these days. Smartphones can do a lot of calculation work and processing.
Their speed is also very fast. Modern mobile phones are equipped with camera large storage capacity and High processing speed.
PSEB 6th Class Computer Notes Chapter 1 Introduction to Computer 4
They can be used in education, business trading, entertainment, gaming etc. Mobile phones are very small devices. It can be carried in our pockets. There are a lot of mobile phones available in the market with different features.

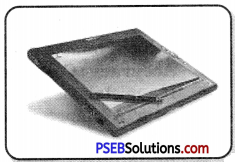
2. Tablet Computer: It is a small computer.
It is mainly known as a tablet. If the battery is used in this tablet. It has a touch screen which is used to give input and get the output. Tablets can be used for many purposes. Most of the students are using tablets in their education at home as well as at their schools.
PSEB 6th Class Computer Notes Chapter 1 Introduction to Computer 5

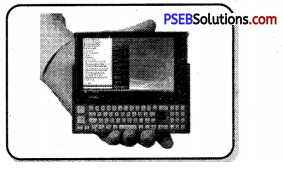
3. Palmtop Computer: Palmtop computer is a small size computer which can be placed on our palm. This computer has a small screen and small keyboard. It is just like a mobile phone having a keyboard. These computers are not very popular in these days. These computers were used for limited purposes only
PSEB 6th Class Computer Notes Chapter 1 Introduction to Computer 6

4. Laptop Computer: Laptop computer is the most famous computer these days. It is a computer with a big screen and keyboard attached to it. It can be easily taken from one place to another. If the battery is used to give power to the laptop computer. All it had also a touchpad and many other features built in it.
PSEB 6th Class Computer Notes Chapter 1 Introduction to Computer 7

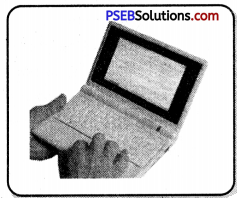
5. Note Book: It is a portable computer. It is smaller than laptop. It is also lighter in weight. It has a battery to work. The battery can be charged again and again. It can be easily taken from one place to another.
PSEB 6th Class Computer Notes Chapter 1 Introduction to Computer 8

PSEB 6th Class Computer Notes Chapter 1 Introduction to Computer

Limitations of Computer:
PSEB 6th Class Computer Notes Chapter 1 Introduction to Computer 9
Computers are capable of doing a lot of work. But, after all this is a machine and unable to do some tasks. These kinds of tasks are considered as limitations of computers.

Some of the main limitations of computer are as under:

  • A computer cannot take decisions by itself.
  • A computer cannot correct wrong instructions.
  • Computer cannot do any work without instruction from the user.
  • It does not have feelings or IQ (Intelligence Quotient)
  • It does not have knowledge and experience like a human being.
  • Computer can not start work until asked.

PSEB 7th Class Maths Solutions Chapter 2 Fractions and Decimals Ex 2.1

Punjab State Board PSEB 7th Class Maths Book Solutions Chapter 2 Fractions and Decimals Ex 2.1 Textbook Exercise Questions and Answers.

PSEB Solutions for Class 7 Maths Chapter 2 Fractions and Decimals Ex 2.1

1. Solve the following fractions :

Question (i).
4 + \(\frac {7}{8}\)
Answer:
4 + \(\frac {7}{8}\)
= \(\frac{4 \times 8+7}{8}\)
= \(\frac{32+7}{8}\)
= \(\frac {39}{8}\)
= 4\(\frac {7}{8}\)

Question (ii).
\(\frac{9}{11}-\frac{4}{15}\)
Answer:
\(\frac{9}{11}-\frac{4}{15}\)
= \(\frac{9 \times 15-4 \times 11}{11 \times 15}\)
= \(\frac{135-44}{165}\)
= \(\frac {91}{165}\)

Question (iii).
\(\frac{11}{16}-\frac{2}{5}+\frac{8}{10}\)
Answer:
\(\frac{11}{16}-\frac{2}{5}+\frac{8}{10}\)
PSEB 7th Class Maths Solutions Chapter 2 Fractions and Decimals Ex 2.1 1a
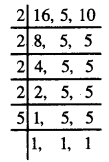
LCM of 16, 5 and 10
= 2 × 2 × 2 × 2 × 5
= 80
= \(\frac{11 \times 5-2 \times 16+8 \times 8}{80}\)
= \(\frac{55-32+64}{80}\)
= \(\frac {87}{80}\)
= 1\(\frac {7}{80}\)

Question (iv).
\(2 \frac{1}{5}+6 \frac{1}{2}\)
Answer:
\(2 \frac{1}{5}+6 \frac{1}{2}\)
= \(\frac{11}{5}+\frac{13}{2}\)
= \(\frac{11 \times 2+13 \times 5}{5 \times 2}\)
= \(\frac{22+65}{10}\)
= \(\frac {87}{10}\)
= 8\(\frac {7}{10}\)

Question (v).
\(8 \frac{1}{2}-3 \frac{5}{8}\)
Answer:
\(8 \frac{1}{2}-3 \frac{5}{8}\)
= \(\frac{17}{2}-\frac{29}{8}\)
= \(\frac{17 \times 4-29}{8}\)
= \(\frac{68-29}{8}\)
= \(\frac {39}{8}\)
= 4\(\frac {7}{8}\)

PSEB 7th Class Maths Solutions Chapter 2 Fractions and Decimals Ex 2.1

Question (vi).
\(\frac{9}{10}-\frac{9}{100}+\frac{9}{1000}\)
Answer:
\(\frac{9}{10}-\frac{9}{100}+\frac{9}{1000}\)
= \(\frac{9 \times 100-9 \times 10+9}{1000}\)
= \(\frac{900-90+9}{1000}\)
= \(\frac {810}{1000}\)

2. Arrange the following in ascending order :

Question (i).
\(\frac{2}{17}, \frac{10}{17}, \frac{3}{17}, \frac{16}{17}, \frac{5}{17}, \frac{8}{17}\)
Answer:
Ascending order of \(\frac{2}{17}, \frac{10}{17}, \frac{3}{17}, \frac{16}{17}, \frac{5}{17}, \frac{8}{17}\) is:
\(\frac{2}{17}, \frac{3}{17}, \frac{5}{17}, \frac{8}{17}, \frac{10}{17}, \frac{16}{17}\)

Question (ii).
\(\frac{1}{5}, \frac{3}{7}, \frac{7}{10}\)
Answer:
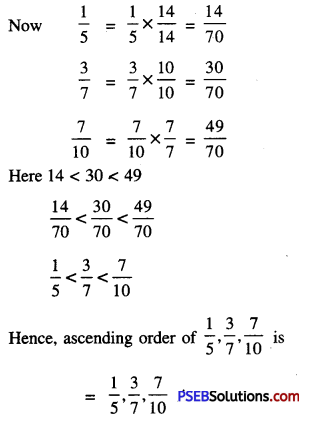
\(\frac{1}{5}, \frac{3}{7}, \frac{7}{10}\)
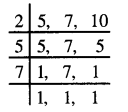
PSEB 7th Class Maths Solutions Chapter 2 Fractions and Decimals Ex 2.1 2a
L.C.M of 5, 7 , 10 = 2 × 5 × 7
= 70
PSEB 7th Class Maths Solutions Chapter 2 Fractions and Decimals Ex 2.1 3a

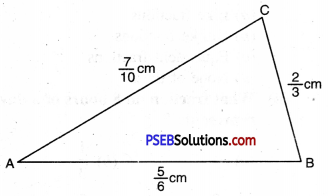
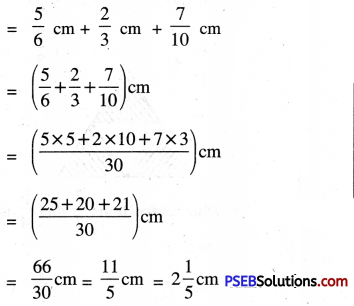
3. The three sides AB, BC and CA of a triangle ΔABC are \(\frac {5}{6}\)cm, \(\frac {2}{3}\)cm and \(\frac {7}{10}\) cm respectively. Find the perimeter of the triangle.
PSEB 7th Class Maths Solutions Chapter 2 Fractions and Decimals Ex 2.1 9
Answer:
Slides of ΔABC are
AB = \(\frac {5}{6}\) cm,
BC = \(\frac {2}{3}\)
CA = \(\frac {7}{10}\)
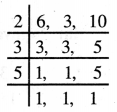
PSEB 7th Class Maths Solutions Chapter 2 Fractions and Decimals Ex 2.1 4a
L.C.M. (6, 3, 10) = 2 × 3 × 5 = 30
Perimeter of ΔABC = AB + BC + CA
PSEB 7th Class Maths Solutions Chapter 2 Fractions and Decimals Ex 2.1 5a

PSEB 7th Class Maths Solutions Chapter 2 Fractions and Decimals Ex 2.1

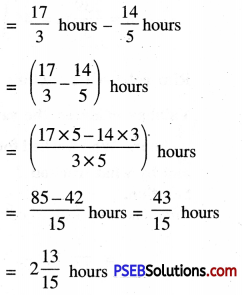
4. Ramesh studies for 5\(\frac {2}{3}\) hours daily. He devotes 2\(\frac {4}{5}\) hours of his time for science devotes for other subjects ?
Answer:
Total daily time for all subjects
= 5\(\frac {2}{3}\) hours = \(\frac {17}{3}\) hours
Time for science and mathematics
= 2\(\frac {4}{5}\) hours = \(\frac {14}{5}\) hours
Time for other subjects
PSEB 7th Class Maths Solutions Chapter 2 Fractions and Decimals Ex 2.1 6a

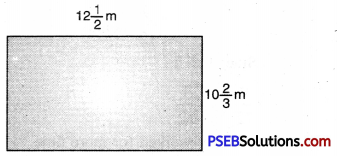
5. Sonia jogs once around the rectangular park of sides 10\(\frac {2}{3}\)m and 12\(\frac {1}{2}\)m. Find the total distance covered by the Sonia.
PSEB 7th Class Maths Solutions Chapter 2 Fractions and Decimals Ex 2.1 7a
Answer:
Length of rectangular park
= 12\(\frac {1}{2}\)m = \(\frac {25}{2}\)m
Breadth of rectangular park
= 10\(\frac {2}{3}\)m = \(\frac {32}{3}\)m
Total distance covered by Sonia = 2 [Length + Breadth]
= \(2\left(\frac{32}{3}+\frac{25}{3}\right) \mathrm{m}\)
= \(2\left(\frac{32 \times 2+25 \times 3}{3 \times 2}\right) \mathrm{m}\)
= \(2\left(\frac{65+75}{6}\right) \mathrm{m}\)
= \(\frac {278}{6}\) m
= \(\frac {139}{3}\) m
= 46\(\frac {1}{3}\) m

6. Ritu coloured a picture in \(\frac {7}{12}\) hours. Vaibhav coloured the same picture in \(\frac {3}{4}\) hours. Who worked for a longer time and by what fraction ?
Answer:
Time taken by Ritu to colour
= \(\frac {7}{12}\) hours
Time taken by Vaibhav = \(\frac {3}{4}\) hours
= \(\frac {3}{4}\) × \(\frac {3}{3}\)
= \(\frac {9}{12}\) hours
Since 9 > 7
∴ \(\frac {9}{12}\) > \(\frac {7}{12}\)
∴ Vaibhav worked for more time.
Difference between time taken by
Vaibhav and Ritu = \(\frac{3}{4}-\frac{7}{12}\)
= \(\frac{3 \times 3-7}{12}\)
= \(\frac{9-7}{12}=\frac{2}{12}\)
= \(\frac {1}{6}\) of an hour.

PSEB 7th Class Maths Solutions Chapter 2 Fractions and Decimals Ex 2.1

7. Multiple Choice Questions :

Question (i).
Fraction \(\frac {2}{5}\), \(\frac {7}{5}\) are :
(a) Like fractions
(b) Unlike fractions
(c) Equivalent fractions
(d) None of these
Answer:
(a) Like fractions

Question (ii).
What fraction do 8 hours of a day represents ?
(a) \(\frac {1}{2}\)
(b) \(\frac {1}{3}\)
(c) \(\frac {8}{60}\)
(d) \(\frac {2}{3}\)
Answer:
(b) \(\frac {1}{3}\)

Question (iii).
Equivalent fraction of \(\frac {3}{5}\) is :
(a) \(\frac {13}{15}\)
(b) \(\frac {5}{3}\)
(c) \(\frac {9}{15}\)
(d) \(\frac {5}{13}\)
Answer:
(c) \(\frac {9}{15}\)

Question (iv).
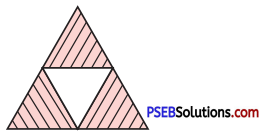
Shaded area of given triangle represents the fractions:
(a) \(\frac {1}{3}\)
(b) \(\frac {3}{4}\)
(c) \(\frac {1}{4}\)
(d) \(\frac {2}{3}\)

PSEB 7th Class Maths Solutions Chapter 2 Fractions and Decimals Ex 2.1 8a
Answer:
(b) \(\frac {3}{4}\)

Question (v).
Sum of fractions \(\frac {2}{7}\), \(\frac {3}{4}\) is equal to :
(a) \(\frac {5}{28}\)
(b) \(\frac {1}{3}\)
(c) \(\frac {5}{11}\)
(d) \(\frac {29}{28}\)
Answer:
(d) \(\frac {29}{28}\)

PSEB 7th Class Maths MCQ Chapter 1 Integers

Punjab State Board PSEB 7th Class Maths Book Solutions Chapter 1 Integers MCQ Questions with Answers.

PSEB 7th Class Maths Chapter 1 Integers MCQ Questions

Multiple Choice Questions

Question 1.
The value of -| – 21| is :
(a) 21
(b) -21
(c) 1
(d) None of these.
Answer:
(b) -21

Question 2.
17 + (-18) =
(a) 35
(b) 1
(c) -1
(d) -35.
Answer:
(c) -1

Question 3.
(-15) × 0 is equal to :
(a) 0
(b) -15
(c) 15
(d) 1.
Answer:
(a) 0

Question 4.
The product of 3 × -1 is :
(a) 3
(b) – 3
(c) 1
(d) -1.
Answer:
(b) – 3

Question 5.
(-8) ÷ (-1) is equal to :
(a) 8
(b) 1
(c) -8
(d) -1.
Answer:
(a) 8

PSEB 7th Class Maths Solutions Chapter 1 Integers MCQ

Fill in the blanks

Question 1.
0 is greater than every …………….. integer
Answer:
Negative

Question 2.
25 – 10 = -10 + ……..
Answer:
25

Question 3.
15 × ……… = 0
Answer:
0

Question 4.
369 ÷ ……… = 369
Answer:
1

Question 5.
20 ÷ ……… = -2.
Answer:
-10

PSEB 7th Class Maths Solutions Chapter 1 Integers MCQ

Write True or False

Question 1.
Sum of two integeres is also integer.
Answer:
True

Question 2.
(-7) + 3 = 3 + (-7) (True/False)
Answer:
True

Question 3.
-2 + 2 = 0 (True/False)
Answer:
True

Question 4.
1 ÷ a = 1 (True/False)
Answer:
False

Question 5.
a ÷ 1 = 0. (True/False)
Answer:
True

PSEB 7th Class Maths Solutions Chapter 1 Integers Ex 1.4

Punjab State Board PSEB 7th Class Maths Book Solutions Chapter 1 Integers Ex 1.4 Textbook Exercise Questions and Answers.

PSEB Solutions for Class 7 Maths Chapter 1 Integers Ex 1.4

1. Evaluate each of the following :
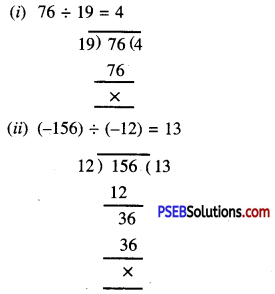
(i) 76 ÷ 19
(ii) (-156) ÷ (-12)
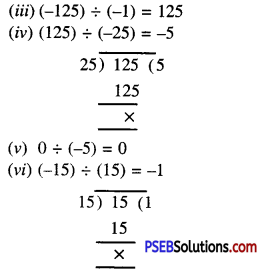
(iii) (-125) ÷ (-1)
(iv) (125) ÷ (-25)
(v) 0 ÷ (-5)
(vi) (-15) ÷ (15)
Answer:
PSEB 7th Class Maths Solutions Chapter 1 Integers Ex 1.4 1
PSEB 7th Class Maths Solutions Chapter 1 Integers Ex 1.4 2

2. Write all even integers between -18 and 0.
Answer:
All even integers between – 18 and 0 are :
-16, -14, -12, -10, -8, -6, -4, -2.

3. Write all odd integers between -9 and 9.
Answer:
All odd integers between -9 and 9 are :
-7, -5, -3, -1, 1, 3, 5, 7.

PSEB 7th Class Maths Solutions Chapter 1 Integers Ex 1.4

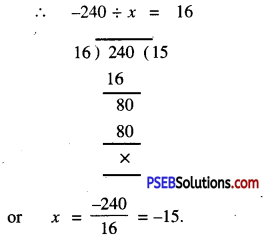
4. By what number should (-240) be divided to obtain 16.
Answer:
Let the required number be x
∴ -240 ÷ x = 16
PSEB 7th Class Maths Solutions Chapter 1 Integers Ex 1.4 3
Hence, the required number is -15

5. Find the value of :

Question (i).
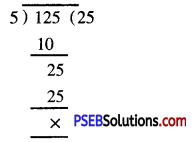
125 ÷ [5 ÷ (-1)]
Answer:
125 ÷ [5 ÷ (-1)] = 125 ÷ (-5)
= -25 Ans.
PSEB 7th Class Maths Solutions Chapter 1 Integers Ex 1.4 4

Question (ii).
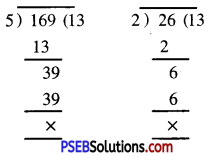
[169 ÷ 13] ÷ [26 ÷ 2]
Answer:
[169 ÷ 13] ÷ [26 ÷ 2]
= [13] ÷ [13] = 1 Ans.
PSEB 7th Class Maths Solutions Chapter 1 Integers Ex 1.4 5

Question (iii).
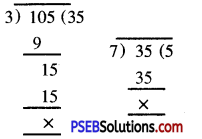
[(-105) ÷ 3] ÷ 7
Answer:
[(-105) ÷ 3] ÷ 7
= [-35] ÷ 7
= -5.
PSEB 7th Class Maths Solutions Chapter 1 Integers Ex 1.4 6

6. Simplify : 12 – [8 + 27 ÷ (2 × 8 – 7)]
Answer:
12 – [8 + 27 + (2 × 8 – 7)]
= 12 – [8 + 27 ÷ (16 – 7)]
= 12 – [8 + 27 ÷ (9)]
= 12 – [8 + 3] = 12- 11
= 1

PSEB 7th Class Maths Solutions Chapter 1 Integers Ex 1.4

7. Simplify : 10 – [8 – {11 + 30 ÷ (4 + 2)}]
Answer:
10 – [8 – {11 + 30 (4 + 2)}]
= 10 – [8 – {11 + 30 ÷ 6}]
= 10 – [8 – (11 + 5)]
= 10 – [8 – 16]
= 10 – [-8]
= 10 + 8 = 18

8. Multiple Choice Questions :

Question (i).
(-8) ÷ 2 =
(a) -16
(b) -4
(c) 4
(d) -8.
Answer:
(b) -4

Question (ii).
(-7) ÷ (-7) =
(a) -1
(b) 49
(c) -49
(d) None of these.
Answer:
(d) None of these.

Question (iii).
0 ÷ 2 =
(a) 1
(b) 2
(c) -2
(d) 0.
Answer:
(d) 0.

PSEB 7th Class Maths Solutions Chapter 1 Integers Ex 1.4

9. The quotient of two integers is always an integer. (True/False)
Answer:
False.

10. If a and b are two unequal non-zero integers then a ÷ b = b ÷ a. (True/False)
Answer:
False.

PSEB 6th Class Computer Notes Chapter 8 Output Devices

This PSEB 6th Class Computer Notes Chapter 8 Output Devices will help you in revision during exams.

PSEB 6th Class Computer Notes Chapter 8 Output Devices

Introduction
Computer is an electronic device which gets input, processes it and give the output. Input is given to computer by input devices. The result which is provided to the user is called output. This output is given to the user using some devices. These devices are known as output devices.

Output Devices:
Output devices are those devices which are used to get output from the computer. These devices display the information into human readable form. These devices are connected to computer using some wires or wireless media. These devices can show the output in text, audio, video are graphic form. There are a lot of output devices available these days.

Uses of output devices: Output devices are used for following purposes:

  • These provide information from the computer.
  • These can be used to get hard copy as well as soft copy.
  • These give the information whether the computer has completed its work or not.

Types of Output Devices
There are many types of output devices available these days. Output devices can be categorized into following categories:

  • Monitor
  • Printer
  • Speaker
  • Headphone
  • Plotter
  • Projector

PSEB 6th Class Computer Notes Chapter 8 Output Devices 1

Monitor:
PSEB 6th Class Computer Notes Chapter 8 Output Devices 2
Monitor is also called visual display terminal. It is used to get soft copy of the output. It is most common output device. It looks like a television screen.
PSEB 6th Class Computer Notes Chapter 8 Output Devices 3
There are different kinds of monitors available these days.

  • Cathode ray tube.
  • Flat panel display

1. Cathode ray tube monitor: These monitors were used in earlier days. These monitors use cathode ray technology to display the information. They look like bulky television sets. The size of these monitors is measured by the diagonal length on the screen. Monitors are available in 15, 17, 19 and 21 inches screens. Initially they were black and white but now colored monitors are also available.

2. Flat panel display monitors: These are the monitors which have a thin display portion. They are reduced in volume, weight and Pi requirement. These monitors can be hung up on the walls. We can see these monitors on calculators, video games, laptop computers etc. These monitors consume less power. Some examples of flat panel display monitors are LCD, LED and plasma.

PSEB 6th Class Computer Notes Chapter 8 Output Devices

Differences between CRT monitors and Flat panel monitors:

CRT Monitor Flat Panel Display Monitors
(i) CRT monitors are big in size. (i) Flat panel monitors are small in size.
(ii) CRT monitors are heavy. (ii) Flat panel monitors are light weight.
(iii) They produce large amount of heat. (iii) Flat panel produce very less heat.
(iv) They use more electricity. (iv) They use less electricity.
(v) CRT monitors are cheaper.
PSEB 6th Class Computer Notes Chapter 8 Output Devices 4
(v) These monitors are costly.
PSEB 6th Class Computer Notes Chapter 8 Output Devices 5

Speaker
Speaker is an output device. Speakers are used to get audio output from the computer. They are connected to the sound card of the computer. Speakers produce audio output in the form of sound waves. Any type of sound can be produced by computer using the speaker.
PSEB 6th Class Computer Notes Chapter 8 Output Devices 6

  • These speakers are required if the user wants to listen songs or watch a movie on a computer. There are many types of speakers available in the market.
  • These ranges from small size to very big size. Normally a set of two speakers is attached to the computer. These speakers are connected to computers using two wires, one for data supply and second for power supply.

Headphone
Headphones are also an output device. These are nothing but smaller versions of speakers. Headphones are also known as earphones. These devices are portable devices. These devices can be plugged into the computer directly or to the speaker attached to the computer. These devices are used when the user alone wants to listen music.

Headphones are similar to the headphones which we use on our mobile phones. They are also available in a variety of models.
PSEB 6th Class Computer Notes Chapter 8 Output Devices 7

Printer:
Printer is an output device which gives a hard copy of the output. The output given by the printer is permanent in nature.
PSEB 6th Class Computer Notes Chapter 8 Output Devices 8
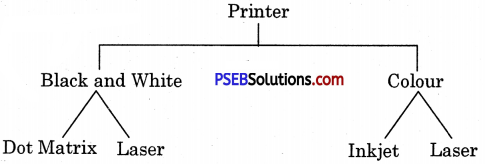
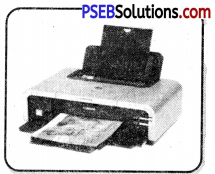
This output can be preserved in the form of paper. There are a lot of printers available in the market. Printer can be colored as well as black and white.

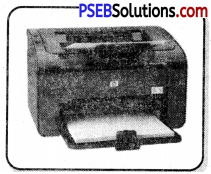
Printer can be divided into three main categories:

  1. Dot Matrix printer
  2. Inkjet printer
  3. Laser printer

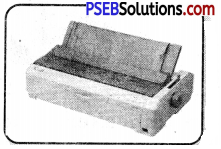
1. Dot Matrix printer: As the name suggests, these printers print any character by combination of various dots. These printers are not very much costly. The speed of these printers is also slow. The printing quality of this printer is not very good. These produce a lot of sound while working. The resolution of printing is also very low. These printers fall in the category of impact printer. These printers are not used in large quantities these days.
PSEB 6th Class Computer Notes Chapter 8 Output Devices 9

2. Inkjet printer: Inkjet printer can be called a non-impact version of Dot Matrix printer.
Similar to Dot Matrix printer inkjet printer also print the text or graphics in the form of small dots. These printers can be colored printers. The printing cost of these printers is very low. The main advantage of these printers is that they do not produce sound while working. These printers are faster than Dot Matrix printers. These printers have small dots of ink on the paper. That is why they are called inkjet printers.
PSEB 6th Class Computer Notes Chapter 8 Output Devices 10
3. Laser printer: Laser printers are the most commonly used printers these days. They use laser technology to print on paper. This printer is black and white as well as colored. The speed of printing in this printer is very high. Their printing quality is also very high. These printers do not produce any sound while working. This printer is costly but the per paper cost is not very much.
PSEB 6th Class Computer Notes Chapter 8 Output Devices 11

Plotter
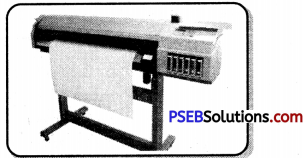
Plotters also give hard copies of output. These are similar to the printer but plotters are used to print on big sized paper or canvas. Plotters are used in computer aided designs. These are used for some specific areas of application such as engineering design graphical design etc. Plotters use pens for drawing pictures in the media. The most common use of plotter is the big banners which we see in the market. These banners are printed with the help of plotters. Plotter can print black and white as well as color. Plotters are very costly devices. They cannot be awarded by single person.

These are of following types:

  • Drum Plotter
  • Flatbed Plotter
  • Inkjet Plotter.

1. Drum Plotter: In drum plotter, a drum is used to rotate in vertical motion. It contains one or more Horizontal pen holders. These pens are used to draw lines on the paper. Drum and pen draw the design by working together simultaneously. Each pen is program selectable. Pens use different colours to draw.

2. Flatbed Plotter: It draws on flat paper. This paper is spread on flat bet table. Paper is not rotated. The pen moves as per the drawing. It contains many pen holdings of different colours. The plot area is as per bed area. It can range from A4 to 50 feet or more.

3. Inkjet Plotter: These plotters uses inkjet technology instead of pens. They can draw in colour. These plotters are usually faster than other types of plotters.
PSEB 6th Class Computer Notes Chapter 8 Output Devices 12

PSEB 6th Class Computer Notes Chapter 8 Output Devices

Projector
Projector is an output device which is used to get visual output. They can be connected to computers.
The projector gives the output big in size. The projectors are mainly used to display something to a large number of people. They are used in office meetings or in classroom teaching by the teachers.
PSEB 6th Class Computer Notes Chapter 8 Output Devices 13
Other Output Devices

Example:

  • Digital camera
  • Pen Drive
  • CD/DVD
  • Modem
  • Fax

Difference Between Input and Output Devices
Following are the differences between input and output devices:

Input devices Output devices
(i) Input devices are used to give input to computers. (i) These devices are used to get output from the computer.
(ii) Data and instructions are given as input using these devices. (ii) After processing information is taken using these devices.
(iii) Input devices are available in large categories. (iii) The categories of availability of in output devices is less.

PSEB 9th Class Science Solutions Chapter 8 Motion

Punjab State Board PSEB 9th Class Science Book Solutions Chapter 8 Motion Textbook Exercise Questions and Answers.

PSEB Solutions for Class 9 Science Chapter 8 Motion

PSEB 9th Class Science Guide Motion Textbook Questions and Answers

Question 1.
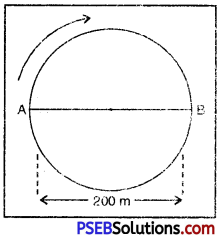
An athelete completes one round of circular track of diameter 200 m in 40 s. What will be the distance covered and the displacement at the end of 2 min 20 s?
Solution:
PSEB 9th Class Science Solutions Chapter 8 Motion 1
Diameter of circular track (d) = 200m
Radius of circular track (r) = \(\frac{d}{2}\) = \(\frac{200m}{2}\) = 100m
Length of circular track (circumference) = 2πr = 2 × \(\frac{22}{7}\) × 100
= \(\frac{4400}{7}\)m
Time taken to complete 1 round (t) = 40 s
Total time = 2 minutes 20 seconds
= (2 × 60 + 20) seconds
= (120 + 20) seconds
= 140 s.
Distance covered in 40 s = \(\frac{4400}{7}\) m = (Circumference of 1 complete circular track)
Distance covered in 1 s = \(\frac{4400}{7×40}\) m
Distance covered in 140 s = \(\frac{4400}{7×40}\) × 140 = 2200 m
An athelete starting from A and going in clockwise direction returns to point A in 3 rounds and reaches point B in 3.5 rounds.
∴ Displacement in 3.5 rounds = AB = shortest distance between initial and final position = 200 m from A to B.

PSEB 9th Class Science Solutions Chapter 8 Motion

Question 2.
Joseph jogs from end A to the other end B of a straight 300 m road in 2 minutes 50 seconds and then turns around and jogs 100 m back to point C in another 1 minute. What are Joseph’s average speeds and velocities in jogging (a) from A to B (b) from A to C?
Solution:
(a) Length between end point A and end point B (AB) = 300 m
Time taken (t) = 2 min. 30 s
= (2 × 60 + 30) s
= (120 + 30) s
= 150 s.
PSEB 9th Class Science Solutions Chapter 8 Motion 2
Average speed = Average velocity
= \(\frac{Total distance between A and B(AB)}{Total time(t)}\)
= \(\frac{300m}{150s}\)
= 2ms-1

(b) Length from end A to end B + Length on return from B to point C.
= AB + BC
= 300 m + 100 m
= 400 m
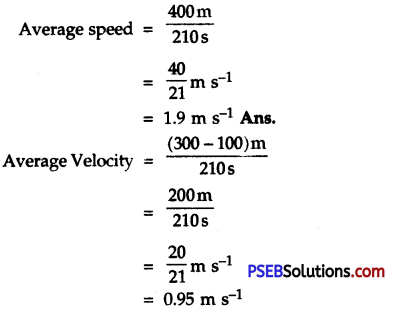
Total Time = 2 min 30 s + 1 min
= 3 min 30 s
= (3 × 60 + 30) s
= (180 + 30) s
= 210 s
PSEB 9th Class Science Solutions Chapter 8 Motion 3

Question 3.
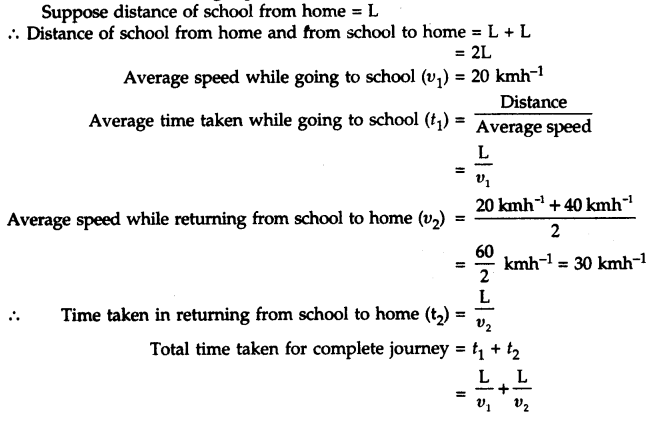
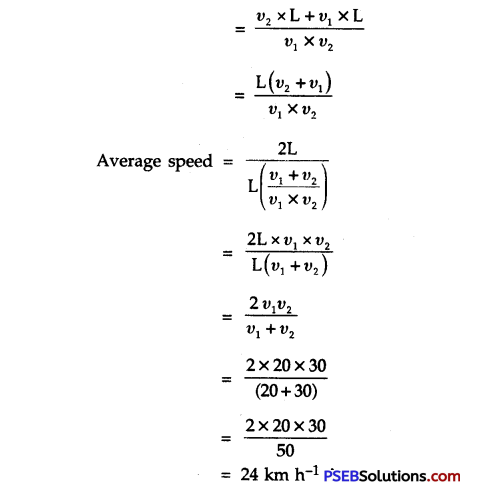
Abdul while driving to school, computes the average speed for his trip to be 20 km h-1. On his trip along the same route, there is less traffic and average speed is 40 km h-1. What is the average speed for Abdul’s trip?
Solution:
PSEB 9th Class Science Solutions Chapter 8 Motion 4
PSEB 9th Class Science Solutions Chapter 8 Motion 5

PSEB 9th Class Science Solutions Chapter 8 Motion

Question 4.
A motorboat starting from rest on a lake accelerates in a straight line at a constant rate of 3.0 m s-2 for 8.0 s. How far does the boat travel during this time?
Solution:
Here, initial velocity of motorboat (u) = 0 [Starting from rest]
Acceleration (a) = 3.0 m s-2
Time (t) = 8.0 s
Distance covered by the motorboat (S) =?
We know, S = ut + \(\frac{1}{2}\)at2
= 0 × 8 + \(\frac{1}{2}\) × 3 × (8)2
= 0 + \(\frac{1}{2}\) × 3 × 8 × 8
∴ S = 96 m.
In other words, the motorboat covers a distance (S) = 96 m.

Question 5.
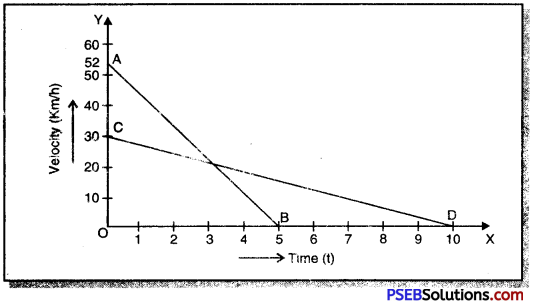
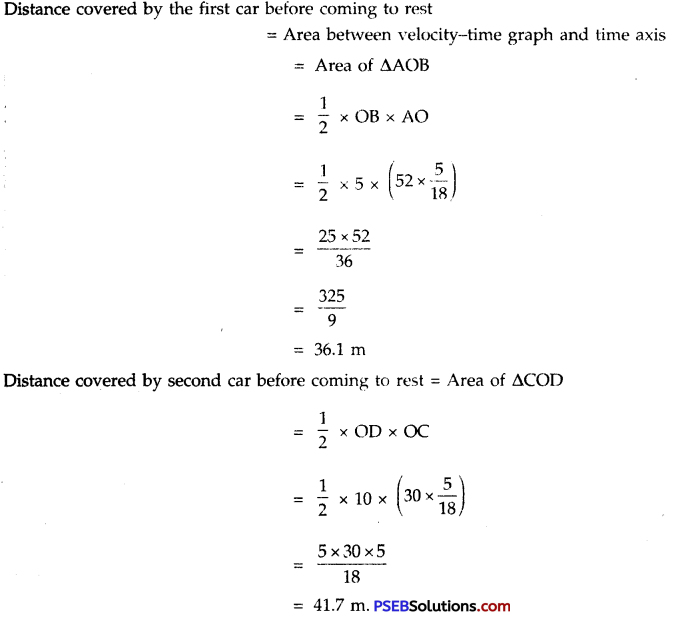
A driver of a car travelling at 52 kmh-1 applies the brakes and accelerates uniformly in opposite direction. The car stops in 5 s. Another driver going at 3 km h-1 applies his brakes slowly and stops in 10 s. On the same graph paper plot the speed versus time graph for the two cars. Which of the two cars travelled farther after the brakes were applied?
Solution:
In the figure AB and CD represent velocity-time graphs of two cars which have their speeds 52 kmh-1 and 30 kmh-1 respectively.
PSEB 9th Class Science Solutions Chapter 8 Motion 6
PSEB 9th Class Science Solutions Chapter 8 Motion 7
In this way, after applying brakes the second car would cover more distance than the first car.

Question 6.
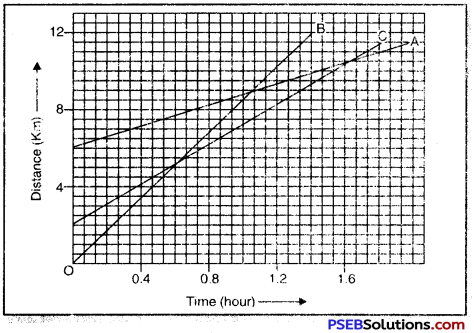
Fig shows the distance-time graphs of three objects A, B and C. Study the graph and answer the following questions:
PSEB 9th Class Science Solutions Chapter 8 Motion 8
(a) Which of the three is travelling the fastest?
(b) Are all three ever at the same point on the road?
(c) How far has C travelled when B passes A?
(d) How far has B travelled by the time it passes C?
Solution:
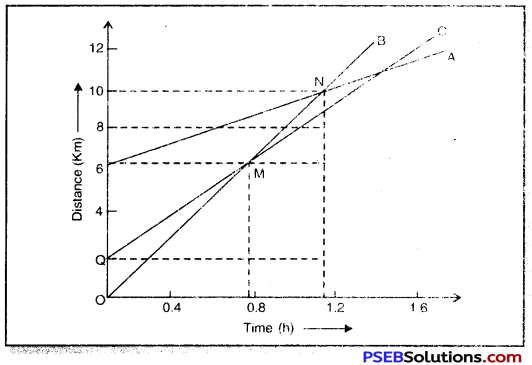
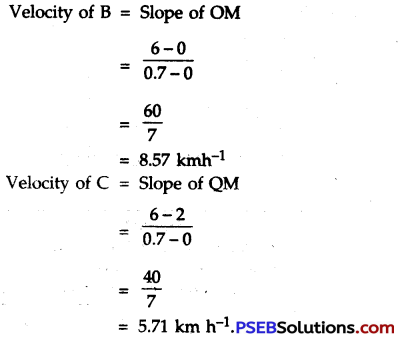
(a) Velocity of A = Slope of PN
\(\frac{10-6}{1.1-0}\)
\(\frac{40}{11}\) = 3.63 kmh-1
PSEB 9th Class Science Solutions Chapter 8 Motion 9
PSEB 9th Class Science Solutions Chapter 8 Motion 10
Because slope of object B is maximum of all therefore, it is moving fastest.
(b) Since all the three graphs do not intersect at any point therefore, all the three do not meet ever at the same point on the road.
(c) When the object B passes A at point E (at 1.4 hr) then at that time the object C will be at F i.e. 9.3 km away from the origin O.
(d) B passes C at G after covering 8 km.

PSEB 9th Class Science Solutions Chapter 8 Motion

Question 7.
A ball is gently dropped from a height of 20 m. If its velocity increases uniformly at the rate of 10 m s-2, with what velocity it will strike the ground?After what time will it strike the ground?
Solution:
u = 0 ms-1
S = 20 m
a = 10 ms-2
υ = ?
t = ?

Using υ2 – u2 = 2as
υ2 – (0)2 = 2 × 10 × 20
υ2 = 4000
∴ υ = \(\sqrt{400}\)
= \(\sqrt{20 \times 20}\)
= 20 m s-1
Now υ = u + at
20 = 0 + 10 × t
or t = \(\frac{20}{10}\)
∴ t = 2 s

Question 8.
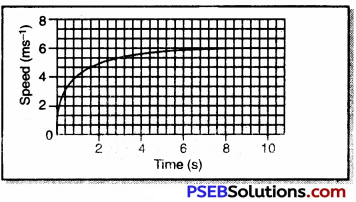
Speed-time graph for a car is shown in the fig.
PSEB 9th Class Science Solutions Chapter 8 Motion 11
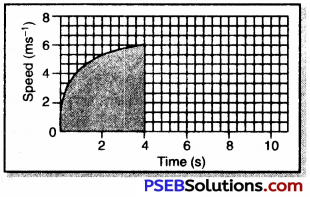
(a) Find how far the car travelled in first 4 s. Shade the area on the graph that represents the distance travelled by car during this period.
(b) Which part of the graph represents uniform motion of the car?
Solution:
PSEB 9th Class Science Solutions Chapter 8 Motion 12
(a) 5 small squares of x axis = 2s
3 small squares of y axis = 2 ms-1
Area of 15 small squares = 2s × 2 ms-1 = 4m
∴ Area of 1 small square = \(\frac{4}{15}\)
Area of velocity-time graph under 0 to 5s = 57 complete small squares + \(\frac{1}{2}\) × 6 small squares.
= (57 + 3) small squares
= 60 small squares.
Distance covered by car in 4 s = 60 × \(\frac{4}{15}\) m
= 16 m

(b) After 6 s the car has uniform motion.

Question 9.
State which of the following situations are possible and give an example for each of these.
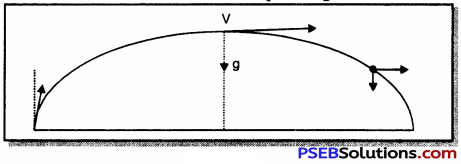
(a) an object with a constant acceleration but with zero velocity.
(b) an object moving in a certain direction with an acceleration in the perpendicular direction.
Answer:
(a) Yes, this situation is possible.
Example: When an object is projected upwards, its velocity at the maximum height is zero although acceleration on it is 9.8 ms-2 i.e. equal to g.
PSEB 9th Class Science Solutions Chapter 8 Motion 13

(b) Yes, at the maximum height of projection the velocity is in the horizontal direction and its acceleration is perpendicular to the direction of motion as shown in figure.

Question 10.
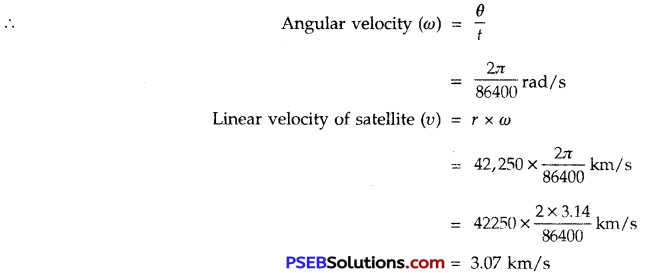
An artificial satellite is moving in a circular path orbit of radius 42,250 km. Calculate its speed if it takes 24 hours to revolve around the earth.
Solution:
Radius of circular path of artificial satellite (r) = 42,250 km
Angle formed (subtended) at the centre of earth (θ) = 2π radian
Time taken by the satellite to complete 1 revolution (t) = 24hrs
= 24 × 3600s
= 86400 s
PSEB 9th Class Science Solutions Chapter 8 Motion 14

Science Guide for Class 9 PSEB Motion InText Questions and Answers

Question 1.
An object has moved through a distance. Can it have zero displacements? If yes,support your answer with an example.
Answer:
Yes, a body can have zero displacement, if fhis body While moving occupies its final position coinciding with its initial position.
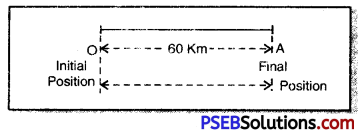
Example: Suppose a body starting its motion from initial position O covers some distance and reaches a position A. If this body while moving returns to its initial position O then in that situation its displacement will be zero.
PSEB 9th Class Science Solutions Chapter 8 Motion 15
But distance covered by the body = OA + AO
= 60 km + 60 km
= 120 km

PSEB 9th Class Science Solutions Chapter 8 Motion

Question 2.
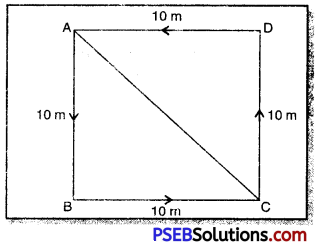
A farmer moves along the boundary of a square field of side 10 m in 40 s. What will be the magnitude of displacement of the farmer at the end of 2 minutes 20 seconds?
Solution:
Total distance round the boundary of field once (i.e. circumference)
= AB + BC + CD + DA
= 10 m + 10 m + 10 m + 10 m = 40 m
Time taken to go round the field once = 40 s
PSEB 9th Class Science Solutions Chapter 8 Motion 16
Total time taken = 2minutes 20 seconds
= (2 × 60 + 20) seconds
= (120 + 20) seconds
= 140 seconds.
Time taken by fanner to complete 3 rounds of field = 3 × 40 s = 120 s
Time left after completing 3 rounds of field = (140 – 120)s = 20 s
∴ Distance covered by farmer in 40 s = 40 m
∴ Distance covered in 1 s = 1 m
Distance that would be covered in 20 s = 20 m
In other words farmer starting from point A and while going along the boundary of the field and after completing 3 rounds in 2 min 20 s would reach the point C.
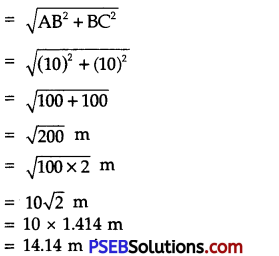
∴ Displacement = AC
(the shortest distance between initial and final position)
PSEB 9th Class Science Solutions Chapter 8 Motion 17

Question 3.
Which of the following is true for displacement?
(a) It cannot be zero
(b) Its magnitude is greater than the distance travelled by the object.
(c) Its magnitude is less than or equal to distance travelled by the object.
Answer:
(c) Its magnitude is less than or equal to distance travelled by the object.

PSEB 9th Class Science Solutions Chapter 8 Motion

Question 4.
Distinguish between speed and velocity.
Answer:
Distinction between Speed and Velocity:

Speed Velocity
1. It is defined as the rate of a change of a position of a body i.e. the distance covered by a body per unit time. It is defined as the rate of change of displacement of a body. i.e. it is the speed in a particular direction.
2. It is a scalar quantity and can be completely represented by its magnitude only. It is a vector quantity. To represent it completely it requires both magnitude and direction.
3. Speed of an object is always positive. Velocity of an object can be both positive and negative.

Question 5.
Under what condition(s) is the magnitude of average velocity of an object is equal to its average speed?
Answer:
We know, Average speed = Total distance travelled / Total time taken
and Average velocity = Displacement /Total time
When a body travels in a straight line with variable motion in the same direction then total distance covered and displacement are equal in magnitude. In this case the average speed and average velocity are equal.

Question 6.
What does the odometer of an automobile measure?
Answer:
The odometer of an automobile measures the distance covered by it.

Question 7.
What does the path of an object look like when it is in uniform motion?
Answer:
When an object is in uniform motion, it moves along a straight line. But an object can also move with uniform motion along a circular path.

Question 8.
During an experiment, a signal from a spaceship reached the ground station in five minutes. What was the distance of the spaceship from the ground station?The signal travels at a speed of light that is 3 × 10s ms-1.
Solution:
Time taken by the signal to reach the ground station from spaceship (t) = 5 min = 5 × 60 s = 300 s
Speed of Signal (υ) = Speed of light = 3 × 10⁸ ms-1
Distance of the spaceship from earth (s) = ?
Distance of spaceship from ground (s) = speed of signal (υ) × Time (t)
= 3 × 108 × 300
= 3 × 108 × 3 × 102
= 9 × 108 × 102
= 9 × 10¹⁰ m

PSEB 9th Class Science Solutions Chapter 8 Motion

Question 9.
When will you say a body is in:
1. uniform acceleration?
2. non-uniform acceleration?
Answer:
1. Uniform Acceleration. When a body travels in a straight line and its velocity changes by equal amounts in equal intervals of time then it is said to travel with uniform acceleration.
2. Non-Uniform Acceleration. When the velocity of a body changes by unequal amounts in equal intervals of time then the body is said to travel with non-uniform acceleration.

Question 10.
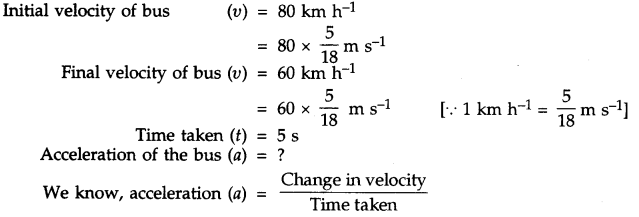
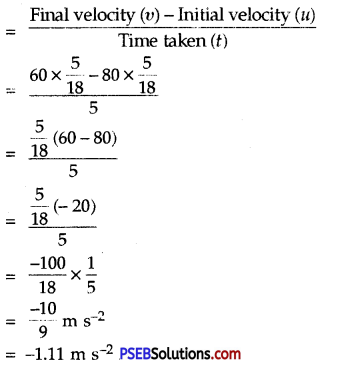
A bus decreases its speed from 80 km h-1 to 60 km h-1 in 5 s. Find the acceleration of the bus.
Solution:
PSEB 9th Class Science Solutions Chapter 8 Motion 18
PSEB 9th Class Science Solutions Chapter 8 Motion 19
Hence, the bus has negative acceleration (retardation).

Question 11.
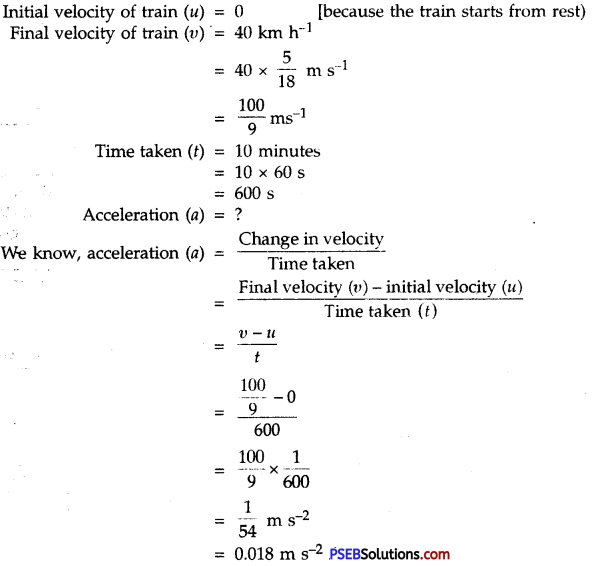
A train starting from a railway station and moving with uniform acceleration attains a speed 40 km h-1 in 10 minutes. Find its acceleration.
Solution:
PSEB 9th Class Science Solutions Chapter 8 Motion 20

PSEB 9th Class Science Solutions Chapter 8 Motion

Question 12.
What is the nature of the distance-time graphs (x – t) for uniform and non-uniform motion of an object?
Answer:
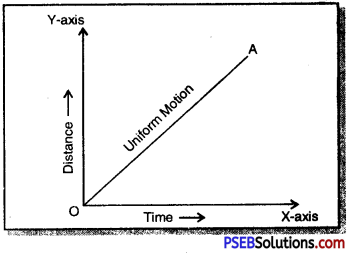
When a body covers equal distances in equal intervals of time, then it is said to travel with uniform motion. In this situation, the distance covered by the body is directly proportional to the time taken. Therefore, distance-time (x – t) graph for uniform motion is a straight line.
PSEB 9th Class Science Solutions Chapter 8 Motion 21
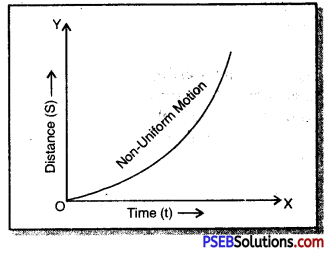
Distance – time (x – t) graph for non-uniform motion may be a curved graph of any shape because a body travels unequal distances in equal intervals of time.
PSEB 9th Class Science Solutions Chapter 8 Motion 22

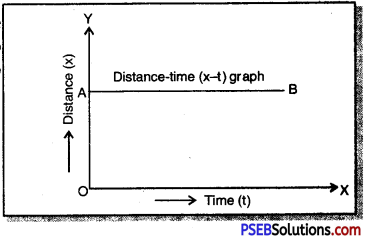
Question 13.
What can you say about the motion of object whose distance – time graph is a straight line parallel to time axis?
Answer:
PSEB 9th Class Science Solutions Chapter 8 Motion 23
The object whose distance-time (x – t) graph is a straight line parallel to the time axis will be at rest with respect to the surroundings.

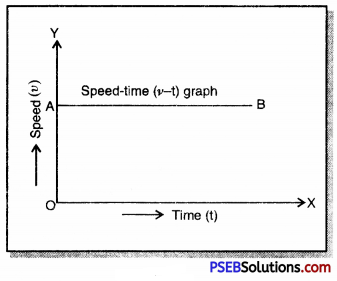
Question 14.
What can you say about the motion of an object if its speed-time graph is a straight line parallel to time axis?
Answer:
PSEB 9th Class Science Solutions Chapter 8 Motion 24
The object whose speed – time (u – t) graph is a straight line parallel to time axis shows that it is in motion with uniform speed.

PSEB 9th Class Science Solutions Chapter 8 Motion

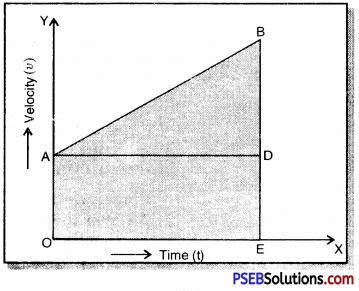
Question 15.
What is the quantity which is measured by the area occupied below velocity-time graph?
Answer:
PSEB 9th Class Science Solutions Chapter 8 Motion 25
The area occupied below velocity-time graph measures displacement of the body.

Question 16.
A bus starting from rest moves with a uniform acceleration of 0.1 ms-2 for two minutes. Find (a) the speed acquired (b) the distance travelled.
Solution:
(a) Initial speed of the bus (u) = 0 (Starting from Rest)
Acceleration of the bus (a) = 0.1 m s-2
Time taken (t) = 2 minutes
= 2 × 60 s
= 120 s
Final speed of the bus (υ) = ?
Distance travelled by the bus (S) =?
We know, υ = u + at
υ = 0 + 0.1 × 120
υ = 1 × 12
υ = 12 ms-1

(b) Again, using S = ut + \(\frac{1}{2}\) at2
S = 0 × 120 + \(\frac{1}{2}\) × 0.1 × (120)2
= 0 + \(\frac{1}{2}\) × 0.1 × 120 × 120
= \(\frac{1}{2}\) × 1 × 12 × 120
= 720 m/s

Question 17.
A train is travelling at a speed of 90 km h-1. Brakes are applied so as to produce a uniform acceleration of -0.5 ms-2. Find how far the train will move before it is brought to rest?
Solution:
Initial speed of train (υ) = 90km h-1
= 90 × \(\frac{5}{18}\) m s-1
= 5 × 5 ms-1
= 25 ms-1
Uniform acceleration (a) = – 0.5m s-2
Final speed of the train (υ) = 0
Distance moved by the train (S) =?
We know, υ2 – u2 = 2as
(0)2 – (25)2 = 2 × (-0.5) × S
– 25 × 25 = -1 × S
∴ S = 625 m

PSEB 9th Class Science Solutions Chapter 8 Motion

Question 18.
A trolley, while going down an inclined plane has an acceleration of 2 cm s~2. What will be its velocity 3 s after the start?
Solution:
Here initial velocity of trolley (u) = 0 [∵ starting from rest]
Acceleration (a) = 2cm s-2
Time (t) = 3 s
Final velocity of trolley (υ ) = ?
We know, υ = u + at
υ = 0 + 2 × 3
∴ Final velocity of trolley (υ) = 6 cm s-1 Ans.

Question 19.
A racing car has uniform acceleration of 4 ms-2. What distance will it cover in 10 s after start?
Solution:
Acceleration of racing car (a) = 4 ms-2
Initial velocity of racing car (u) = 0
Time (t) = 10 s
Distance covered by the car (S) = ?
We know, S = ut + \(\frac{1}{2}\)at2
S = 0 × 10 + \(\frac{1}{2}\) × 4 × (10)2
S = 0 + 2 × 10 × 10
∴ Distance covered by racing car (S) = 200 m

Question 20.
A stone is thrown in a vertically upward direction with a velocity of 5 m s-1. If the acceleration of the stone during its motion is 10 m s-2 in the downw ard direction. What will be the height attained by the stone and how much time will it take to reach there?
Solution:
Here, initial velocity (u) = 5 m s-1
Acceleration (a) = – 10 ms-2
[∵ it moves upward against the gravity]
Final velocity of stone (υ) = 0 [At the highest point it is brought to rest]
Height attained (S = h) = ?
Time taken (t) =?
We know,
υ = u + at
0 = 5 + (-10) × t
0 = 5 – 10 × t
10 × t = 5
or t = \(\frac{5}{10}\)
∴ Time taken (t) = 0.5 s
Again, using υ2 – u2 = 2as
(0)2 – (5)2 = 2 × -10 × h
– 5 × 5 = – 20 × h
or h = \(\frac{-25}{-20}\) = \(\frac{5}{4}\)
∴ Height attained (h) – 1.25 m

PSEB 7th Class Computer Notes Chapter 3 Microsoft Word Part-I

This PSEB 7th Class Computer Notes Chapter 3 Microsoft Word Part-I will help you in revision during exams.

PSEB 7th Class Computer Notes Chapter 3 Microsoft Word Part-I

Introduction:
Word processing is the most commonly used software in computers, with the help of this, we can create documents, save the documents, print the documents and also we can edit the already created document. Let’s learn about these features of word processing.

Wort Processing:
We make a lot of mistakes when typing a document with the help of typewriter, which we can’t correct again, we have to type the document again to make it better, but word processing gives us a facility through which we can easily correct our mistakes in typed documents without having to retype them.
Word processing is a process by which we can create, save and print any type of document in a computer and it can be used anytime in the future and can be edited if required.
The software that is used for word processing process called word processor. For example: MS Word, NotePad, WordPad and word perfect all are word processors.

Features of Word Processing:
Following are the features of word processor:

  • A word processor provides an easier and faster method to type the text.
  • It offers so many styles, size, color, effects for text.
  • Using a word processor, you can apply editing operations to the text.
  • It stores all your documents for. future use.
  • It allows you to insert photos, music, background etc. into the document.
  • It can move any document from one place to another with the help of cut, copy, and paste option.
  • You can delete, edit, update the data in the pre-created document at any time.
  • It helps us to find and correct mistakes in the typed text.
  • It also provide the facility to check the grammar mistakes in the typed text.

PSEB 7th Class Computer Notes Chapter 3 Microsoft Word Part-I

Word Processing – Software:
A word processor is a software program capable of creating, saving and printing typed documents. Today, the word processor is one of the most widely used software programs on the computer, it can create different types of files and to create these files requires different software such as WordPad, Microsoft Office, Microsoft Word, etc are some examples of word processors.

Today in this lesson we will read about MS Word word processor.

Microsoft Word
Microsoft Word is a word processor software program published by Microsoft Company also called MS Word, WinWord, Word. Microsoft Word provides advanced features for creating and saving different types of documents. For example, we can create letter typing, emails, reports, tables, etc. in Microsoft Word.
PSEB 7th Class Computer Notes Chapter 3 Microsoft Word Part-I 1

Some of the basic applications of MS Word are as follows:

  • Creating and saving a text document.
  • Editing and formatting existing documents.
  • Make the document attractive with the help of different styles, size, colors and effects.
  • Creating graphical documents with images, charts, smart art etc.
  • Identify grammatical and spelling errors in the document.

Features of Microsoft Word
Some of the special features of Microsoft word are as follows:

  • MS Word allows us to include text anywhere in the document.
  • We can delete any word, line or page from the document as easily as we erase the words written on paper.
  • We can cut and copy the text and paste it anywhere in the same document or any other document.
  • MS Word allows us to set the page margin and page size according to our needs.
  • We can add Bold, Italic and Underline effects to the text.
  • We can change the size, style, color of the text.
  • We can add header on the top of pages and footer on the bottom of the page.
  • We can add pictures, chart, graphs and smart art.
  • We can convert the text into tables.
  • You can also set different margins in a document and also determine the different locations to start a paragraph.
  • It also provides us with the facility of macro. This is a list of many commands with which our time is saved.
  • MS Word also provides us the facility of spelling checks. It shows a red line below the words that are incorrect.
  • MS Word also provides us the facility of grammar checks.
  • It also provides Find and Replace option.
  • It also provides the facility of dictionary with which we can find many words with the same meaning and use them in our document.

Starting MS Word
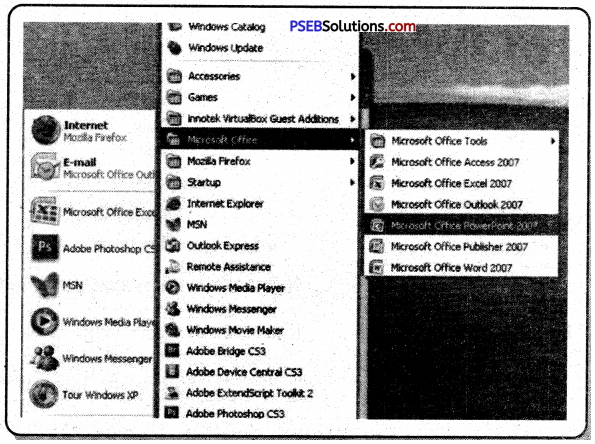
The steps to start MS Word are as follows:
1. First, click the Start button
PSEB 7th Class Computer Notes Chapter 3 Microsoft Word Part-I 2
on the desktop

2. Now click on All Program from the popup menu as shown in the picture below.

3. Now click MS Office! MS Word.
PSEB 7th Class Computer Notes Chapter 3 Microsoft Word Part-I 3
Or
Type “Word” in the search bar as shown in the picture below and press Enter key from the keyboard
PSEB 7th Class Computer Notes Chapter 3 Microsoft Word Part-I 4

Components of MS Word Window
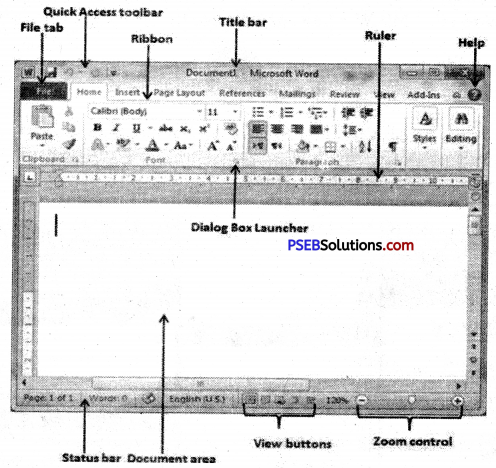
When you start the Word application then a window opens on the screen as shown in the picture below. Let us understand the different important parts of this window.
PSEB 7th Class Computer Notes Chapter 3 Microsoft Word Part-I 5
1. File Menu: This option is available in the upper left corner of the window, it contains many of the following commands:
(a) Home: It has options like font color, font size, font style, alignment, bullets, line spacing, etc. All the basic elements that someone might need to edit their document are available in the Home option.
PSEB 7th Class Computer Notes Chapter 3 Microsoft Word Part-I 6
(b) Insert: Tables, sizes, images, charts, graphs, headers, footers, page numbers, etc. are available in insert options.

(c) Design: The template (pre-created document design) or the design in which you want your document to be created can be selected under the Design tab.

(d) Page layout: Under the Page Layout tab we can find the options such as Margins, Orientation, Columns, Lines, Indentations, Spacing, etc.

(e) Reference: This tab is most useful for those who are preparing thesis or writing books or working on a long document. Footnote, table of content, bibliography, captions etc. options can be found under this tab.

(f) Review: Spell check, grammar, thesaurus, word count, language, translation, comments, etc. can all be tracked under the Review tab.

2. Quick Access Toolbar: Collection of buttons that provide one click access to commonly used commands such as Save, Undo or Redo. You can also customize this according to your preference.

3. Title Bar: This bar window is at the top of the screen and the name of the open document appears on it. Above this bar are three control buttons:
PSEB 7th Class Computer Notes Chapter 3 Microsoft Word Part-I 7
minimize, maximize, close button

4. Ribbon: The ribbon consists of three organized commands:
PSEB 7th Class Computer Notes Chapter 3 Microsoft Word Part-I 8
(a) Tabs: These appear on the top of the ribbon and contain groups of related commands. For example: home, insert, page layout ribbon, references, mailings Review etc. all are tabs. We have already read about them.
(b) Group: They handle related commands; the name of each group appears below the group on the ribbon. For example, a group of commands related to fonts (Font Group) or a group of commands related to alignment (paragraph group), etc.
(c) Commands: Commands appear in each group as described above. For example: Cut, Copy, Paste, Font Size, Color, Alignment etc. are all commands.

5. Ruler: There are two rulers in the word window – a horizontal ruler and a vertical ruler. The horizontal ruler appears just below the ribbon and is used to set margins and tab stops. The vertical ruler appears on the left side of the word window and is used to determine the vertical position of the page.

6. Help: The help icon can be used whenever you want to get help related to MS Word. It provides excellent tutorials on various topics related to Word.

7. Document Area: Right below the ruler, there is a large space called the text area. This is the area where we type our document; the blinking line in this area is called the insertion point which indicates that your typing will start from this place.

8. Status Bar: It displays the information of the document as well as the position of the insertion point. From left to right, this bar contains information on the total number of pages and words, document language, etc.

9. Dialog Box Launcher: This appears as a very small arrow in the lower-right corner of most groups of the ribbon. Clicking this button opens a dialog box or task pane that provides more options about the group.

10. View buttons: At the bottom right of the window screen is a set of 5 buttons that allow us to view the document in a different view.
PSEB 7th Class Computer Notes Chapter 3 Microsoft Word Part-I 9
(a) Prints Layout: This is the default document view in Word. The Print Layout view shows the document as it would appear after printing.
(b) Full-Screen Layout View: This view opens the document to a full screen. This layout helps us to make our document easily readable above the screen.
(c) Web Layout: This view displays a document on the screen the way it will look when viewed in a Web browser if you saved it as a web page.
(d) Out Line View: The outline view shows the document as an outline form.
(e) Draft View: This is the most commonly used view, in this view we can edit our document very quickly and easily.

PSEB 7th Class Computer Notes Chapter 3 Microsoft Word Part-I

Creating a New Document
Follow these steps to create a new document:
PSEB 7th Class Computer Notes Chapter 2 Windows Explorer 1

  • Click the office button and then click File menu
  • Now click on New option from the drop down menu, as shown in the picture.
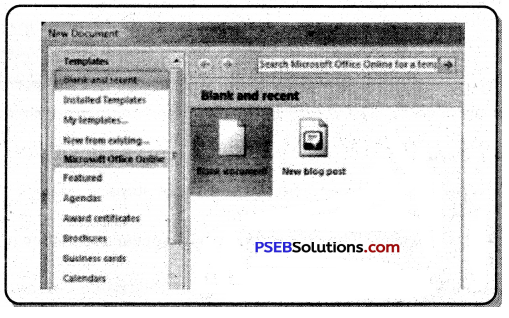
  • A New Document dialog box will appears on the screen.
  • Click Blank Document option from this dialog box and then Click Create Option as shown in picture.
  • Now a blank document will appear on the screen

Or
You can create a new document by pressing the Ctrl + N keys from the keyboard.
PSEB 7th Class Computer Notes Chapter 3 Microsoft Word Part-I 11
Open an Existing Document
Follow these steps to open an existing document:

  • Click the File tab or Office Button.
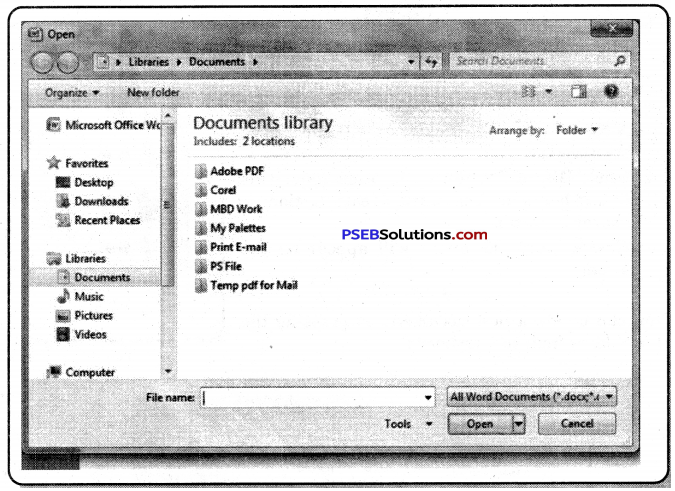
  • Click Open option. The Open dialog box appears.
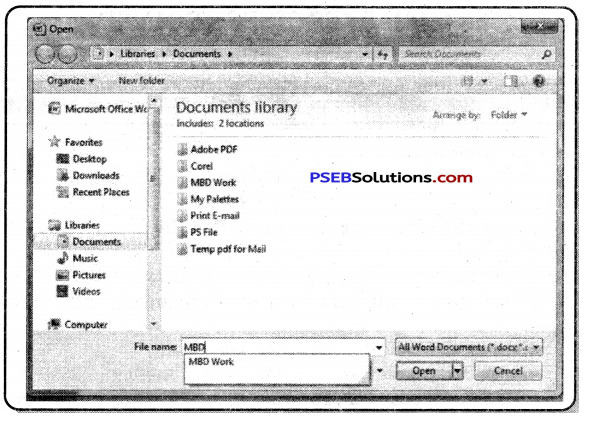
  • As shown in picture below select a document which you want to open and then Click Open button.
  • Now your document will open on the screen.

Or
You can open an existing document by pressing the Ctrl + 0 keys from the keyboard.
PSEB 7th Class Computer Notes Chapter 3 Microsoft Word Part-I 12

Saving a Document
To save a newly created document follows these steps:

  • Click the File tab or Office Button.
  • Click Save option. The Save dialog box appears. As shown in picture below.
  • Now type the name of your document in File name box and then click Save button.

Or
You can also save your document by pressing the Ctrl + S keys from Keyboard Now your document is safe for future use.
PSEB 7th Class Computer Notes Chapter 3 Microsoft Word Part-I 13

PSEB 7th Class Computer Notes Chapter 3 Microsoft Word Part-I

Note:

  • Word processing is a process by which we can create, save and print any type of document
  • The software that is used for word processing process called word processor.
  • MS Word, NotePad, WordPad and word perfect are all word processors.
  • Microsoft Word is a word processor software program, provides advanced features for creating and saving different types of documents.
  • Tabs appear on the top of the ribbon and contain groups of related commands.
  • Group handle related commands; the name of each group appears below the group on the ribbon.
  • The large area at the bottom of the ruler is called the text area. We can type our document in this text area.
  • Text can be viewed on a computer screen before it is printed, errors can be detected and corrected.
  • A dialog box launcher is present in the lower right corner of each group.
  • Word allows us to view the document in 5 different views. Prints Layout. Full screen layout view, Web Layout, Out Line View, Draft view.

PSEB 7th Class Computer Notes Chapter 2 Windows Explorer

This PSEB 7th Class Computer Notes Chapter 2 Windows Explorer will help you in revision during exams.

PSEB 7th Class Computer Notes Chapter 2 Windows Explorer

Introduction:
Windows Explorer is an important part of Windows. It manages files and folders. You can cut, copy, paste, rename and delete your files and folders. Explorer puts your files and folders in the correct order.

There are two types of Explorer:

  1. Windows Explorer
  2. Internet Explorer.

Windows Explorer:
The main function of Windows Explorer is to provide a graphical interface for navigating the computer’s hard disk and associated media. It is used to view, organize and manage the files / folders on the computer’s hard disk. Windows Explorer is automatically launched any time you open a folder in Windows XP.
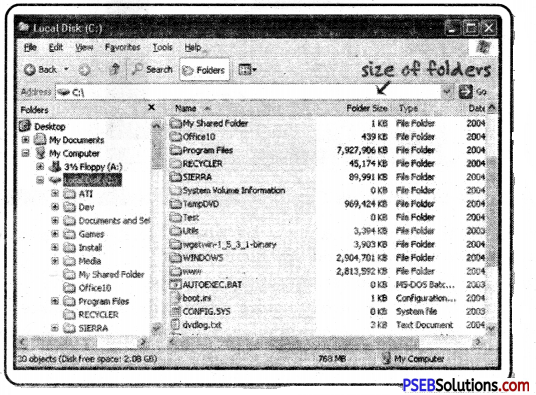
PSEB 7th Class Computer Notes Chapter 2 Windows Explorer 1
Windows Explorer is also called File Explorer. It is used to view files and folders on our computer. We can open the data, folder and library of the disk in the computer and also search for an item. We can use it to open, delete, rename, copy, move and create new folders.

Opening the Windows Explorer
We can open Windows explorer in many ways. Some of these are as follow:
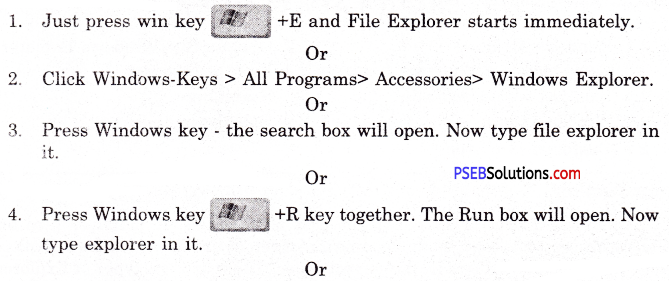
PSEB 7th Class Computer Notes Chapter 2 Windows Explorer 2
Or
By default, Windows 10 includes a File Explorer shortcut on the taskbar. Its icon looks like a folder. Click or tap on it and File Explorer is opened.
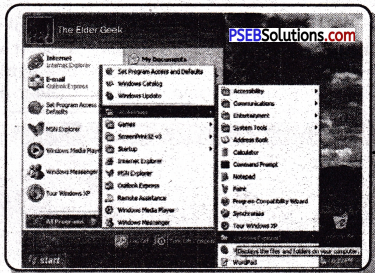
PSEB 7th Class Computer Notes Chapter 2 Windows Explorer 3

Components of Windows Explorer
Components of the windows explorer are files, folders, and drives. With the help of Explorer we can easily find any file or folder.

  • File: File is the smallest unit of data storage.
  • Folders: Folders are used to store related files in one place.
  • Drive: Hard disk storage areas are called drives. For example Local Disk C, D, E, F, and G: drives.

With Windows Explorer we can easily access files, folders and drives. Windows Explorer is divided into following parts.

  • Left Pane: This is called the navigation pane. Here we can see drives, files and folders
  • Right Pane: When a file, folder is selected, its details appear in the right pane.

PSEB 7th Class Computer Notes Chapter 2 Windows Explorer 4
PSEB 7th Class Computer Notes Chapter 2 Windows Explorer 5

  • Forward and Back buttons: Enables you to go to folders you’ve already opened. If you go to a different folder, you can choose the Back button to return to the last folder you accessed.
  • Address Bar: Enables you to go to a different folder in the same Explorer window.
  • Search Box: Allows you to search for subfolders, documents, images, programs, Web pages, and bookmarks in the current folder.
  • Status Bar: Displays information about a selected folder and its contents, such as the total number of items in the folder, the number of items selected and total file size.
  • Ribbon: Enables you to perform layout, formatting, and sharing tasks, as well as how File Explorer displays your files and folders.

PSEB 7th Class Computer Notes Chapter 2 Windows Explorer

Series of Locations:
The folders and drives in the computer, the computer connected to the network and its shared folders, drives and printers are arranged in a tree shape. This sequence is called a series of locations. It contains the following items:
Favorites: The top most folder in this series is the Desktop folder. It contains desktop, downloads and recent place items.
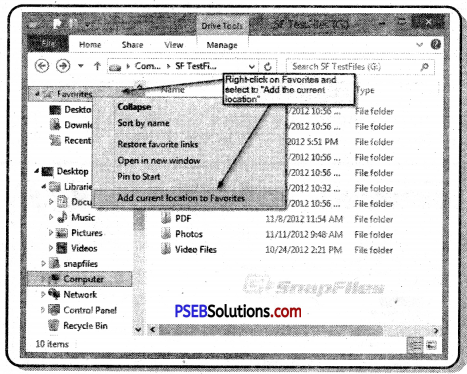
PSEB 7th Class Computer Notes Chapter 2 Windows Explorer 6

2. Library Folder: By default this folder contains four libraries, such as; Documents, music, photos and videos. These folders contain related items; Such as pictures in pictures folder, related videos in video folder, etc.
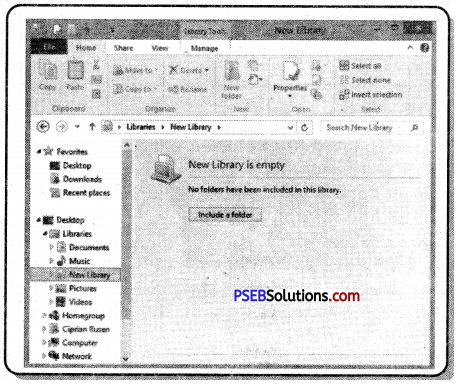
PSEB 7th Class Computer Notes Chapter 2 Windows Explorer 7

3. Personal Folder: Your personal folder is named after the user name to which you have logged in to the computer and by default it contains the following folders; such as Contacts, Downloads, Favorites, Links, My Documents, My Music, My Pictures, My Videos, Saved Games and Search.
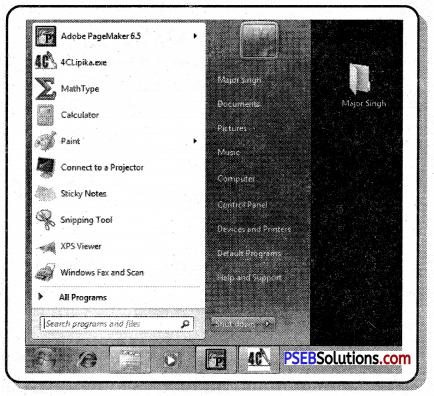
PSEB 7th Class Computer Notes Chapter 2 Windows Explorer 8

4. MY Computer: Disks in a computer; such as C: drive, D: Drive, E: Drive etc. and other connected devices such as Printer, USB, memory stick and camera are attached to the computer, they are visible here.
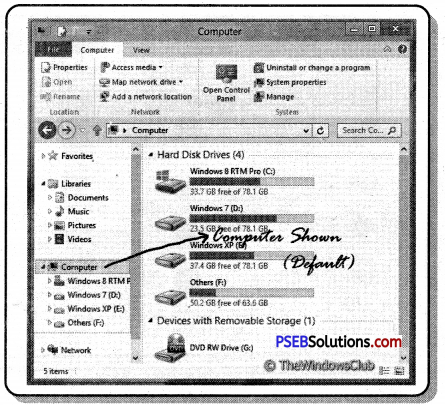
PSEB 7th Class Computer Notes Chapter 2 Windows Explorer 9

5. Network: If you are connected to a local network, you see other computers and devices in it.
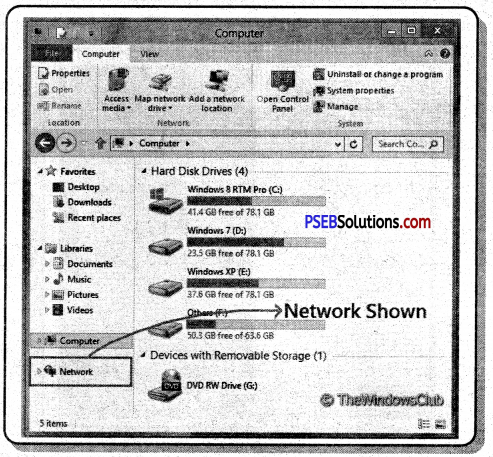
PSEB 7th Class Computer Notes Chapter 2 Windows Explorer 10

6. Control Panel: Control Panel is used to configure hardware and software of computer system and to change settings of computer system.
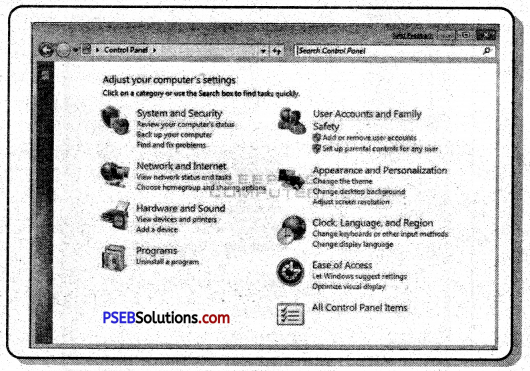
PSEB 7th Class Computer Notes Chapter 2 Windows Explorer 11

7. Recycle Bin: It contains deleted files/folders or programs.
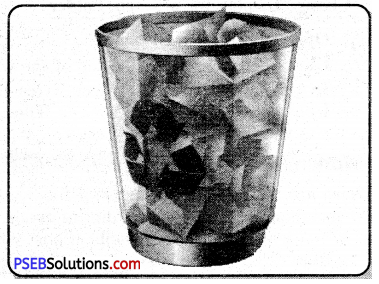
PSEB 7th Class Computer Notes Chapter 2 Windows Explorer 12

View means how files and folders appear in a computer system. Explorer views show the direction in which files and folders will appear. It has five types of views. These are thumbnails, tiles, icons, lists and details.

  • Small, Medium, Large and Extra Large Icons View: Items in this view are in more than one row and each item appears in the shape of an icon. Each item has a name.
  • Tiles Icon View: Items in this view are in more than one row and each item appears in the shape of an icon. Each item has a name. It contains other information, such as the type of file and its size.
  • List Icon View: Items in this view are in more than one column. Each item has a name and the icon is to the left of the name.
  • Content Icon View: Items in this view appear in the column. Each item is in the shape of an icon. It has a name and type of the file is written below it. Some other properties such as modification date and size below it are also visible, By default this view is used for search.
  • Detail Icon View: Each item appears as a table row. The first column contains the name of the item in the form of a small icon and the rest of the column lists its properties such as its size and the date and type of modification.
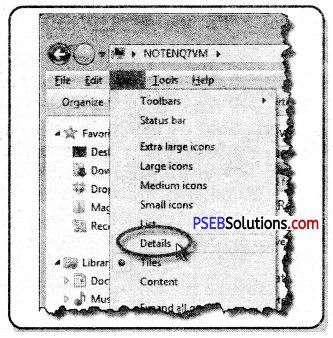
PSEB 7th Class Computer Notes Chapter 2 Windows Explorer 13

PSEB 7th Class Computer Notes Chapter 2 Windows Explorer

Change Display for a Single Folder

  • Open File Explorer.
  • Click the View tab at the top of the window.
  • In the Layout section, select Extra large icons, Large icons, Medium Icons, Small icons, List, Details, Tiles, or Content to change to the view you want to see.

There are many different types of files you can use. For example, Microsoft Word documents, digital photos, digital music, and digital videos are all types of files. When you use different applications, you’ll often be viewing, creating, or editing files. Files are usually represented by an icon. In the image below, you can see a few different types of files.
Windows uses folders to help you organize files. You can put files inside a folder, just like you would put documents inside a real folder. In the image below, you can see some folders on the desktop.

Selecting the Items
Usually before doing any work on a file or folder such as opening a file, closing a file, deleting file, copy a file etc. we have to select it. There are different ways to select a single file/folder or multiple files/folders.
1. Selecting a Single Item: If more than one item is available and you want to select one of the items in it, it can be selected by clicking with the mouse on that file.

2. Selecting More Than One File ; There are a few ways to select more than one file at a time:
(a) If you’re viewing your files as icons, you can click and drag the mouse to draw a box around the files you want to select. When you’re done, release the mouse; the files will be selected. You can now move, copy, or delete all of these files at the same time.
(b) Selecting All Items: If you want to select all files in a folder at the same time, open the folder in File Explorer and press Ctrl+A or click “Select all” option from the “Select” group on the Home tab. All of the files in the folder will be selected.
(c) Select items using the Shift key: To select a group of files from a folder, click the first file, press and hold the Shift key on your keyboard, then click the last file. All of the files between the first and last ones will be selected.
(d) Selecting an item using (Ctrl key): To select specific files from a folder, press and hold the Control key on your keyboard, then click the files you want to select.

3. Reverse selection: To reverse the selection, select the “Invert Selection” option in the Edit menu.

Creating a Folder
If you want to create a new folder, it is created in the current location. Here are some ways to create a folder:

  • Open the File explorer, click on the “New Folder” button option.
  • The new folder will appear. Type the desired name for the folder and press Enter.

Or
Press the Ctrl + Shift + N keys together from the keyboard. The new folder will appear. Type the name of the folder and press Enter key.
Or
Right-click on a blank space, click “New” ⇒ “Folder” in the context menu. The new folder will appear. Type the name of the folder and press Enter key.
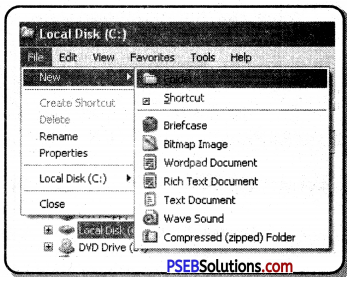
PSEB 7th Class Computer Notes Chapter 2 Windows Explorer 14
Or
PSEB 7th Class Computer Notes Chapter 2 Windows Explorer 15

  • Place the cursor where you want to add your folder.
  • In File Explorer, click on the Home menu item.
  • From the Home riibbon, click on the New folder button.
  • Enter the name of your new folder and press enter key.

Re-naming the Item
You can change the name of any file or folder. Here are the steps to rename an item:

  • Click the file or folder, wait about one second, and click again. An editable text field will appear.
  • Type the desired name on your keyboard and press Enter. The name will be changed.
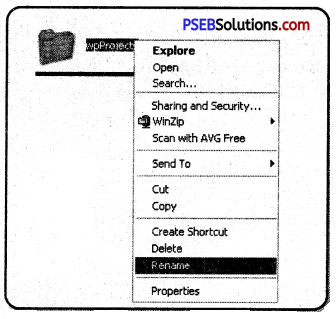
    Or
  • You can also right-click the folder and select “Rename” copy option from the menu that create shortcut appears. An editable text field will appear.
  • Type the desired name from , keyboard and press Enter. The name will be changed.

PSEB 7th Class Computer Notes Chapter 2 Windows Explorer 16

Delete a File or Folder
If you no longer need to use a file, you can delete it. When you delete a file, it is moved to the Recycle Bin. If you change your mind, you can move the file from the Recycle Bin back to its original location. If you’re sure you want to permanently delete the file, you will need to empty the Recycle Bin.

Following are the Steps to delete file/folder:

  • Select the file or folder you want to delete.
  • Press the Delete key from the keyboard. A message will appear asking for deletion.
  • Click on “Yes”. Item will be deleted.

PSEB 7th Class Computer Notes Chapter 2 Windows Explorer 17
Or

  • Click and drag the file to the Recycle Bin icon on the desktop.
  • To permanently delete the file, right click the Recycle Bin icon and select “Empty Recycle Bin”. All files in the Recycle Bin will be permanently deleted.

PSEB 7th Class Computer Notes Chapter 2 Windows Explorer

Copying or Pasting Items
To copy a file/folder the steps are as follow:

  • Select the item to be copied.
  • Select the “Copy” option from the “Clipboard” group on the “Home” tab.

Or
Press ctrl + c keys from the keyboard.
Right click on the file/folder you want to copy. A menu will open. From this menu select “copy” option. Now your file/folder will be copied.

Steps to paste the file/Folder are as follow:

  • Place the cursor where you want to paste the file/folder.
  • Select the “Paste” option from the “Clipboard” group on the “Home” tab.
  • Your copied item will now be pasted.

Or
Press the Ctrl + V key from the keyboard.
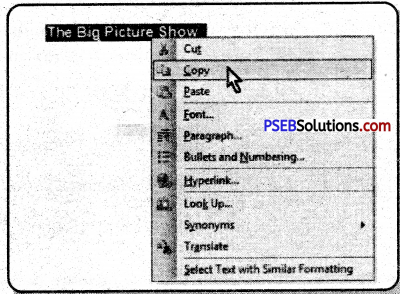
PSEB 7th Class Computer Notes Chapter 2 Windows Explorer 18
Or
Locate and right-click the desired location, then select “Paste” option from the menu appeared.

Move Items by Cut and Paste
Move items from one place to another is similar to copy and paste but in this the cut option is used instead of copy. The important difference between copy / paste and cut / paste is that when we copy and paste an item, a duplicate item of that specified item is created in a new location which does not move from its original location. An item moved by cut or paste does not move from its original location but moves to its original location.

Cut and paste is used as follows.

  • Select the item to be cut.
  • Select the “Cut” option from the “Clipboard” group on the “Home” tab.

Or
From the keyboard Press the Ctrl + X key.
Or
Right-click the mouse and select Cut from the menu that appears. Steps to paste the file/Folder are as follow:

  • Place the cursor where you want to pasite the file/folder.
  • Select the “Paste” option from the “Clipboard” group on the “Home” tab.
  • Your copied item will now be pasted.

Or
Press the Ctrl + V key from the keyboard.
Or
Locate and right-click the desired location, then select “Paste” option from the menu appeared.

Copying Items with Send To
The Send to Option is an easy way to copy one or more items or programs to a new location. Following are the steps to use Send to option:

  • Select the item to be copied.
  • Press the right mouse button; select the option “Send To” from the menu.
  • Now select the specified location. By default, the Send To submenu contains the following locations:
    (a) Compressed (zipped) Folder
    (b) Desktop (Create Short-cut)
    (c) Documents Library
    (d) Fax and Mail recipients
    (e) Removable devices, such as: USB, Memory Sticks Select the option as needed.
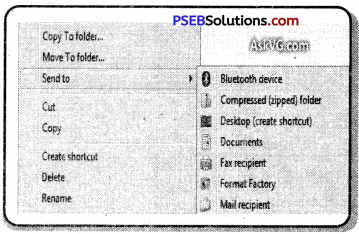
PSEB 7th Class Computer Notes Chapter 2 Windows Explorer 19

Searching
Search commands can be used to find files, folders, etc. Sometimes we save an item and forget its location and in the future when we need that item we can’t find it, but with searching we can easily find our item we search for.

  • Press the Ctrl + E key from the keyboard in Windows Explorer or click in the search box that appears in Windows.
  • Type one or more search terms. If you use more than one search term, vour file must match those search terms.
  • The results appear automatically in the item view as you type the search term. We do not need to press Enter key to do this.
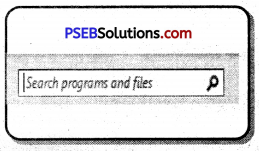
PSEB 7th Class Computer Notes Chapter 2 Windows Explorer 20

Run Command:
The run command is obtained by clicking on Start button. Run commands are used to run a program or open folders and documents directly. Steps to use Run command are as follow:
1. Click on Start button.
2. Select All apps and expand Windows System, then click Run to open it. The run box will open.
Or
Just press the Windows key and the R key (win+R) at the same time, it will open the Run command box immediately.
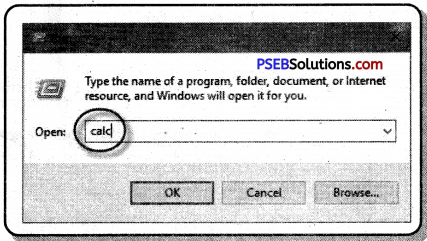
PSEB 7th Class Computer Notes Chapter 2 Windows Explorer 21
Or
Type the word run inside search box in the taskbar, and then click Run from the search result. A Run dialog box will appear on the screen.

To open any program, type name in Run dialog box and click Ok. For Example type “Calc” to open the calculator.

Calculator:
Calc is the name of the spreadsheet program used in OpenOffice. A Calculator is an electronic hardware device or software capable of performing mathematical calculations, such as addition, multiplication, subtraction, or division. The calculator can also be used to calculate dates, convert currency, and if you’re using the Standard mode, you can keep the calculator window on top of other windows.

The steps for opening the calculator are as follows:
1. Click Start.
2. In the programs list, find and click the Calculator program.
PSEB 7th Class Computer Notes Chapter 2 Windows Explorer 21
Click Start.
Type “calc” in search box and press Enter.
Or
Press the shortcut keys Windows key+X.
In the Power User Task Menu, click the Run option.
Type “calc” in Run box and press Enter.
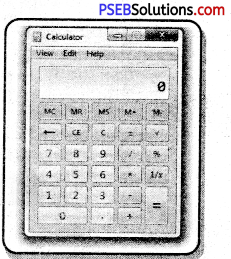
PSEB 7th Class Computer Notes Chapter 2 Windows Explorer 22

Customize Desktop:
Customizing is the process of changing the settings of a desktop.

Themes:
Themes are a combination of pictures, colors, and sounds. It has background, screen saver, border color and sound scheme.

Windows has the following themes:
(a) My Themes
(b) Arrow Themes
(c) Basic and High Contrast Themes

Following are the steps to apply the theme:

  • Open Settings.
  • Click on Personalization.
  • Click on Themes.
  • Click the Get more themes in the Microsoft Store option.
  • Select the theme you want.
  • Click the Get button.
  • Click the Apply button.
  • Click the newly added theme to apply it from the “Themes” page.

PSEB 7th Class Computer Notes Chapter 2 Windows Explorer

Desktop Background
It is a wallpaper image that appears behind the icons on your computer’s desktop. It can be in JPEG or Gif format. The following are steps to change the desktop background:
(а) Right-click the desktop and choose Personalize from the shortcut menu. The Personalization window appears.
(b) Click the Desktop Background link. The Desktop Background dialog box appears.
(c) Select a category of desktop background options from the Picture Location list box and then click the image from the background preview list that you want to use.
(d) The background is previewed on your desktop. Click Save Changes.
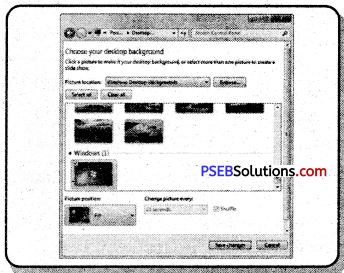
PSEB 7th Class Computer Notes Chapter 2 Windows Explorer 23

Screen Saver:
Screen saver is the graphics that appear on the screen after not working on the computer for some time. It is used for security and protection of the screen. We can set our own screen saver.

Steps to set the screen saver : Here are the steps to set up a screen saver
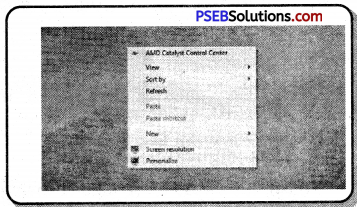
PSEB 7th Class Computer Notes Chapter 2 Windows Explorer 24
PSEB 7th Class Computer Notes Chapter 2 Windows Explorer 25
(a) Right-click the desktop and choose Personalize from the shortcut menu. The Personalization window appears.
(b) Click the Lock Screen option. The lock screen dialog box appears.
(c) In the Screen Saver Settings window, choose a screen saver from the drop-down list.
(d) Click on the Preview button to preview the screen saver.
(e)The screensaver has to be set to run auto-matically from the desktop. So type the time setting in the Wait option that appears in the picture.
(f) Click on Apply button and press Ok button.

Note:

  • Windows Explorer is an important part of Windows. It manages files and folders.
  • Windows Explorer is also called File Explorer. It is used to view files and folders on our computer.
  • Win key + E is used to open window Explorer .
  • File is the smallest unit of data storage.
  • Folders are used to store related files in one place.
  • Hard disk storage areas are called drives.
  • On navigation pane, we can see drives, files and folders
  • Address Bar enables you to go to a different folder in the same Explorer window.
  • Search Box allows you to search for subfolders, documents, images, programs, Web pages, and bookmarks in the current folder.
  • Control Panel is used to configure hardware and software of” computer system and to change settings of computer system.
  • Recycle Bin contains deleted files/folders or programs.
  • Explorer views show the direction in which files and folders will appear. O Explorer has five types of views.
  • Thumbnails, tiles, icons, lists and details views.
  • Ctrl+A keys are used to select all files and folders in explorer windows.